


ES
L mites de peso: 600 Lb / 272 Kg
PARA EVITAR EL VOLTEO DEL SOF , NO SE SIENTE, ACUESTE O
PARE EN LOS BORDES DE LA UNIDAD CUANDO EL SOF SE
ENCUENTRA EN POSICI N DE CAMA.
Mantenga las manos alejadas de los mecanismos instalados en los apoya
brazos.
Consejos tiles
Su fut n puede cambiar de posici n de sof a la posici n de cama. Tenga en
cuenta que el proceso de transici n es m s f cil si se quita el colch n.
Mueva sus muebles nuevos con cuidado, se requiere de dos personas para
levantar y trasladar su mueble a su nueva ubicaci n.
Sus muebles DHP se pueden desmontar y volver a ensamblar en caso de
mudanza.
Limpie el producto con un pa o suave. NO utilice productos qu micos o
abrasivos de limpieza.
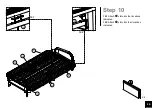
Instrucciones
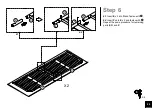
Paso 12
Una
T
x
3
con
O
x
2
,
P
x
2.
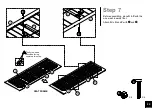
Paso 13
Una
S
x
2
con
O
,
P
con
.
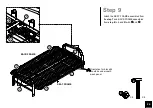
Paso 14
14.1
Coloque la funda en posici n plana y abra los dos cremalleras
que se encuentran en los lados.
14.2
Coloque las 4 partes del colch n dentro de cada uno de los
compartimientos y luego cierre las cremalleras.
14.3
Coloque el sub-ensamble de Funda/Colch n sobre el marco que
usted ensamblo anteriormente.
CÓMO USAR SU FUTÓN
Dos posiciones diferentes:
Posición de asiento:
Primero:
levante lentamente el respaldo hasta que escuche el
primer "clic".
Segundo:
Empuje el respaldo hacia adelante desde la primera
posición de asiento hasta que escuche un segundo clic.
Posición de la cama:
Desde la primera o la segunda posición de
asiento, simplemente empuje el respaldo hacia adelante tanto como
sea posible, luego lentamente hágalo retroceder hasta que alcance
la posición de dormir.
NO permita que los niños se suban o jueguen en la unidad. El
incumplimiento de estas instrucciones podría provocar lesiones graves.
Summary of Contents for FF5000BLKS
Page 9: ...9 Step 4 Attach D x 2 to H x 2 with X 2 5 H H D D H D...
Page 10: ...10 Step 5 Attach G x 4 to A B with X 8 10 X 4 1 A B G G G G G A 1 10...
Page 16: ...16 Step 11 Lift the Back Frame to the second position First position Second position...
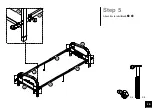
Page 17: ...17 Step 12 O O P P T T Attach T x 3 to O x 2 and P x 2 T T T...
Page 18: ...18 Step 13 O P S S S X 4 8 Attach S x 2 to O and P with...


