Dorel Home Products FF5000BLKS Instruction Booklet Download Page 22

NO LO REGRESE A LA TIENDA !


Visite 

www.dhpfurniture.com/spa/replacement-parts

o llame gratis al 

1-800-267-1739

FF5000BLKS

Fecha de compra

Metal Arm Futon

Negro

Si le faltan piezas o las que se incluyen est n da adas, con 
mucho gusto le enviaremos sus piezas de reemplazo sin 
cargo extra.

N mero de lote

Gracias por su compra DHP!

ESTE INSTRUCTIVO CONTIENE INFORMACION 

IMPORTANTE

 DE 

SEGURIDAD. POR FAVOR LEA Y GUARDE PARA SU REFERENCIA FUTURA.

ES

DHP garantiza que este producto est  libre de defectos de f brica en la mano de obra
y el material y se compromete a solucionar dichos defectos.  Este producto tiene una 
garant a limitada de 1 a o a partir de la fecha de compra original. Esta garant a se 
limita a reparar o reemplazar piezas defectuosas solamente. El trabajo de ensamblaje
no est  incluido.

Esta garant a no se aplica a productos que se hayan mal ensamblado, mal usado o 
que hayan sido modificados o reparados de alguna manera. La responsabilidad por 
da os indirectos se excluye en la medida en que la ley permita la exclusi n. Esta 
garant a le otorga derechos legales espec ficos, y tambi n puede tener otros 
derechos que var an de estado a estado.

Para beneficiarse con este servicio de garant a, el comprador debe enviar la factura 
original. Los componentes reparados o reemplazados est n garantizados hasta el 
final del per odo de garant a original solamente. Los componentes defectuosos se 
reparar n o reemplazar n sin cargo, sujeto a las condiciones descritas anteriormente.
Visite www.dhpfurniture.com para ver la garant a limitada v lida en los Estados 
Unidos y Canad .

Informaci n sobre la garant a 

Para solicitar ayuda con el ensamblaje, identificaci n de partes, informaci n del 
producto o simplemente ordenar otras partes, dirijase a:

   [email protected]
   

1-800-267-1739 

 Lunes - Viernes / 

9:00

 am - 

9:00

 pm (hora del este)

 S bado / 

10

 am - 

6:30

 pm (hora del este)

 Domingo / 

11

 am - 

7

 pm (hora del este)

   DHP Servicios al Cliente


12345 Albert Hudon, Suite 100, Montr al, Qu bec, Canada, H1G 3L1

Cont ctenos!

Lea antes de comenzar a ensamblar

   Llame a nuestro n mero gratuito si necesita asistencia.
   Trabaje en un  rea espaciosa y cerca de donde su producto ser  utilizado,

preferiblemente sobre una alfombra o utilice el cart n del empaque para proteger su
piso y su producto.

   El n mero de personas recomendadas para el montaje de este producto es: 

2

 (sin

embargo es recomendable contar con ayuda adicional). Tiempo estimado de
ensamble es 

1 h 30 min

.

   Aseg rese de que todas las partes est n incluidas. La mayor a de las partes

est n etiquetadas o selladas en los bordes.

   Lea cada paso cuidadosamente. Es muy importante que cada paso de las

instrucciones sea realizado en el orden correcto. Si estos pasos no se siguen en
secuencia, pueden ocurrir dificultades durante el ensamble.

   Puede visitar nuestro sitio https://helpcenter.dhpfurniture.com (Escanear debajo 

del c digo QR si posee un tel fono inteligente o tableta) para videos de ensamblaje y
m s.

Precauci nes

   Este producto esta dise ado para uso domestico y no para uso comercial.
   ADVERTENCIA PARA NI OS PEQUE OS - Este producto contiene

componentes peque os. Por favor aseg rese de que las piezas esten fuera del
alcance de los ni os.

   No utilice herramientas el ctricas para ensamblar su mueble. Este tipo de

herramientas pueden rasgar o da ar las partes.

Summary of Contents for FF5000BLKS

Page 1: ...e Metal Arm Futon If parts are missing or damaged we will gladly ship your replacement parts free of charge Lot Number Thank you for purchasing from DHP THIS INSTRUCTION BOOKLET CONTAINS IMPORTANT SAF...

Page 2: ...urniture com to view the limited warranty valid in the U S and Canada Call our toll free number if you need assistance Work in a spacious area and near where the unit will be used preferably on a carp...

Page 3: ...include components required to complete this assembly Replacement Parts visit www dhpfurniture com eng replacement parts A Arm T621680 X 1 B O P G H Q L R E A B O O P P G G H E Q A L R Arm T621690 X...

Page 4: ...he parts needed for the assembly There are inner box es that include components required to complete this assembly Replacement Parts visit www dhpfurniture com eng replacement parts D S T V1 D S S T V...

Page 5: ...se indicated in the step by step instructions The screw s bolt s to be used at each step are shown in actual size in the lower right corner of the page 6 7 8 4 5 3 2 1 1 4 X 1 3 8 X 8 5 16 X 2 7 16 X...

Page 6: ...ches with the shoulder of V1 A B V1 V1 V1 V1 V1 B Avoid fraying the surface of parts during assembling please lay the part A and B on a piece of cardboard You need an extra hand and a mallet to help w...

Page 7: ...9 4 X 4 4 4 4 4 9 9 9 The top of Mechanisms L R may look different due to the movable joints Please determine the orientation based on their bottom sides Hint Hold Nut using wrench key and then tighte...

Page 8: ...8 Step 3 Attach G x 2 to H x 1 with Repeat the same procedure for another G x 2 and H X 8 8 G H G G G H G H...

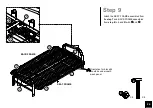
Page 9: ...9 Step 4 Attach D x 2 to H x 2 with X 2 5 H H D D H D...

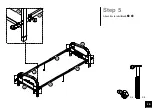
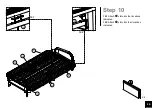
Page 10: ...10 Step 5 Attach G x 4 to A B with X 8 10 X 4 1 A B G G G G G A 1 10...

Page 11: ...11 Step 6 6 1 Insert E x 2 into O and fasten with 6 2 Insert P onto E x 2 and fasten with Repeat the same procedure for remaining parts E O and P X 8 P O X 2 8 O O E E P E 6 1 6 2...

Page 12: ...Step 7 Before assembling place O P with the wire mesh towards floor Attach Q to O and P with and X 4 9 3 X 4 P O SEAT FRAME O O Q Q 9 9 3 3 O P Q Q Q The Screw head should be facing upward in this ste...

Page 13: ...2 X 2 6 X 2 7 3 9 6 7 8 1 8 2 BACK FRAME and Before assembling place O P with the wire mesh towards floor 8 1 Attach Q to O and P with and 8 2 Attach Q to O and P with and O P Q Q 7 6 The Screw head s...

Page 14: ...P P R L X 8 X 8 2 O P R 2 2 9 9 Attach the SEAT FRAME assembled from the step 7 and BACK FRAME assembled from step 8 to L and R with and SEAT FRAME BACK FRAME Orientation for brace Q should be undern...

Page 15: ...15 Step 10 10 1 Attach x 4 to H x 2 at locations indicated 10 2 Attach x 4 to G x 4 at locations indicated 11 X 8 G G 10 1 10 2 H G G H H G...

Page 16: ...16 Step 11 Lift the Back Frame to the second position First position Second position...

Page 17: ...17 Step 12 O O P P T T Attach T x 3 to O x 2 and P x 2 T T T...

Page 18: ...18 Step 13 O P S S S X 4 8 Attach S x 2 to O and P with...

Page 19: ...er flat and open the two zippers located on each side of the cover 14 2 Put the Pads into each compartment in the cover and close the zippers 14 3 Place the sub assembly Pad Cover on the frame you jus...

Page 20: ...sh the backrest forward as much as possible then slowly pull it back all the way until you reach the sleeping position FOR SEATING POSITION FOR BED POSITION HOW TO USE YOUR FUTON Two different positio...

Page 21: ...with two people lifting and carrying the unit to its new location Your DHP furniture can be disassembled and reassembled to move Some parts have been pre assembled for this item They are illustrated o...

Page 22: ...a v lida en los Estados Unidos y Canad Informaci n sobre la garant a Para solicitar ayuda con el ensamblaje identificaci n de partes informaci n del producto o simplemente ordenar otras partes dirijas...

Page 23: ...21770 Retenedor T613540 Gancho T612410 Cubierta T621780 Forro de tela T621600 Colch n T621610 Paso 1 Insertar V1 x 4 dentro de A B Paso 2 Una L con A con R con B con La parte superior de los mecanismo...

Page 24: ...2 Paso 13 Una S x 2 con O P con Paso 14 14 1 Coloque la funda en posici n plana y abra los dos cremalleras que se encuentran en los lados 14 2 Coloque las 4 partes del colch n dentro de cada uno de lo...

Page 25: ...oir la garantie limit e valide aux tats Unis et au Canada Informations sur la garantie Besoin d aide pour assembler identifier des pi ces s informer sur le produit ou pour commander des pi ces contact...

Page 26: ...hon T621780 Couverture en tissu T621600 Matelas T621610 tape 1 Ins rer V x 4 dans A B tape 2 Attacher L A R B avec La partie sup rieure des m canismes peut sembler diff rente en raison de leurs partie...

Page 27: ...P x 2 tape13 Attacher S x 2 O P avec tape 14 14 1 Placez la couverture sur le sol et ouvrez les deux fermetures clair sur chaque c t 14 2 Ins rer les 4 parties du matelas l int rieur de chacun de chaq...

Reviews: