


ES
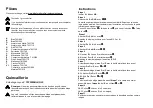
Partes
Piezas de reemplazo, visite www.dhpfurniture.com/spa/replacement-parts
Todo se incluye en 1 caja grande!
Hay 1 caja(s) interna(s) que incluyen los componentes necesarios para
completar este ensamblaje.
Paquete de componentes
Paquete de componentes #: TFF5000BLKS-00
Nota:
Por favor no apriete completamente las piezas hasta que el
ensamblaje sea completado, a menos de que se indique espec ficamente en
las instrucciones de paso a paso.
Antes de tirar este paquete, por favor utilice la Casilla de Verificaci n para
identificar sus partes y garantizar de que cuenta con todas las piezas
necesarias para el ensamblaje.
Los tornillo(s), perno(s) que se utilizar n en cada paso se muestran en
tama o real en la esquina inferior derecha de cada p gina.
Instrucciones
A
B
O
P
G
H
Q
L
R
E
D
S
T
V1
Brazo:T621680
Brazo:T621690
Marco de Malla:T621700
Marco de Malla:T621710
Ensanchador:T621720
Conector del ensanchador:T621730
Armaz n:T621740
Mecanismo:T621750
Mecanismo:T621760
Conector del marco:T612300
Pata Del Medio:T621770
Retenedor:T613540
Gancho:T612410
Cubierta:T621780
Forro de tela:T621600
Colch n:T621610
Paso 1
Insertar
V1
x
4
dentro de
A/B
.
Paso 2
Una
L
con
A
con
R
con
B
con
,
.
La parte superior de los mecanismos puede parecer diferente debido a sus
partes movible.
Por favor determine su orientaci n bas ndose en la parte inferior.
Tip:
Sujete la tuerca
usando la llave
y luego ajuste el perno
usando
la llave
.
Paso 3
Una
G
x
2
con
H
x
1
con
.
Repita el mismo procedimiento para el otro
G
X 2 y
H
.
Paso 4
Una
D
x
2
con
H
x
2
con
.
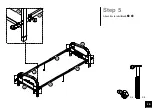
Paso 5
Una
G
x
4
con
A/B
con
,
.
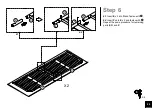
Paso 6
6.1
Inserte
E
x 2 dentro de
O
y ajuste con
.
6.2
Inserte
P
sobre
E
x 2 y ajuste con
.
Repita el paso para las otras partes
E
,
O
,
P.
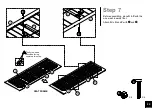
Paso 7
Antes de ensamblar, coloque
O
y
P
con la malla de alambre hacia el suelo.
Una
Q
con
O
y
P
usando
y
.
Paso 8
Antes de ensamblar, coloque
O
y
P
con la malla de alambre hacia el suelo.
8.1
Una
Q
con
O
y
P
usando
y
.
8.2
Una
Q
con
O
y
P
usando
y
.
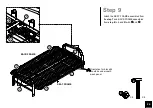
Paso 9
Una el marco del asiento ensamblado en el
Paso 7
y el marco del respaldo
ensamblado en el
paso 8
a
L
y
R
usando
y
.
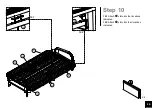
Paso 10
10.1
Pegue
x 4 con
H
x 2 en donde se indica.
10.2
Pegue
x 4 con
G
x 4 en donde se indica.
Paso 11
Levante el marco de respaldo hasta la segunda posici n como se indica.
Summary of Contents for FF5000BLKS
Page 9: ...9 Step 4 Attach D x 2 to H x 2 with X 2 5 H H D D H D...
Page 10: ...10 Step 5 Attach G x 4 to A B with X 8 10 X 4 1 A B G G G G G A 1 10...
Page 16: ...16 Step 11 Lift the Back Frame to the second position First position Second position...
Page 17: ...17 Step 12 O O P P T T Attach T x 3 to O x 2 and P x 2 T T T...
Page 18: ...18 Step 13 O P S S S X 4 8 Attach S x 2 to O and P with...


