background image


A


ANTENNA MOUNTING • 4, 23 
ATTACHING THE BOTTOM MAST TO A 

YOUR MAST • 7 

ATTACHING THE CABLES • 8 
ATTACHING THE ELEMENTS • 9 

C


CORE MODULE CONNECTIONS • 16, 25 

D


DDF7011 INSTALLATION AND SETUP • 3 
DDF7012 INSTALLATION AND SETUP • 21 

G


GETTING STARTED • 3, 21 

I


INTRODUCTION • 1 

M


MOUNTING THE MAST TO THE ANTENNA 

• 5 

S


SINGLE BAND ANTENNA INSTALLATION • 

T


THREE BAND ANTENNA INSTALLATION • 

13 

TWO BAND ANTENNA INSTALLATION • 11 


INDEX 

Summary of Contents for DDF7011

Page 1: ...USER S GUIDE DDF7011 AND DDF7012 USERS MANUAL ...

Page 2: ......

Page 3: ... Antenna 7 Attaching the Bottom mast to a Your Mast 9 Attaching the Cables 10 Attaching the Elements 10 Two Band Antenna Installation 15 Three Band Antenna Installation 17 Core Module Connections 23 DDF7012 INSTALLATION AND SETUP 29 Getting Started 29 Antenna Mounting 31 Core Module Connections 33 SPECIFICATIONS 38 DDF7012 Specifications 39 DDF7011 Specifications 39 INDEX 41 ...

Page 4: ... mounting hardware 11 Figure 9 Three Wire Element Mounting Arrangement 12 Figure 10 Antenna element mounted on the balun 13 Figure 11 Fully Assembled VHF Antenna 14 Figure 12 Upper mast and cables installed for two antenna installation 15 Figure 13 Assembled UHF VHF Antenna 16 Figure 14 UHF Antenna Frame Installed on Mast 17 Figure 15 TU Antenna Mast Installed 18 Figure 16 THF Antenna Frame Instal...

Page 5: ... returned at owner s expense If improper operation is due to an error on the part of the purchaser there will be a repair charge Doppler Systems are not responsible for damage caused by the use of improper tools or solder failure to follow the printed instructions misuse or abuse unauthorized modifications misapplication of the unit theft fire or accidents This warranty applies only to the equipme...

Page 6: ......

Page 7: ...DDF7012 contain all the necessary components required to locate a radio frequency source Both systems utilize the same core module shown in Figure 1 below Chapter 1 INTRODUCTION Figure 1 The DDF7011 and 7012 utilize the same Core Module ...

Page 8: ...r antenna system one to three bands A fixed site radio modem antenna optional A GPS receiver A self test generator optional Antenna cabling 12 V Power Supply A laptop computer optional Carrying cases for all the components Figure 2 shows the block diagram of a typical DDF7011 three band configuration Figure 2 Block Diagram of Three Band Fixed Site Direction Finder DDF7011 ...

Page 9: ...owing components A core module A mobile direction finding summer assembly Four 1 4 wave whip antennas A GPS receiver A compass optional A yaw rate sensor optional A laptop computer optional Antenna cabling Carrying cases Figure 3 depicts a typical DDF7011 configuration Figure 3 Mobile Direction Finder DDF7012 ...

Page 10: ...sers Manual User s Guide This manual will describe the installation and setup of the DDF7011 and DDF7012 For details on operating the system see the TargetTrack Software User s Manual and the MPT User Interface Software Guide ...

Page 11: ...make sure the cables will reach to the location of the direction finding equipment 2 If this site is to be used as the control site remove the vertical radio modem antenna from one of the long antenna cases If it is to be used as a remotely connected site remove the radio modem yagi antenna from one of the long antenna cases 3 Assemble the radio modem antenna 4 Connect the radio modem antenna to a...

Page 12: ...e the GPS satellites 19 Connect 12 V power to the unit using the supplied cable and power supply 20 Apply power to the core module 21 Check to make sure the direction finder and the receiver are powered 22 Turn on the laptop and start the TargetTrack software ANTENNA MOUNTING For optimum results it is necessary to mount the fixed site antenna as high as possible above the average terrain It is als...

Page 13: ...al mounting hardware MOUNTING THE MAST TO THE ANTENNA All of the antenna assemblies come with a bottom mast one or more antenna frames and antenna elements At the base of the antenna frame there are a number of longer screws protruding from the bottom connector plate as shown in the photo below Remove these screws Figure 4 Remove the loose cap screws to install the lower mast ...

Page 14: ...osition the bottom mast to fit over the connectors and drain plug and fasten the mast to the antenna frame using the screws from step 1 The figure below shows the mast connected to the frame Figure 5 Secure the lower mast to the frame using the cap screws ...

Page 15: ...ixed site antennas are furnished with a mast clamp for installation on a pipe or pole The diameter of the pipe or pole can be between 1 25 in and 3 5 in The figure below shows how the mast clamp is installed Figure 6 Attach the lower mast to your mounting mast with the mast clamp ...

Page 16: ...it just meets the red line on the mating connector Fasten the TNC connector until it is tight Use the supplied cable ties to fasten the cables to the masts At this point the assembly should look similar to the photo below ATTACHING THE ELEMENTS Four Wire Biconical Antennas The antenna elements are mounted to baluns at the end of the frame arms using an o ring a 5 16 24 cap screw and a lock washer ...

Page 17: ...11 DDF7011 Installation and Setup Figure 8 Arrangement of the antenna element mounting hardware ...

Page 18: ...s The antenna elements are mounted to baluns at the end of the frame arms using a 5 16 24 cap screw a flat washer and a rubber washer The arrangement of the hardware is shown in the photo below Figure 9 Three Wire Element Mounting Arrangement Cap Screw Flat Washer Rubber Washer ...

Page 19: ...p screw until the lock washer is fully compressed Do not over tighten the cap screw or the brass threads in the balun may be stripped Mount all sixteen elements Align the biconical elements so that all elements are symmetric The photo below shows two elements connected to the balun Figure 10 Antenna element mounted on the balun ...

Page 20: ...DF7011 and DDF7012 Users Manual User s Guide After all the elements are attached the antenna is ready to be erected The assembled antenna will look like the photo below Figure 11 Fully Assembled VHF Antenna ...

Page 21: ...onnecting mast and cables The connecting mast is installed similarly to the base mast When installing the coaxial cable make sure the end of the cable with the most ferrite beads is connected to the lower antenna The photo below shows the upper mast and the cables connected to the lower mast Figure 12 Upper mast and cables installed for two antenna installation ...

Page 22: ...Manual User s Guide Next connect the UHF antenna frame to the upper mast and connect the cables and then install the antenna elements on all the frames The completed antenna stack is shown below Figure 13 Assembled UHF VHF Antenna ...

Page 23: ...E BAND ANTENNA INSTALLATION Follow the steps above to install the three element antenna and simply install the third antenna using the short connecting mast supplied Figure 14 UHF Antenna Frame Installed on Mast ...

Page 24: ...18 DDF7011 and DDF7012 Users Manual User s Guide Figure 15 TU Antenna Mast Installed ...

Page 25: ...19 DDF7011 Installation and Setup Figure 16 THF Antenna Frame Installed on Mast ...

Page 26: ...ar to the other elements except that they have longer cap screws The other style shown in Figure 16 below have a rubber washer installed to preload the elements and to keep moisture out of the threads Do not over tighten the elements or you may strip the brass inserts in the balun Figure 17 THF Antenna Mounting Hardware ...

Page 27: ...21 DDF7011 Installation and Setup The final assembly will look like the photo below Figure 18 Assembled THF UHF VHF Antenna ...

Page 28: ......

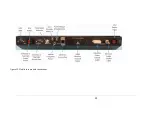
Page 29: ...23 23 CORE MODULE CONNECTIONS Figure 17 below shows the front panel of the Core Module ...

Page 30: ......

Page 31: ...25 25 Figure 19 Fixed Site Core front panel connections ...

Page 32: ......

Page 33: ... of the computer using the 1 8 inch stereo cable supplied with the unit If you purchased a computer with the DDF7011 it will come furnished with an iMic USB to Audio converter that has a line input If your computer does not have a line input and you are going to use an external scan receiver then you will need to purchase an audio interface The radio modem is used to communicate with other Doppler...

Page 34: ......

Page 35: ... through a window opening in the vehicle Do not route cables where they can be crushed 6 Securely mount the yaw rate sensor optional anywhere within the vehicle The wide side of the sensor must be mounted parallel to the floor of the vehicle 7 Open the core module case 8 Connect the radio modem antenna to the TNC connector on the core module 9 Connect the direction finder antenna and control cable...

Page 36: ...g the supplied cable and cigar lighter plugs If you are using the laptop power supply it is suggested that you use two cigar lighter plugs and two power cables 16 Check to make sure the direction finder and the receiver are powered 17 Turn on the laptop and start the TargetTrack software ...

Page 37: ...r with the cables oriented towards the rear of the car Connect the magnetic mount antenna cables to the corresponding TNC connectors on the RF summer That is the left front antenna to the left front connector etc as shown in Figure 18 Locate the summer near the back of the car the lid of the trunk or boot so that the magnetic mount antenna cables do not have excessive slack Space the antennas betw...

Page 38: ...32 DDF7011 and DDF7012 Users Manual User s Guide Figure 20 VHF and UHF antenna arrangement ...

Page 39: ...of vehicle roof and try to maintain as much separation as possible between the radio modem antenna and the direction finder antennas CORE MODULE CONNECTIONS Figure 20 below shows the front panel of the Core Module Figure 21 THF Mobile Antenna Installation cables exit toward rear of vehicle ...

Page 40: ......

Page 41: ...35 Figure 22 Mobile core module connections ...

Page 42: ......

Page 43: ...ased a computer with the DDF7011 it will come furnished with a iMic USB to Audio converter that has a line input If your computer does not have a line input and you are going to use an external scan receiver then you will need to purchase an audio interface The radio modem is used to communicate with other Doppler radio direction finders in the event that the other direction finders cannot be netw...

Page 44: ...38 DDF7011 and DDF7012 Users Manual User s Guide Appendix SPECIFICATIONS ...

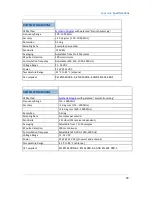
Page 45: ... 25 C to 85 C antenna CE Compliant Per EN 61000 6 2 EN 61000 6 4 AND EN 301 489 1 DDF7011SPECIFICATIONS DF Method Synthetic Doppler with patented Smooth Summing Frequency Range 115 1000 MHz Accuracy 1 deg rms 115 500 MHz 1 6 deg rms 500 1000 MHz Resolution 0 1 deg Sampling Rate 2 samples per second Sensitivity 123 dBm FM receiver dependent Averaging Adjustable from 1 to 20 samples RF pulse detecti...

Page 46: ......

Page 47: ...E ELEMENTS 9 C CORE MODULE CONNECTIONS 16 25 D DDF7011 INSTALLATION AND SETUP 3 DDF7012 INSTALLATION AND SETUP 21 G GETTING STARTED 3 21 I INTRODUCTION 1 M MOUNTING THE MAST TO THE ANTENNA 5 S SINGLE BAND ANTENNA INSTALLATION 5 T THREE BAND ANTENNA INSTALLATION 13 TWO BAND ANTENNA INSTALLATION 11 INDEX ...

Reviews: