Vehicle System
Disassembly & Assembly
78
d.
assembly of auxiliary section.
1.
fix section by using a vice for
lateral(machined)faces not to be damaged.
2.
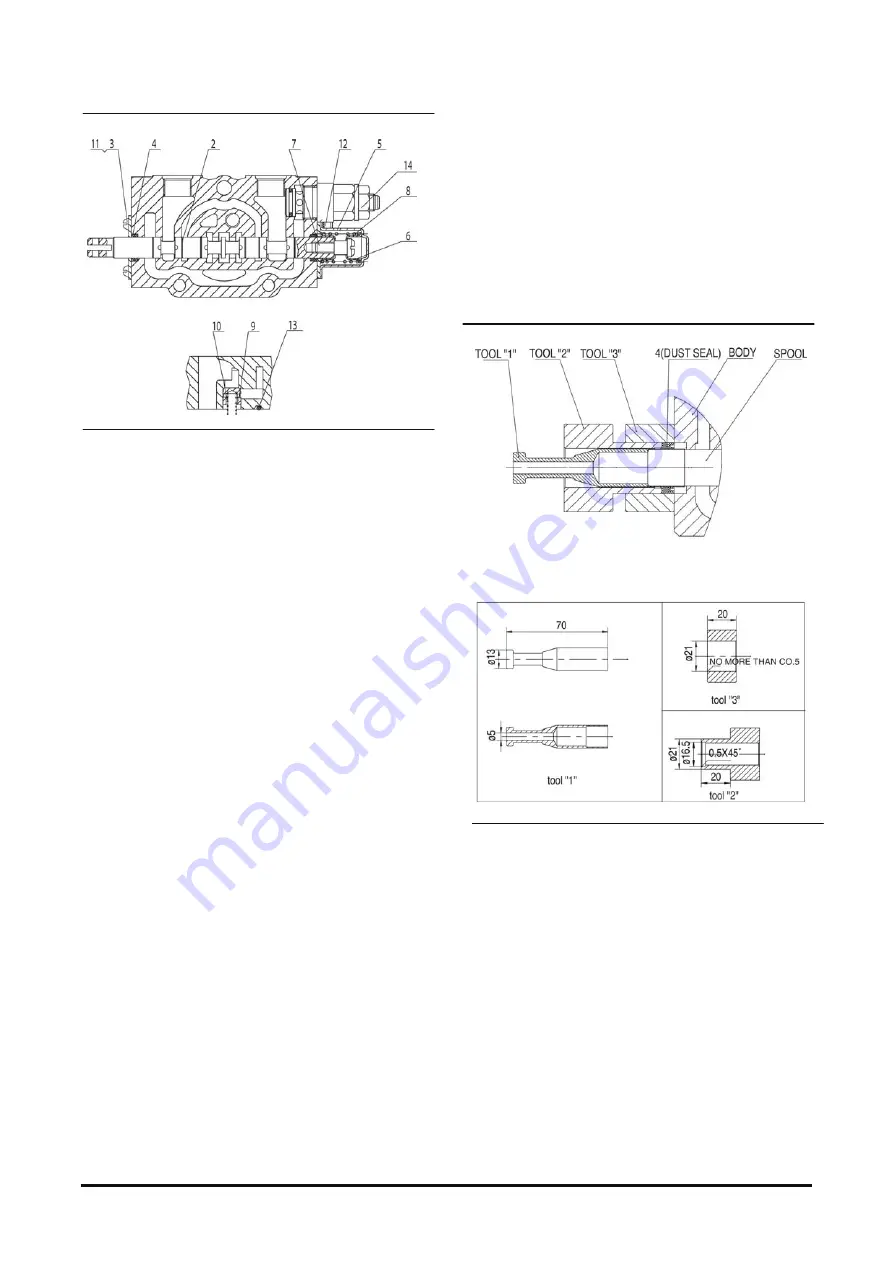
Install spool(2) into body(1) smoothly and
slowly. A direction of spool access to body is
same as that of spool disassembly.
3.
dust seals(4) put on the end of spool by using
a tool.
NOTE
: be careful not to damage a dust seal,
as it could make an external leakage.
4.
after fixing the spool end, install seal plate(3),
spring retainer(6) and spring(8). And tighten
set screw(7) by 14N
•
m.
NOTE
: make sure that set screw are
tightened by a exact torque. In case of
excessive drift of cylinder on neutral position.
5.
put seal plate(3) on the end of spool and
tighten two hex bolts(11) by 14N
•
m
6.
install cap(7) and tighten two hex bolts(14)
by14N
•
m.
7.
release a section from a vise, and install O-
ring(13), poppet(9) and spring(10) into lateral
face.
e.
assembly of section.
place each section in a row, insert tie rod, and tight-
en nut by 27.4-31.4N
•
m.
NOTE:
in case of excessive torque, it could make as
pool sticking. In case of insufficient torque, it
could make an external leakage problem.
Note Dust seal mounting procedure.
This tool is needed when assemble tilt section (c, 3)
and assemble auxiliary section (d, 3).
1.
insert the dust seal(4) from the side with a
champer the side without a champer(no more
than c0.5)of tool(3).
2.
insert the tool(2) into the tool(3).
3.
insert the tool(1) into the tool(2)
4.
insert the spool into the above assembly.
(note that the dust seal(4) is in its right position)
5.
remove the tool(1).
6.
hit the tool(2) to insert the dust seal(4) into the
valve body.


