


Downflo Evolution, DFE 2-8 to 5-80
6
X
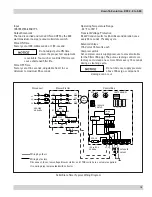
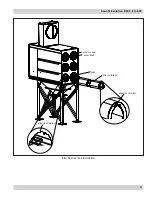
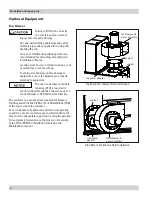
Typical Installation
Typical Installation
1.
Place hopper discharge-side up on ground or other level
surface and attach legs to hopper.
2.
Assemble leg cross braces.
3.
Turn hopper and leg assembly over and lift into position
over anchor bolts.
4.
Level hopper.
5.
Tighten all fasteners securely, including all anchor bolts.
Tighten all hardware
before removing crane.
6.* Apply 1/4-in diameter rope-type sealant to hopper
flange.
7.
Lift collector over leg and hopper assembly and lower
slowly.
8.
Secure with bolts, washers, and nuts supplied.
9.* Apply 1/4-in diameter rope-type sealant around inlet
opening.
10. Lift inlet onto collector. Secure with bolts, washers, and
nuts supplied.
Tighten all hardware before removing
crane.
11. Remove crane.
12. Apply sealant to hopper/cabinet and cabinet/inlet seam.
angle not to
exceed 30°
from vertical
(min 60°
from horizontal)
Do Not lift with
this orientation
Apply sealant
after marriage of
hopper to cabinet
and cabinet to inlet
seam (step 12)
*1/4-in diameter rope-type
sealant (steps 6 and 9)
module flange
3/8-in flat washer
3/8-16 x 1-in bolt
Steps 1-2
Step 10
Steps 3-6
Steps 7-9
*The 1/4-in diameter rope-type sealant supplied with the
collector is temperature sensitive. It may soften and become
difficult to work with at elevated temperatures. Store rope-type
sealant in a cool location before use.
Summary of Contents for DFE 2-4
Page 42: ...A 1 Donaldson Company Inc Appendix A Clean Change Bag In Bag Out Filter and Liner System...
Page 56: ...B 2 Donaldson Company Inc Service Notes Date Service Performed Notes...
Page 57: ...Downflo Evolution DFE 2 8 to 5 80 B 3 Date Service Performed Notes...
Page 58: ...B 4 Donaldson Company Inc Date Service Performed Notes Service Notes...


