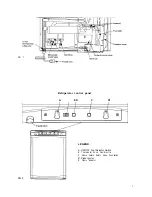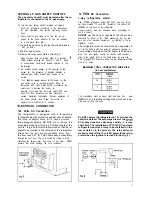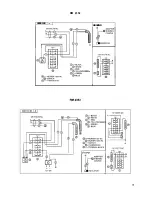
Check to be sure that the power cord is properly
connected to the power supply. (See FIG. 8). If the
refrigerator is equipped for 12 volt DC operation,
the tow vehicle or caravan engine should be
running to prevent discharging the battery
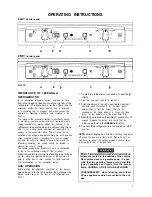
Turn the knob A to the position marked
‘“AC” for
120 volt AC operation or
“DC”
for
DC
operation.
Turn the thermostat knob B to position 4.
To shut off the refrigerator turn the knob A to “OFF”
position.
THERMOSTAT
The refrigerator is equipped with a thermostat that can
be adjusted by turning the knob B to different setting to
maintain the desired cabinet temperature.
At OFF In gas operation, the thermostat closes its main
valve and the burner runs continuously at the
bypass rate, just enough to keep the burner lit.
In electrical operation, the contacts in the ther-
mostat are open and the heating elements are
off.
At MAX In gas operation, the thermostat allows the
burner to remain on high flame continuously. In
electric operation, the heating element is “ON”
continuously. Lowest cabinet and freezer tem-
peratures are obtained at this setting.
The thermostat can be adjusted between “MAX and
“OFF’ to obtain the desired cabinet temperature.
The closer the knob is to “MAX -the colder the cabinet
temperature. The closer the knob is to “OFF”
the warmer
the cabinet temperature.
When the thermostat reaches the set temperature, it will
cut the burner back to bypass or, in electric operation,
shut off the heating element.
The setting of the thermostat is not critical, but we rec-
ommend it be adjusted to maintain a dry frost on the
cooling fins. Adjust the thermostat knob closer to “MAX
w h e n t h e o u t s i d e t e m p e r a t u r e b e c o m e s w a r m .
HOW TO USE THE REFRIGERATOR
FOOD STORAGE COMPARTMENT
The food storage compartment is completely closed and
unventilated, which is necessary to maintain the required
low temperature for food storage. Consequently, foods
having a strong odor or those that absorb odors easily
s h o u l d b e c o v e r e d . V e g e t a b l e s , s a l a d s e t c . s h o u l d b e
covered to retain their crispness. The coldest positions
in the refrigerator are under the cooling tins and at the
bottom of the refrigerator. The warmer areas are on the
upper door shelves. This should be considered when
placing different types of food in the refrigerator.
FROZEN FOOD STORAGE
COMPARTMENT
Quick frozen soft fruits and ice cream should be placed
in the coldest part of the compartment, which is at the
bottom of the aluminum liner. Frozen vegetables, may
be stored in any part of the compartment.
This compartment is not designed for deep or
freezing of food. Meat or fish, whether raw or prepared,
can be stored in the frozen food storage compartment
provided they are
first in the refrigerator. They
can be stored about three times longer in the frozen food
c o m p a r t m e n t a s c o m p a r e d t o t h e f r e s h f o o d c o m p a r t -
ment. To prevent food from drying out, keep it in cov-
ered dishes, containers, plastic bags orwrapped in alu-
minum foil.
Ice cubes can be made in the freezer compartment.
For faster ice making, the tray should be placed in direct
contact with the bottom of the freezer compartment.
Ice making is accelerated if the thermostat knob B is
turned to the “MAX setting.
It is a good idea to do this a few hours before the antici-
pated need for ice, but be sure to turn the thermostat
back to normal setting, usually about mid-setting when
the ice is formed. Food in the lower compartment may
be frozen if the setting is left on “MAX position.
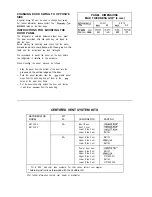
Total Refrigerated Volume 3
DEFROSTING
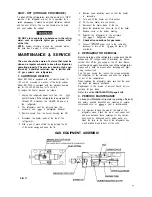
Shut off the refrigerator by turning the knob A to “OFF”
position. Empty the refrigerator, leaving the drip tray un-
der the finned evaporator. Leave the cabinet and freezer
doors open. Filling the ice tray with hot water and plac-
ing it on the freezer shelf can reduce defrosting time.
NOTE: Defrost water runs from the drip tray to a recep-
tacle at the rear of the refrigerator where it normally
e v a p o r a t e s .
With a lot of defrost water as a result of heavy frosts
build up on the cooling fins, remove the drip tray and
turn it around. Replace the drip tray with the outlet on
the right side of the drip tray and put a bowl under the
outlet.
When the ice has melted, dry the interior of the refrig-
erator with a clean cloth. Replace the drip tray to its origi-
nal position and connect the draining tube.
Replace all food and set the thermostat to “MAX” for a
few hours. Then reset the thermostat to the desired set-
ting, usually at mid-setting.
DO NOT use a hot air blower. Permanent damage
could result from warping the metal or plastic parts.
DO NOT use a knife or an ice pick, or other sharp
tools to remove frost from the freezer compartment.
They can create a leak in the ammonia system.
CLEANING THE REFRIGERATOR
Cleaning the refrigerator is usually done after it is de-
frosted or put into storage. To clean the interior liner of
the refrigerator, use lukewarm weak soda solution. Use
only warm water to clean the finned evaporator, gasket,
ice tray and shelves.
NEVER use strong chemicals or abrasives to clean
these parts, as the protective surfaces will be dam-
aged. It is important to always keep the refrigerator
10

