5
3. Cleaning
Clean the refrigerator thoroughly at intervals, as
necessary. Remove the shelves; these, parts,
as well as the cabinet interior and the door should be
washed with a warm solution of sodium bi-carbonate.
Finally wipe over with a cloth rinsed in warm water
only, and dry with a clean cloth. Do not wash any
plastic parts in water that is more than hand warm, and
do not expose them to dry heat. The outside of the
cabinet should be wiped down regularly with a clean,
damp cloth.
NEVER USE STRONG CHEMICALS OR ABRASIVE
CLEANING MATERIALS ON ANY PART OF THE
CABINET.
4. Positioning the appliance
When first using this refrigerator please consider the
following points:
ENSURE REFRIGERATOR IS LEVEL
THE PIPEWORK AT THE BACK GETS HOT IN USE
THE REFRIGERATOR HAS NO 'MOTOR' AND IS
THEREFORE VIRTUALLY SILENT
ALLOW AT LEAST 3 HRS. FOR SIGNS OF
COOLING
During the refrigeration process, the appliance
gives off heat from the condenser (under the
upper part of the rear cover) into the surrounding air.
The more ventilated the condenser is, the more
effective the refrigeration will be.
The other condition for satisfactory operation is that
the appliance is levelled. This could be checked by
placing a glass of water on top of the appliance.
It is important that the appliance is not directly
exposed to radiated heat (sunlight, radiator, near an
oven, etc.).
4.1. Installation instructions
The refrigerator is equipped with an electrically heated
absorption cooling unit which is virtually silent in
operation.
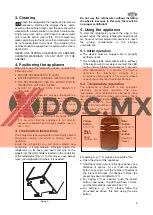
Inside the refrigerator you will find a plastic bag
containing 4 small wheels. Carefully place the
refrigerator on its back and insert the pins of the
wheels into the metal holders located on the underside
of the refrigerator (Fig. 2.). In this way you can always
move your refrigerator to where it is needed.
Figure 2.
Do not use the refrigerator without installing
the wheels, because in this case there will be
no proper ventillation!
5. Using the appliance
To start the refrigerator connect the plug to the
socket outlet. The empty refrigerator needs about
6-7 hours at normal ambient temperature to reach
the proper temperature in the storage
compartment.
5.1. Initial operation
The device must be plugged into a properly
earthed socket.
The miniBar starts automatically with a self-test.
If the electronics do not detect any fault, the LED
for the interior lighting illuminates for 2 seconds
after approxiametly 10 seconds. If a fault is
detected, the illumination changes to a
continuous flashing light. If this occurs, please
consult your authorised Customer Service.
5.2. Temperature regulation
The appliance is fitted with a fully automatic
electronic temperature regulator. The inner
temperature of the refrigerator can be set by using
the optional 4-button remote control device. There
are 4 different temperature preset values: 3°C,
5°C, 7°C, and 12°C. Two buttons of the remote
serve for the temperature setting:
- Yellow button: 3°C and 7°C.
- Blue button: 5°C and 12°C.
For setting e. g. 7°C, please proceed like this:
Open the door of the appliance.
Hold the remote in front of the door sensor, at a
distance of approx. 10 cm. Push the yellow
button once and count the number of flashes of
the interior LED light. If it flashes 3 times, the
preset has been modified to 3°C.
For having 7°C as desired, push the yellow
button once again. The LED will flash 7 times,
and the temperature preset will be 7°C.
For setting e. g. 12°C, please follow the
procedure as above, this time using the blue
button.
GB
Yellow
button
3°C/7°C
Black
button
Reset
cooling unit
Blue
button
5°C/12°C
Red
button
Red Dot
Reset

