background image

INHALT

1. Auspacken des Geräts

2. Ansicht des Geräts

3. Reinigung

4. Aufstellung des Geräts

4.1. Installationsanweisungen

5. Einsatz des Geräts

5.1. Erste Inbetriebnahme

5.2. Temperaturregelung

5.3. Steuerung der Kühleinheit (CUC)

6. Nützliche Hinweise

7. Abtauen, Reinigung und Wartung

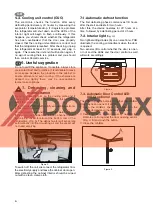
7.1. Automatische Abtaufunktion

7.2. Innenbeleuchtung

7.3. LED der automatischen Türkontrolle (ADC) optional

8. Kundendienst

9. Inbetriebnahme, Technische Daten

9.1. Anschluss an das Stromnetz

10. Informationen zum Umweltschutz

11. Recycling

Achtung!
Die Garantiebedingungen entsprechen der EU-Richtlinie 44/1999/CE und den
im jeweiligen Bestimmungsland geltenden Gesetzen.
Bei Fragen zu Garantie und Kundendienst sowie für Ersatzteile wenden Sie sich
bitte an unser Dometic Servicenetzwerk.
Die Garantie deckt keine Schäden durch unsachgemäße Benutzung ab.
Die Garantie deckt keine Änderungen am Gerät oder den Einsatz nicht-
originaler Ersatzteile von Dometic ab.
Die Garantie erlischt, wenn das Gerät nicht gemäß den Anweisungen installiert
und benutzt wird.
Nennen Sie bitte das Modell sowie die Produkt- und die Seriennummer des
Geräts, wenn Sie sich mit dem Dometic Servicenetzwerk in Verbindung setzen.
Diese Informationen finden Sie auf dem Typenschild im Innern des Kühlgerätes.

10

D

Summary of Contents for MB20-60

Page 1: ...207 5396 39 RH 465LD Type MB20 60 miniBar Operating Instructions Bedienungsanleitung Mode d emploi Istruzioni per l uso Handleiding Manual de Instrucciones Instru es de Utiliza o FR DE GB IT NL PT ES...

Page 2: ...oduct which heat up Always ensure that there is adequate ventilation as a failure to do this will result in component failure and possible content loss See installation instructions Parts which heat u...

Page 3: ...ed to When contacting Dometic Service Network please state the model product number and serial number You will find this information on the data plate inside of the refrigerator CONTENTS 1 Unpacking 2...

Page 4: ...n firm 2 View of the appliance 1 Door 2 Door lock if available 3 Lamp 4 ADC LED if available 5 Storage Compartment 6 Evaporator cover 7 Evaporator sensor behind evaporator 8 Evaporator 9 Shelves 10 Ai...

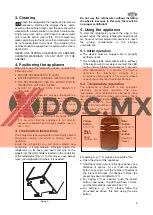
Page 5: ...n the underside of the refrigerator Fig 2 In this way you can always move your refrigerator to where it is needed Figure 2 Do not use the refrigerator without installing the wheels because in this cas...

Page 6: ...th a fully automatic electronic temperature regulator The frost will melt and the defrost water will run through the drain tube from the drip channel into an evaporating vessel located at the bottom r...

Page 7: ...ced for any reason the wires in the mains lead are coloured in accordance with the following code Green and Yellow Earth Blue Neutral Brown Live The wire coloured green and yellow must be connected to...

Page 8: ...pliance should be delivered to a specialized collection and reprocessing firm which reclaims the usable materials The rest is properly destroyed Appliances bearing this symbol must be deposited at the...

Page 9: ...ch im Betrieb auf Stellen Sie sicher dass stets ausreichend Luftzirkulation zur Verf gung steht da das Ger t sonst besch digt werden kann und der Inhalt verdirbt Siehe auch Installationsanweisungen He...

Page 10: ...antiebedingungen entsprechen der EU Richtlinie 44 1999 CE und den im jeweiligen Bestimmungsland geltenden Gesetzen Bei Fragen zu Garantie und Kundendienst sowie f r Ersatzteile wenden Sie sich bitte a...

Reviews: