background image

Disposal 

Dometic BR342


24 


EN


8  Disposal 


Regulations for environmental safety and correct disposal 


All organisations must apply a set of procedures to identify, evaluate and control the influence that their activities 
(manufacturing, products, services, etc.) have on the environment. 

The procedures to be followed to identify significant environmental impact must take the following factors into account: 


use of raw materials and natural resources 


atmospheric emissions 


discharge of liquids 


waste management and recycling 


contamination of the soil 


In order to minimise environmental impact, the manufacturer provides a series of indications here below that should be 
taken into account by all those who, for whatever reason, interact with the appliance during its working life. 


All packing components must be disposed of (preferably recycled) in compliance with statutory legislation in the 

country in which disposal takes place. 


All product components must be disposed of (preferably recycled) in compliance with statutory legislation in the 

country in which disposal takes place. 


For correct disposal, the appliance must be consigned to an authorised waste disposal company to ensure that all 

recyclable components are reused and the remaining materials are processed properly. 


During installation ensure the room has adequate ventilation to prevent the build-up of stale air that might be harmful 

to the health of the operators. 


During operation and maintenance ensure that any waste pollutant products (oil, grease, etc.) are disposed of correctly. 


Keep noise levels down to reduce noise pollution. 


For more information on correct dismantling of our products please refer to the recycling handbooks at 

www.dometic.com


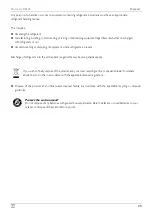
 Place the packaging material in the appropriate recycling waste bins wherever possible. 


 When in operation or undergoing repairs and maintenance work, make sure that the refrigerant circuit is not 

damaged and refrigerant cannot escape. It acts as a greenhouse gas and should not be allowed into the environment. 


Summary of Contents for BR342

Page 1: ...AIR CONDITIONERS BRISK 2 BR342 EN Air conditioning roof unit Installation and Operating Manual ...

Page 2: ......

Page 3: ...ata 26 1 Explanation of symbols DANGER Safety instruction Failure to observe this instruction will cause fatal or serious injury WARNING Safety instruction Failure to observe this instruction can cause fatal or serious injury CAUTION Safety instruction Failure to observe this instruction can lead to injury NOTICE Failure to observe this instruction can cause material damage and impair the function...

Page 4: ... physical sensory or mental capabilities or whose lack of experience and knowledge prevent them from using the device safely should not use it without supervision or instruction by a responsible person Do not undo the upper cover of the roof air conditioner in the event of a fire Use approved extinguishing agents instead Do not use water to extinguish fires CAUTION The roof air conditioner must be...

Page 5: ...height 283 mm 2 2 Handling electrical cables WARNING The electrical power supply may only be connected by a qualified electrician CAUTION Fit a fuse of at least 10 A to the connection with the vehicle s power supply Attach and lay the cables so that they cannot be tripped over or damaged NOTICE Use cable ducts to lay cables through walls with sharp edges Do not lay loose or bent cables next to ele...

Page 6: ...ps who are familiar with the guidelines and safety precautions to be applied 4 Required components No in fig 1 Quantity Description 1 1 BR342 Rooftop Air conditioner 2 1 Air Distribution Box 1 Duct Divider 1 Ceiling Template 1 ADB Cover 8 Sheet Metal Screws 4 Mounting Bolts 2 Wood Screws 2 Front Rear Vent Doors 1 Remote Control 2 Batteries 1 Filter 1 2 Figure 1 Required components ...

Page 7: ...or similar equipment It will not work properly if exposed to strong vibrations Do not operate the roof air conditioner if the ambient temperature is above 43 C 6 Labels Labels are attached to the Dometic BR342 roof air conditioner These labels provide the user and fitter with information on specifications of the device A label is applied to the base of the rooftop unit and can be read from inside ...

Page 8: ...accordance with these installation instructions Always wear the recommended protective clothing e g protective goggles gloves NOTICE Beware of damage Observe the structural engineering of the vehicle and seal of all openings made when installing the roof air conditioner Check whether the roof of the vehicle is able to support the weight of a person before climbing onto it Ask the vehicle manufactu...

Page 9: ...attachment of the air outlet unit or the cooled air from flowing through the swivelling air distribution nozzles For safety reasons note the location of existing wiring harnesses wires and other components within the installation area in particular those which are not visible when installing the roof air conditioner when drilling or screwing etc Note on electrical system Only a qualified electrici...

Page 10: ...Installation Dometic BR342 10 EN New opening Carefully mark and cut the required roof opening Use the roof opening as a guide and cut the matching hole in the ceiling 65mm ...

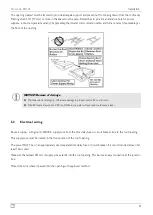
Page 11: ...ge to product and or RV could occur NEVER create a low spot on RV roof Otherwise water will pool and could cause a leak 5 4 Electrical wiring Route a copper with ground 240VAC supply wire from the time delay fuse or circuit breaker box to the roof opening This supply wire must be located in the front portion of the roof opening The power MUST be on an appropriately sized separate time delay fuse o...

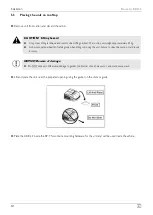
Page 12: ...low occupational health of safety guide when lifting or moving the unit Failure to obey this caution could result in injury NOTICE Beware of damage Do NOT slide unit Otherwise damage to gasket on bottom of unit may occur and could cause a leak Lift and place the unit over the prepared opening using the gasket on the unit as a guide Place the ADB kit inside the RV This contains mounting hardware fo...

Page 13: ...ignment of the unit over the roof opening and adjust if necessary Unit may be moved from below by slightly lifting Remove air distribution box and mounting hardware from carton All models in this manual will use a four 4 bolt pattern for installing the air distribution box kit ...

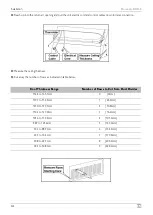
Page 14: ...ess Cut away the number of rows as indicated in table below Roof Thickness Range Number of Rows to Cut from Duct Divider 152 4 to 165 1mm 0 0mm 139 7 to 152 4mm 1 25 4mm 127 0 to 139 7mm 2 50 8mm 114 3 to 127 0mm 3 76 2mm 101 6 to 114 3mm 4 101 6mm 88 9 to 101 6mm 5 127 0mm 76 2 to 88 9mm 6 152 4mm 63 5 to 76 2mm 7 177 8mm 50 8 to 63 5mm 8 203 2mm 38 1 to 50 8mm 9 228 6mm ...

Page 15: ... ceiling template up to the roof opening and start each mounting bolt by hand through the ceiling template and up into the unit base pan Bolts should be fed into locations A D E and H as shown in the following diagram NOTICE Incorrect installation of the divider could cause compressor to short cycle resulting in supply circuit overload and reduced product performance ...

Page 16: ... Overtightening could damage unit s base pan or ceiling template Not enough torque will allow an inadequate roof seal and could cause a leak Fix the return air sensor to the tie fix on the ceiling template so it is positioned in the return air stream Feed the communication wire through the hole in the ceiling plate as shown below and connect the 2 ends ...

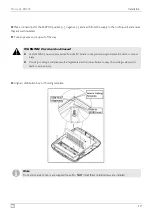
Page 17: ...al shock hazard Verify 240VAC power is disconnected from the RV Failure to obey this warning could result in death or serious injury Provide grounding in compliance with all applicable electrical codes Failure to obey this warning could result in death or serious injury Align air distribution box with ceiling template Note Front and rear vent doors are supplied loose Do NOT install them until all ...

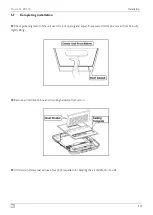
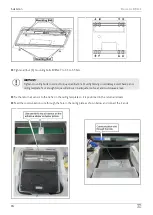
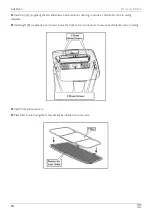
Page 18: ...urn air opening to secure air distribution box to ceiling template Install eight 8 supplied wood screws inside the front rear and side doors to secure air distribution box to ceiling Install front and rear doors Place filter in return air grille It may already be installed on some units ...

Page 19: ...nit installation is now complete and is ready for operation The power supply to the unit may now be turned on Verify that all features of the installed system work Please read the following operating instructions before attempting to run the unit 6 Operating instructions 6 1 Centre air discharge The ADB is able to discharge the air directly down below the ADB by opening the slider shown below ...

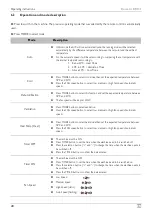
Page 20: ...ss MODE button to select this function and set the expected temperature between 18 C and 30 C The fan speed will be kept at LOW Ventilation Press MODE button to select ventilation Press the FAN speed button to select low medium or high fan speed of automatic speed Heat Pump Heat Press MODE button to select heat mode then set the expected temperature between 18 C and 30 C Press the FAN speed button...

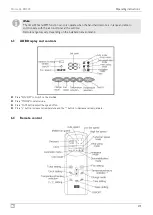
Page 21: ...mmunicate with the air conditioner at the set time Remote range may vary depending on the installation environment 6 3 ADB Display and controls Press ON OFF to switch on the machine Press MODE to select mode Press FAN button adjust the speed of fan Press button increase set temperature and the button to decrease set temperature 6 4 Remote control ...

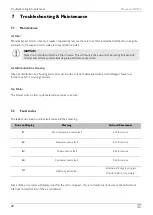
Page 22: ... control panel with a soft cloth dampened with a mild detergent Never use furniture polish or scouring powders Fan Motor The blower motor is factory lubricated and requires no service 7 2 Fault codes The table shown below outlines fault codes and their meaning Code on Display Meaning Actions Comments E1 Room temperature sensor fault Call for service E2 Evaporator sensor fault Call for service E3 C...

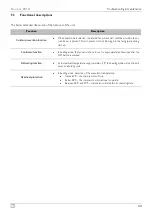
Page 23: ...blowing into the living space during start up Cooldown function In heating mode the fan will continue to run for approximately 60 seconds after the OFF button is pressed Defrosting function At low ambient temperatures approximately 5 C the heating mode will periodically enter a defrosting cycle Overheat protection In heating mode detection of the evaporator temperature Above 60 C the compressor wi...

Page 24: ...al takes place All product components must be disposed of preferably recycled in compliance with statutory legislation in the country in which disposal takes place For correct disposal the appliance must be consigned to an authorised waste disposal company to ensure that all recyclable components are reused and the remaining materials are processed properly During installation ensure the room has ...

Page 25: ...rant is present Discharge of refrigerant into the atmosphere is against the law Severe penalties apply If you wish to finally dispose of the product ask your local recycling centre or specialist dealer for details about how to do this in accordance with the applicable disposal regulations Dispose of the product at an official waste disposal facility in accordance with the applicable recycling or d...

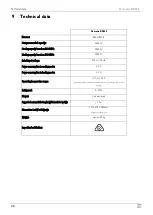
Page 26: ...0 V 50 Hz Power consumption in cooling mode 6 3 A Power consumption in heating mode 5 3 A Operating temperature range 7 C to 43 C performance will be reduced when operating below 7 C heating or above 35 C cooling Refrigerant R 410a Blower 3 blower levels Suggested max vehicle length with insulated walls 7 5 m Dimensions L x W x H mm 721 x 670 x 282 mm height above vehicle roof Weight approx 40 kg ...

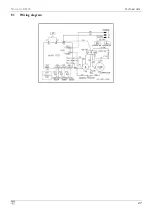
Page 27: ...Dometic BR342 Technical data EN 27 9 1 Wiring diagram ...

Page 28: ......

Page 29: ...B V Ecustraat 3 NL 4879 NP Etten Leur 31 76 5029000 31 76 5029019 Mail info dometic nl NEW ZEALAND Dometic New Zealand Ltd Unite E The Gate 373 Neilson Street Penrose 1 Auckland 64 9 622 1490 64 9 622 1573 Mail customerservices dometic co nz NORWAY Dometic Norway AS Østerøyveien 46 N 3232 Sandefjord 47 33428450 47 33428459 Mail firmapost dometic no POLAND Dometic Poland Sp z o o Ul Puławska 435A P...

Reviews: