Before using the terminal
17
■
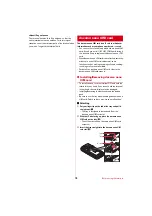
Removing
a
Put your fingertip on the tab of the tray, pull it
straight out, then remove the docomo nano UIM card
b
Insert the tray straight into the docomo nano UIM
card slot
✔
INFORMATION
・
When handling docomo nano UIM card, take care not to
touch or scratch the IC. Also, be aware that trying to insert
or remove the docomo nano UIM card using excessive
force may cause it to break.
・
For removing/inserting the tray from/into the docomo
nano UIM card slot, do not remove or insert forcibly. Doing
so may damage the tray.
◆
Security codes of docomo nano
UIM card
You can set up a security code called a PIN code for your
docomo nano UIM card. At the time of subscription, the
code is set to "0000", which you can change by yourself.
・
The terminal supports microSD card of up to 2 GB,
microSDHC card and microSDHC UHS-I card of up to
32 GB, and microSDXC card and microSDXC UHS-I
card up to 64 GB (as of September, 2016).
・
Note that DOCOMO does not guarantee actual
operations of all microSD cards. For information on
compatible microSD cards, contact manufacturers of
microSD cards.
・
Do not turn the power OFF or give shock while
accessing data on the microSD card. The data may
corrupt.
・
A microSDXC card can be used only with a SDXC
compatible device. Do not insert a microSDXC card
into a device not compatible with SDXC. Doing so may
damage the data in the microSDXC card. To use the
microSDXC card with damaged data, initialize the
microSDXC card by a SDXC compatible device (all
data will be deleted).
・
To copy data using a device not compatible with
SDXC, use a microSDHC card or microSD card
compatible with the device of copied destination.
・
The terminal supports up to Class 10 speed microSD
card.
・
The terminal supports UHS speed Class 1 microSD
card.
◆
Attaching/Removing battery pack
・
To install/remove, turn the terminal OFF and hold the
terminal in your hand. If you do not hold the terminal
in your hand, the sub-display may be damaged.
・
If the terminal is wet, wipe off the remaining water,
then remove the back cover.
・
For installing/removing the back cover, refer to "To
ensure waterproofness/dustproofness".
・
Use the battery pack F37 exclusive for the terminal.
・
When the battery pack is removed, the reserved
update of software my be canceled. Also, when the
battery pack is removed while the data and time
setting is set to "Set manually", the date and time may
be deleted.
■
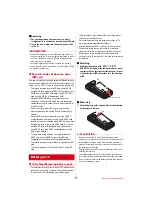
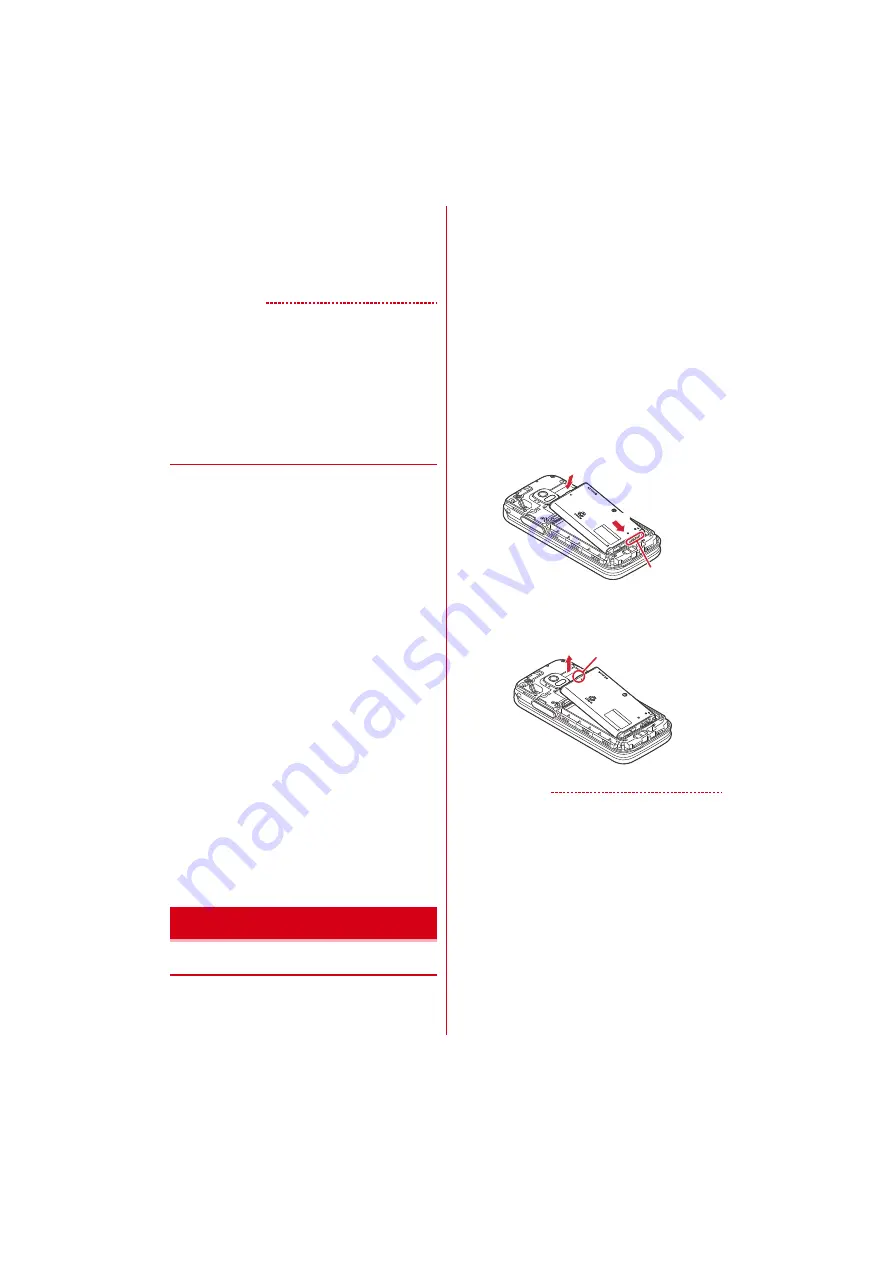
Attaching
a
With the side printed with "NTT
ドコモ
(NTT
DOCOMO)" facing up, align the battery pack's metal
contacts with the terminal's metal contacts, insert it
to the direction of
a
, then attach it to the direction
of
b
.
■
Removing
a
Hold the battery pack's tab and lift it to the direction
of the arrow to remove
✔
INFORMATION
・
Be aware that trying to insert the battery pack using
excessive force may cause the terminal's contacts to break.
・
Installing/Removing by a way other than the procedure
above or using excessive force may cause the terminal or
the back cover to damage.
・
Attach the back cover firmly to prevent water or dust from
entering the terminal.
・
The rubber gasket on the cover inside play an important
role in maintaining the waterproof/dustproof performance.
Do not remove or scratch the rubber gaskets. Also, prevent
dust from adhering to them.
Battery pack
Mic
ro
Sum
mit
a
b
Metal contacts
Mic
ro
Sum
mit
Tab


