DMP Electronics EBOX-ALN3350 User Manual Download Page 23


EBOX-ALN3350 


User Manual 

DMP Electronics Inc. 

23 


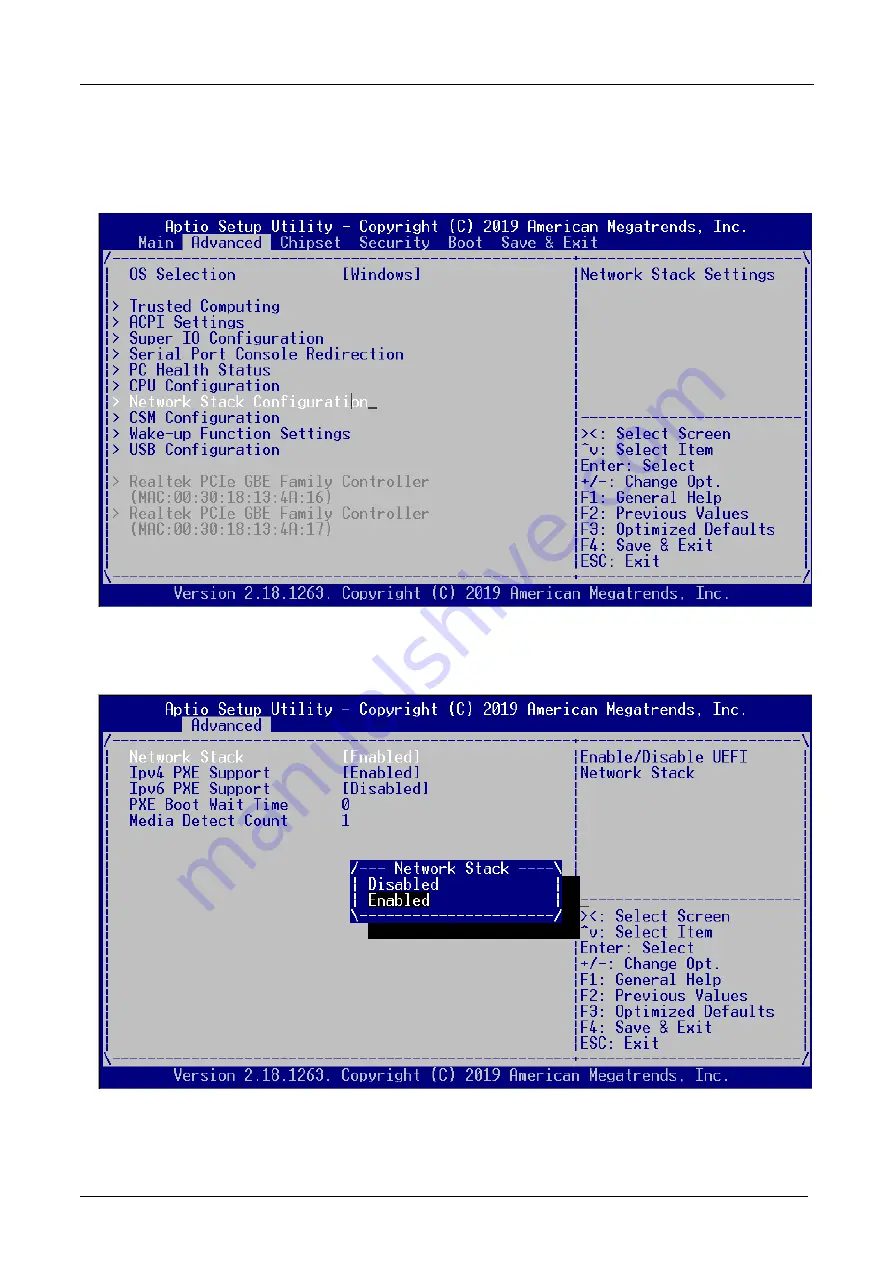
PXE diskless boot Selection 

1.


Move to “Advanced” for “Network Stack Configuration” and make further setting.   


2.


Set “Network Stack” Enabled and Ipv4 & Ipv6 PXE Support will appear. 


Note: Ipv4 & Ipv6 stand for Internet Protocol version 4 & 6, when set to Enabled, PXE diskless 
boot will be created. 


Summary of Contents for EBOX-ALN3350

Page 1: ...EBOX ALN3350 User s Guide...

Page 2: ...names appearing in this document are the properties and registered trademarks of their respective owners All names mentioned herewith are served for identification purpose only Safety Information WARN...

Page 3: ...eswithPart15ofthe FCCrules Operation issubjecttothefollowingtwo conditions 1 thisdevicemaynot causeharmfulinterference and 2 thisdevicemustacceptanyinterferencereceived includinginterferencethatmaycau...

Page 4: ...stothedistributorsa warrantyof12months Thiswarrantycoversthefailure causedbyhardwarebreakdown excludinghard drives butdoesnotcovertheactofmisuseandmishandling 3 Thesupplierwillnotacceptunknownpost the...

Page 5: ...85 422 20 ATModeSetting Auto PowerOnFunction 21 Serial Port Console Redirection 21 OS Selection 23 PXEdisklessboot Selection 24 DriversInstallation Guide 24 Chipset driver 25 Graphic driver 26 Audio d...

Page 6: ...EBOX ALN3350 User Manual DMP Electronics Inc 6 Chapter1...

Page 7: ...escription Quantity 1 EBOX ALN3350MiniPC x1 2 40WPowerAdaptor Vin 100 240VAC50 60Hz x1 3 Powercable availableUS UK EU AUtypes x1 4 VESAscrew x4 Note The accessories are subject to change without immed...

Page 8: ...ALN3350 can be easily integrated with VESA monitor to access at any time EBOX ALN3350 can be attached to any VESA mounting fixture allowing it to be securely mounted onto desks walls or buildings and...

Page 9: ...EBOX ALN3350 User Manual DMP Electronics Inc 9 Chapter2...

Page 10: ...Power Button For system power on off Back Panel F USB 3 0 port Connection for external USB devices G RJ 45 LAN Jack Realtek 8111H GigaLAN H HDMI Output port Support HDMI display I Mic in Line out pho...

Page 11: ...EBOX ALN3350 User Manual DMP Electronics Inc 11 EBOX ALN3350 Internal description Optional item MINIPCIE WLAN 159H Wi Fi BT module info www compactpc com tw...

Page 12: ...EBOX ALN3350 User Manual DMP Electronics Inc 12 Appearance Diagram...

Page 13: ...p to 1920 x 1200 60Hz Audio Realtek ALC662VD LAN Realtek 8111H GigaLAN x2 Built in PXE diskless boot Disk Support mSATA x1 SATA device x1 Internal I O 4 pin wafer for SATA power output x1 SIM card hol...

Page 14: ...erals Connecting the Power Adaptor A DCpower Jack EBOX ALN3350 use 12V 3 33A AC adapter with power cable for the power source Connecting the Monitor B VGAConnection ConnectingVGAdisplayviaVGA cable C...

Page 15: ...n for external USB devices supports up to 5Gbps data transfer rate E Serialport RS 232 485 422 Connection for serial port interface devices F Power LED Power LED lights up when the system turned on G...

Page 16: ...EBOX ALN3350 User Manual DMP Electronics Inc 16 Chapter3...

Page 17: ...BIOS Reconfiguring Load Default Setting 1 AMI BIOS is used in EBOX To reconfigure the hardware press Del or Esc key to enter BIOS setup main menu 2 Press F3 key to load optimized defaults as below 3...

Page 18: ...boot up a shortcut boot up device select menu will appear Use direction key to select boot device and enter to boot up BIOS COM Setting RS 232 485 422 1 Press Del or Esc key to enter BIOS menu after...

Page 19: ...EBOX ALN3350 User Manual DMP Electronics Inc 19 2 Move to Serial Port 1 Configuration 3 Next to Transmission Mode and select COM port Mode 4 Press F4 key to save exit...

Page 20: ...Auto Power On Function EBOX ALN3350 supports Auto Power On function system will boot up automatically after power restored 1 In BIOS Menu move to Chipset and South Cluster Configuration 2 Set System S...

Page 21: ...ed and set Console Redirection as Enabled 2 Set Terminal Type as VT100 press F4 key to save exit Terminal Type Emulation ANSI Extended ASCII char set VT100 ASCII char set VT100 Extended VT100 to suppo...

Page 22: ...or OS selection and set OS mode Three optional settings Windows Intel Linux and MSDOS Note User need to go to this item to select the OS mode before installing corresponding OS drivers otherwise probl...

Page 23: ...ot Selection 1 Move to Advanced for Network Stack Configuration and make further setting 2 Set Network Stack Enabled and Ipv4 Ipv6 PXE Support will appear Note Ipv4 Ipv6 stand for Internet Protocol ve...

Page 24: ...ually 1 Chipset 2 Graphic 3 Audio 4 LAN 5 TXE 6 iRMT 7 ISH Please download above drivers from EBOX website Chipset driver Intel Chipset Device Software 1 Unzipthedownloadedfileand executeSetupChip exe...

Page 25: ...DMP Electronics Inc 25 Graphic driver 1 Executeigxpin exeandclick Next toinstall 2 A license agreementmessage willpopout clickAcceptand install 3 Afterinstalled select Yes Iwanttorestartthiscomputerno...

Page 26: ...ALN3350 User Manual DMP Electronics Inc 26 Audio driver 1 ExecuteSetup exeandinstallerwillpopout then click Next toinstall 2 Afterinstalled select Yes Iwanttorestartthiscomputernow and clickFinishtore...

Page 27: ...EBOX ALN3350 User Manual DMP Electronics Inc 27 LAN driver 1 ExecuteSetup exeand InstallShieldWizard willpopout then click Next to install 2 Afterinstalled click Finish to exitthewizard...

Page 28: ...rustedExecutionEngine isa computerhardwaretechnologyprimarygoalsare Attestationofthe authenticityof a platformanditsoperatingsystem 1 ExecuteSetupTXE exeandclick Next toinstall 2 Check Iaccepttheterm...

Page 29: ...ryaboutmissingout Intel RMTprovideswithanalternativetothetraditionalPCsleepstate When system receivesincomingemails real timenews socialmediaposts and weather alerts allwhileminimizingpower consumptio...

Page 30: ...Electronics Inc 30 ISH driver Intel IntegratedSensor Solution Intel IntegratedSensor Solution installsIntelIntegrated SensorSolutiondrivertoEBOX 1 Double clickSetupISS exeandclickinstall 2 Click Finis...

Page 31: ...EBOX ALN3350 User Manual DMP Electronics Inc 31 Chapter4...

Page 32: ...HDMIconnector 19 pin J4 VGA D Sub connector 15 pin J5 SATA SATAIIIport connector 7 pin J6 SATApoweroutput 2 54mm4 pinheader 4 pin J7 Full size mPCIe co lay mSATA mPCIeconnector 52 pin J8 Half size mPC...

Page 33: ...ld 15 SCL 6 TMDS_Data1 16 SDA 7 TMDS_Data0 17 DDC CEC_GND 8 TMDS_Data0_Shield 18 5VPower 9 TMDS_Data0 19 HotPlugDetect 10 TMDS_CLK J4 VGA 15 pinD Subconnector Pin Signal Name Pin Signal Name Pin Signa...

Page 34: ...IM_VCCP NC 16 15 GND Mechanical Key GND 18 17 Reserved NC W_DISABLE 20 19 Reserved NC RESET 22 21 GND 3 3V 24 23 PERN0 MSATA_RXP GND 26 25 PERP0 MSATA_RXN 1 5V 28 27 GND SMB_CLK 30 29 GND SMB_DATA 32...

Page 35: ...LAD1 14 13 REFCLK LAD0 16 15 GND Mechanical Key GND 18 17 PLTRST_N W_DISABLE 20 19 LPC_CLK RESET 22 21 GND 3 3V 24 23 PERN0 GND 26 25 PERP0 1 5V 28 27 GND SMB_CLK 30 29 GND SMB_DATA 32 31 PERTN0 GND 3...

Page 36: ...IM VCC 4 GND 2 SIM RST 5 SIM VPP 3 SIM CLK 6 SIM IO J12 USB3 0 connector Pin Signal Name Pin Signal Name 1 5V 6 Receive 2 DATA 7 GND 3 DATA 8 Transmit 4 GND 9 Transmit 5 Receive J13 RS 232 485 4229 pi...

Page 37: ...EBOX ALN3350 User Manual DMP Electronics Inc 37 Chapter5...

Page 38: ...ference subjectingtomalfunction Provideadequateairventilation circulation toprevent internalbuildupofheat DonotplaceEBOXnear behindthecurtainsordraperies inbetweentwobooksthatblockitsventilation slots...

Page 39: ...Donotuseanytypeofabrasivepad scouringpowder or solvent suchasalcoholor benzene asthesemay damagethefinishofEBOX Whena solidobjectfallsora liquidspillsontoEBOX turnoffEBOXimmediately unplugthe LANandp...

Page 40: ...onwellbyremovingtheACadaptor Waitforoneminute andthen reattachallpowerconnectionbeforepressingthepowerbutton Condensationmaycause EBOX malfunctionfora while Ifhappens donotuseEBOX forat leastonehour W...

Page 41: ...notstart followthesestepstoinitializetheBIOS 1 TurnoffEBOXunit 2 RemoveanyperipheraldevicesconnectedtoEBOXunit 3 RestartEBOXunit 4 Press Del or Esc toenter BIOSSetupmainmenuwindow 5 Followthestepsaswr...

Page 42: ...EBOX ALN3350 User Manual DMP Electronics Inc 42 Chapter6...

Page 43: ...RMANumbermustbeshownclearlyon your shippinglabel 4 DMPElectronicsInc mustreceiveallReturnsbeforeareplacement willbesent 5 Repair costdependsontheparts damage reasons andwhetherunderwarrantyperiod etc...

Reviews: