background image

22

www.dkn-uk.com

Tips For Stretching

• 


Begin with small mobility exercises of 

all the joints e.g. simply rotate your 
ankles, bend your knees and roll your 
hips. Gradually make the movements 
larger and faster. This will allow the 

body’s natural lubrication (synovial fluid) 

to protect the surface of your bones at 
these joints.

• 


Always warm up the body before 

stretching as this increases blood flow 

around the body, creating warmth which 
makes the muscles suppler.

• 


Start with your legs, and steadily work up 

the body.

• 


Each stretch should be held for at least 

10 seconds (working up to 20 to 30 
seconds) and usually repeated about 2 
or 3 times.

• 


Do not stretch until it hurts. If there’s any 
pain, ease off.

• 


Don’t bounce. Stretching should be 

gradual and relaxed.

• 


Don’t hold your breath during a stretch.

• 


Stretch after exercising to prevent 

muscles from tightening up.

• 


Stretch at least three times a week to 
maintain flexibility.

Warm-Up And Cool-Down

A successful cardio-vascular exercise 
program consists of a full-body warm-up, 
aerobic exercise, and a cool-down. Do the 
entire program at least two and preferably 
three times a week, resting for a day between 
workouts. After several months, you can 

increase your workouts to four or five times 

per week.

WARM-UP 

The purpose of warming up is to prepare 
your body for exercise and to minimise 

injuries. Warm up for five minutes before 

strength-training or exercising aerobically. 
Perform activities that raise your heart rate 
and warm the working muscles. Activities 
may include brisk walking, jogging, jumping 
jacks, jump rope, and running on the spot. 
Try to incorporate moves that take the joints 
through their full range of motion.

STRETCHING 

Stretching while your muscles are warm 

after a proper warm-up and again after 
your strength or aerobic training session is 
very important. Muscles stretch more easily 
at these times because of their elevated 
temperature, which greatly reduces the risk 

of injury. Stretching develops flexibility and 

reduces muscles soreness.

Stretching Guide

Summary of Contents for AM-3i

Page 1: ...www dkn uk com AM 3i Owner s Manual Manual version 1 2...

Page 2: ...com Safety Information 3 5 Machine Assembly 6 15 Product Overview 6 Assembly Instructions 7 15 Operating Instructions 16 17 Console Images 16 Configuring Your Exercise Bike 17 Controls 17 Console Fee...

Page 3: ...rapeutic or medical purposes 08 This machine may only be used by one person at a time 09 Always wear appropriate workout clothing when exercising Aerobic shoes are required when using this machine 10...

Page 4: ...t susceptible to wear e g handlebar cranks pedals bearings and the connection points 21 Stop using the machine immediately if there are any defective components and keep it out of use until you replac...

Page 5: ...product Disposing of this product correctly will help save valuable resources and prevent any potential negative effects on human health and the environment which could otherwise arise from inappropr...

Page 6: ...assembly process Please familiarise yourself with the parts labeled in the drawing below and check that they are all present and correct before you begin to assemble your machine Pedal Seat Post Knob...

Page 7: ...M 3i Assembly Screwdriver 1 Box Spanner 1 T shape knob M7 65MM 1 Allen Key Allen Bolt M7 P1 0 30MM 1 Bushing 7 12 30MM 1 Metal cover 1 Spring Washer 7 2T 2 Regular Washer 7 1T 2 IS850 Screw M3 12L 2 T...

Page 8: ...ssembly Instructions Your DKN AM 3i is partially pre assembled to help ensure it runs smoothly and to reduce the amount of assembly required There are 9 straight forward steps that need to be followed...

Page 9: ...www dkn uk com 9 STEP 3...

Page 10: ...10 www dkn uk com STEP 4...

Page 11: ...www dkn uk com 11 STEP 5...

Page 12: ...12 www dkn uk com STEP 6...

Page 13: ...www dkn uk com 13 STEP 7...

Page 14: ...14 www dkn uk com STEP 8...

Page 15: ...www dkn uk com 15 STEP 9...

Page 16: ...16 www dkn uk com Console Image Operating Instructions...

Page 17: ...approximate calorie burn and strictly remains a random indication Pulse Hold firmly both sensors on the handgrip please wipe sensors and hands before starting measuring your pulse or apply optional Bl...

Page 18: ...STOP Press RESET to exit the program Program Mode Press UP DOWN to select beginner advanced or performance confirm with ENTER Select profile 1 to 4 confirm selection with ENTER Program target value fo...

Page 19: ...Set Target Heart Rate confirm selection with ENTER THR default value is 100 Bpm Program target value for program time using UP DOWN ENTER and press START Upon entering rate in Bpm beats per minute the...

Page 20: ...neral wellbeing Regular exercise will Relieve tension and stress Provide enjoyment and fun Stimulate the mind Help maintain a stable weight Control appetite Boost self image Improve muscle tone and st...

Page 21: ...cover How To Begin Start with two or three 15 minute sessions per week with a rest day between workouts Warm up for 5 to 10 minutes with gentle movements incorporating the whole body such as walking w...

Page 22: ...bility Warm Up And Cool Down A successful cardio vascular exercise program consists of a full body warm up aerobic exercise and a cool down Do the entire program at least two and preferably three time...

Page 23: ...our physician before starting any exercise program COOL DOWN The purpose of cooling down is to return the body to its normal or near normal resting state at the end of each exercise session A proper c...

Page 24: ...ides error codes on the console Please note the code your machine displays so we can help with diagnosing and resolving the issue Important Please retain your sales receipt as DKN Customer Care may re...

Page 25: ...m a Transport b Abuse misuse failure to follow instructions or improper or abnormal use c Non home use including commercial professional or rental purposes d Repairs not provided by DKN e Accidents li...

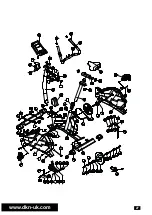
Page 26: ...26 www dkn uk com Appendix 1 Exploded Diagram...

Page 27: ...www dkn uk com 27...

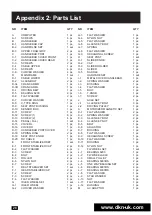
Page 28: ...LIZER CAP 2 pc F 2 SCREW 2 pc F 3 SCREW 4 pc F 4 FLAT WASHER 4 pc G IDLER WHEEL SET 1 set G 1 IDLER WHEEL 1 pc G 2 CURVED WASHER 1 pc NR ITEM QTY G 3 FLAT WASHER 1 pc G 4 NYLON NUT 1 pc G 5 FLAT WASHE...

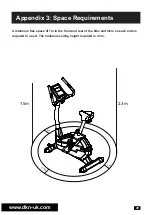
Page 29: ...k com 29 Appendix 3 Space Requirements 0 6m 1 5m 1m 1m 2 3m A minimum free space of 1m in the front and rear of the bike and 0 6m on each side is required to use it The minimum ceiling height required...

Reviews: