©
2016 DJI. All Rights Reserved.
RONIN-MX User Manual
V1.0 2016.04
Page 1: ...2016 DJI All Rights Reserved RONIN MX User Manual V1 0 2016 04...
Page 2: ...signify that you have read this disclaimer and warning carefully and that you understand and agree to abide by the terms and conditions herein You agree that you are solely responsible for your own c...
Page 3: ...g Started 7 Tuning Stand 7 Assembling the Handle Bar 7 Installing the Handle Bar onto the Gimbal 8 DJI Intelligent Battery 8 Charging the DJI Intelligent Battery 9 Using the DJI Intelligent Battery 10...
Page 4: ...Matrice 600 aircraft for capturing amazing footage from the air It also support to be used on vehicle Jib or Wirecam The technologybuiltinto the DJI Ronin MX allows a broad spectrum of cameras of vary...
Page 5: ...ndle bar for the gimbal The handle bar is assembled from five parts including a top handle two handle bars and two grips Remote Control 2 4 GHz x1 Control the gimbal s movements switch work modes and...
Page 6: ...ra Upper Mounting Plate x1 For mounting your camera onto the gimbal Vibration Absorber x1 For mounting the gimbal onto the Matrice 600 Accessories Package Camera Screw A 1 4 x2 Camera Screw B 3 8 x2 C...
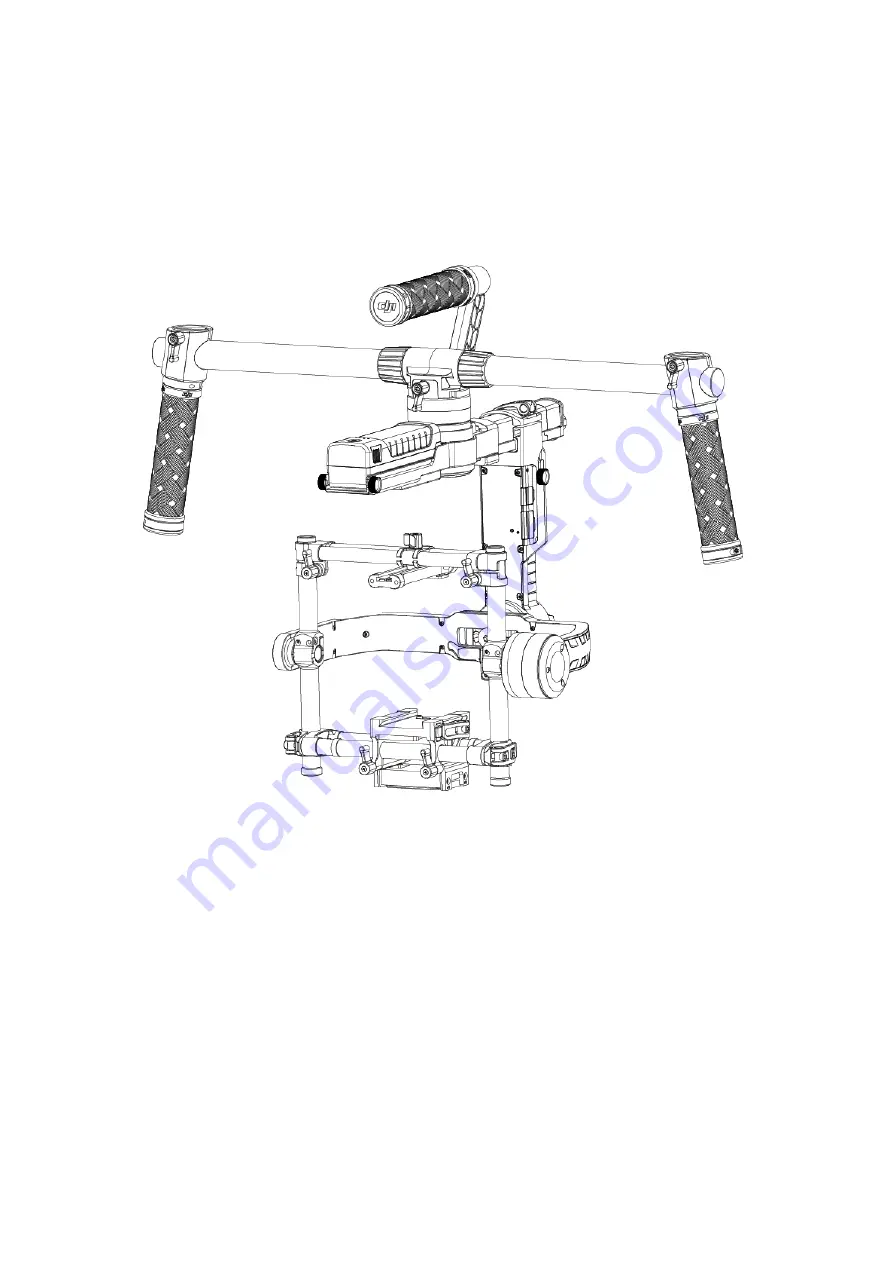
Page 7: ...r 6 DJI Intelligent Battery 7 Pan Adjustment Slider 8 Intelligent Battery Power Distributor Mounting Plate optional 9 D BUS Receiver Port 10 USB Port CAN1 Bus Port 11 Bind Button 12 Gimbal LED Indicat...
Page 8: ...d Then press the buttons 2 on the outsides of the upper support arms and pull them upwards away from the stand Press the button 3 on the vertical support and slide it up to extend the stand as shown 3...
Page 9: ...structed during a 360 degree pan The installation is complete DJI Intelligent Battery Before you start using your Ronin MX be sure to charge the battery The DJI Intelligent Battery was specially desig...
Page 10: ...pe LiPo Capacity 1580 mAh Voltage 14 4 V Charging Environment Temperature 32 to 104 F 0 to 40 C Operating Environment Temperature 14 to 104 F 10 to 40 C Charging Discharging Environment Relative Humid...
Page 11: ...y Powering Off When the DJI Intelligent Battery is turned on press and hold the power button for 1 second to turn off the DJI Intelligent Battery DJI Intelligent Battery Installation 1 Loosen the scre...
Page 12: ...th the following types of cameras Other cameras similar in size and weight may also be compatible Black Magic Cinema Camera Canon 5D MK III Nikon D800 Black Magic Pocket Cinema Camera Canon 6D Panason...
Page 13: ...very tight lens securing system and some cameras such as the Canon 5D MKII and MKIII have very loose lens securing systems The Ronin MX balances the camera as one solid unit If the mounted camera has...
Page 14: ...amera achieves a rough balance tighten the camera base side clamp and the lock knob Note You can adjust the tightness of the clamp with an M3 Allen wrench Configuring the Handle Bar The customizable h...
Page 15: ...that the camera lens is pointing upward then loosen the two vertical adjustment tabs and the lock knobs on the top cross bar 2 Gently slide the camera mountcrossbar forwards or backwards until the cam...
Page 16: ...t tilt balance is achieved the camera will stay level when you remove your hand while holding the roll axis in position Step 4 Balancing the Pan Axis To achieve the pan axis balance you must adjust th...
Page 17: ...istant app and configure your Ronin MX Download and Install 1 Download the DJI Assistant app For the iOS version search DJI Assistant in the App Store then follow the installation instructions Search...
Page 18: ...Basic Settings The functions accessible in the Wizard are the most basic functions you may want to adjust upon receiving your Ronin MX These options are also the most frequently used functions during...
Page 19: ...usted The speed will determine how fast the camera will travel while translating a pan roll tilt movement Deadband will determine how much movement the gimbal will tolerate prior to translating the ca...
Page 20: ...hly recommended to choose the Camera Type SLR Camera or RED Camera to obtain best Stiffness Strength Outfilter and Control value The Auto Tune Stability button allows for automatic adjustment of each...
Page 21: ...e Refer to the Basic Settings section for details relating to SmoothTrack Mode 3 Angle Adjustment Enable Manual Adjustment to allow the pan and tilt axes to be adjusted by hand when the Ronin MX is tu...
Page 22: ...e gimbal will rotate left or right during controller input Pan axis endpoints can be adjusted independently for left and right movement when used with a remote control or the thumb controller Tilt axi...
Page 23: ...on the Speed Toggle Presets for SmoothTrack will take precedence over the Assistant settings Once the remote control is turned off the SmoothTrack settings in the Assistant will take over Viewer Menu...
Page 24: ...ces an issue or needs to make a quickmechanical adjustment to the gimbal orcamera setup Roll Control When the Roll Control is off the roll axis movement cannot be controlled by a remote control or the...
Page 25: ...finish before picking up the Ronin MX Do not touch or move the Ronin MX during calibration Balance Detection Tap to check the balance status of the tilt and roll axis Ensure there is no obstacle durin...
Page 26: ...the Assistant as needed The Assistant installer supports Windows XP above Installing and Running on Mac OS X 1 Download the Assistant installer DMG from the Ronin MX product page on DJI com 2 Run the...
Page 27: ...shown in this manual are from the Windows version Settings Adjust the following basic functions before using the Ronin MX Camera Type Briefcase Mode SmoothTrack and Maximum Speed Adjustment The defini...
Page 28: ...test procedures Reset Password If you forgot your Bluetooth connection password click here to reset your password Calibrate Center If the Ronin MX s pan axis is off center you can recalibrate the tru...
Page 29: ...nts can be tested Ensure that the camera is unobstructed when clicking the test buttons Controller Priority If both input devices simultaneously send control signals to the gimbal the input from the s...
Page 30: ...ovide feedback during remote operator configuration Pan tilt and roll can be re assigned to either of the remote control sticks The controlled axis can also be reversed 4 Battery This page provides al...
Page 31: ...sistant blinks blue 2 Click Upgrade 3 Wait for the download to finish 4 Click Upgrade again and then click Confirm 5 Power the Ronin MX off and then on after the upgrade is complete 1 Ensure that your...
Page 32: ...Assistant you are using in the Info tab The S N is a 32 digit authorization code that is used to activate certain functions The authorization code for your unit is entered after it is manufactured You...
Page 33: ...port 13 Reserved Port Connecting the Remote Control to the Ronin MX 1 Turn on the Ronin MX 2 Press the Bind Button shown below of the Ronin MX once The Ronin MX s LED indicator will blink green quick...
Page 34: ...us Power LED Indicator Sound Remote Control Status None Functioning normally None Charging remote controls powered off None Remote control joystick calibration error re calibrate BB BB BB Low voltage...
Page 35: ...ating Motor Kill Switch Quickly flip the FUNCTION Switch between Position 1 and Position 3 at least three times to activate the Motor Kill Switch Repeat this process to turn off the Motor Kill Switch...
Page 36: ...at eye level Upright Mode can also be used without any adjustments Do not flip the gimbal sideways left or right to convert to Upright Mode Briefcase Mode Briefcase Mode allows you to hold the Ronin...
Page 37: ...nting the Ronin MX onto a Matrice 600 ensure the camera is mounted securely on the Ronin MX and the balancing is adjusted properly 1 Remove the Matrice 600 s upper cover and lower cover of the center...
Page 38: ...the vibration absorber onto the bottom of the Matrice 600 with the lock Knob facing forward then tighten the 12 vibration absorber screws 4 Slide the gimbal into the gimbal connector of the vibration...
Page 39: ...cable then connect the camera s HDMI port and the Lightbridge 2 air system Note that wire connection for video link will obstruct the pan axis movement in certain range the pan axis could not rotate 3...
Page 40: ...mbal Roll Tap to fine tune the gimbal s roll if you notice the roll axis is not level SmoothTrack Settings The Deadband and the speed can be adjust separately for pan and tilt axis Remote Control Sett...
Page 41: ...f and power on again automatically when calibration is complete Observe the roll axis s position recalibrate is needed if the roll axis is off level Ensure there is nothing obstructing the gimbal s mo...
Page 42: ...The figure below shows the proper configuration for transporting the Ronin MX with the Tuning Stand Using the hook and loop straps lock the Ronin MX in place as shown Be sure to remove the straps pri...
Page 43: ...ess finish before picking up the Ronin MX 5 SmoothTrack does not work 1 Turn on the remote control and be sure that the MODE switch is not in Position 1 the uppermost position 2 Check whether SmoothTr...
Page 44: ...W x 1 DJI Lightbridge x 1 GCU Input Power Intelligent Battery 423496 1580 mAh 14 4 V Connections 2 4 GHz Remote Control Bluetooth 4 0 USB 2 0 PC MAC Assistant Requirements Windows XP or above Mac OS X...
Page 45: ...re designed to provide reasonable protection against harmful interference in a residential installation This equipment generates uses and can radiate radio frequency energy and if not installed and us...
Page 46: ...conditions suivantes 1 l appareil ne doit pas produire de brouillage et 2 l utilisateur de l appareil doit accepter tout brouillage radio lectrique subi m me si le brouillage est susceptible d en comp...
Page 47: ...res that this device is in compliance with the essential requirements and other relevant provisions of the R TTE Directive A copy of the EU Declaration of Conformity is available online at www dji com...