background image

24

Chapter 2: Camera Configuration

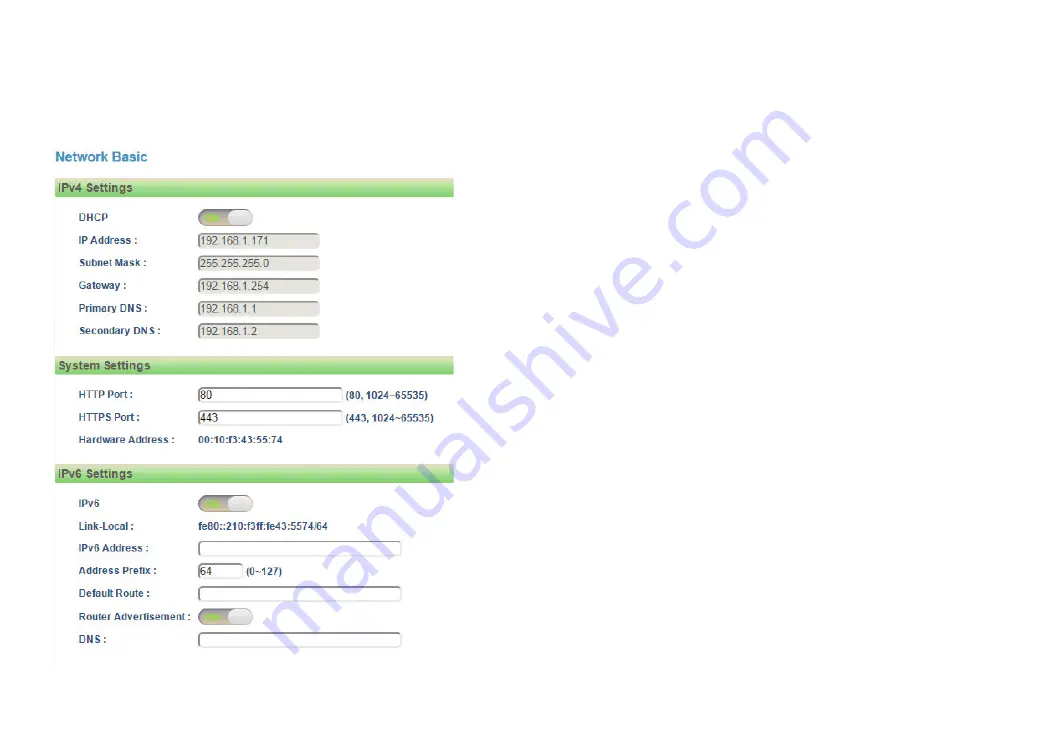
Network - Basic

IPv4 Settings

DHCP

Enables or disables DHCP, use this feature if the camera is connected to a 
network with DHCP server.

To manually configure an IP address, disable DHCP and input the IP address, 
subnet mask, default gateway, primary and secondary DNS server address.

System Settings

HTTP Port

Configures the HTTP port number of the web configuration menu.

HTTPS Port

Configures the HTTPS port number of the web configuration menu.

Hardware Address

Unique MAC address for each camera device.

IPv6 Settings

Enables or disables IPv6 function.

To manually input an IP address, enable IPv6 and input the address prefix, 
default route, enable/disable router advertisement and DNS server address. 

Summary of Contents for NDR153P

Page 1: ...Published March 2018 IR Indoor Fixed Mini Dome Camera NDR153P User Manual Note The manual is subject to change without notice ...

Page 2: ...ns 15 Day Night Setting 17 Image Basic Settings 18 Orientation 18 Digital Processing 18 Image ROI 20 Configurations 20 Image Privacy Zone 21 Configurations 21 Image OSD 22 General Settings 22 Text Overlay 22 Network Basic 23 IPv4 Settings 23 System Settings 23 IPv6 Settings 23 RTMP Settings 24 Network FTP 25 Configurations 25 Network SSL 26 SSL Configurations 26 Certificate 26 Network SSH 27 SSH C...

Page 3: ...ule Settings 45 Event Object Detection 46 Object Detection Configurations 46 Object Schedule Settings 49 Event FTP Upload 50 FTP Upload Handler Configurations 50 Remote Server 50 Event SMTP Notification 51 SMTP Notification Handler Configurations 51 Trigger Event 51 SMTP Server 52 Recipient List 52 Event Network Storage 53 Network Storage Configurations 53 Trigger Event 53 Recipient Setup 53 Login...

Page 4: ...1 Chapter 1 Product Introduction Chapter 1 Product Introduction Overview NDR153P Cable ...

Page 5: ... Top Cover Housing 1 Put the installation sticker on the ceiling 2 Remove the base of the camera Use expansion bolts and mounting screws to fix the base of the camera onto the ceiling 3 Adjust the direction of the camera to the desired field of view 4 Put the top cover housing of the camera back and fix it to the base on the ceiling ...

Page 6: ... software The following information outlines the instructions for each method Installing CAM FINDER Software 1 Download the CAM FINDER installer file Please access http www diviotec com index php tid 1603 pid 31 cid 50 2 Unzip the CAM FINDER file to a location on the hard drive 3 Once unzipped double click on the setup file to start the installation program 4 Click the Next button on the welcome s...

Page 7: ... desired installation folder Next button Browse button Disk Cost button User accounts 8 Click on the Next button to continue 6 To check the available drives you can install the software to and their available and required disk space please click on the Disk Cost button 7 Specify which user accounts on the computer can access the program the options are Everyone and Just me ...

Page 8: ...mera Configuration Next button 9 Click on the Next button to begin installation Close button 10 Once the installation process is complete click on the Close button to finish A shortcut will be created on the desktop ...

Page 9: ... List The IE will be opened automatically 2 When the program is launched it will begin searching the network for IP cameras automatically the search will last for up to 90 seconds You can also manually search cameras by clicking on the Search button 3 Once the camera is discovered it will show the following information Model Name IP address MAC address UUID Serial Number Version Camera List ...

Page 10: ...he home page of the camera Firmware Upgrade Upgrades the camera firmware Search When the Search button is clicked the application will start searching cameras on the network To stop searching click the Done button Assign IP When the Assign IP button is clicked a pop up window IP Address Configuration will appear providing options to use DHCP or static IP address Home Page To view the home page of ...

Page 11: ...nformation type in Admin default login name and 1234 default password 4 Once logged in you will see the main screen Web Browser 5 If no video is displayed on the screen please make sure you have VLC Media Player installed on the computer If not please download and install it first then you can see the video from the web browser Note The recommended browsers to use are Internet Explorer Safari Fire...

Page 12: ... However the zoom position cannot be manually entered in the text field Focus Control Adjusts the camera s focus To adjust the focus automatically press the Auto Focus button To set the focus manually press the to focus far objects and to focus near objects The focus can also be adjusted through the slider bar Zoom Control Focus Control Zoom Slider Snapshot Takes a image snapshot from the camera y...

Page 13: ...11 Chapter 2 Camera Configuration Configuring the Camera s Setting 1 To configure the camera s setting click on the Setup button on the main screen to enter the configuration menu Setup ...

Page 14: ...r corresponding sub menu on the right The following are the camera settings available on the left hand side Video Video Configuration Image Exposure Basic Settings ROI Privacy Zone OSD Network Basic FTP SSL SSH 802 1x SNMP Firewall LDAP DDNS RTSP GB28181 System Date Time Maintenance User Management Event Alarm Handler Motion Detection Tampering Alarm Object Detection FTP Upload SMTP Notification N...

Page 15: ...mart ROI Enables or disables Smart ROI feature Enabling it will increase the bit rate of moving objects and make them clearer Bit rate of images around the moving objects will not be modified Frame Rate Adjusts the frame rate of the video stream the range is 1 30FPS The stream will be off if 0 is selected Smart FPS Enables or disables Smart FPS feature Enabling it will increase the FPS to 30FPS wh...

Page 16: ...re H 265 and H 264 Resolution Configures the resolution of the video stream The available options are 1280x720 640x480 640x360 and 320x240 Rate Control Configures the Rate Control mode as CBR constant bit rate or CVBR constrained variable bit rate for the stream Frame Rate Adjusts the frame rate of the video stream the range is 0 30FPS The stream will be off if 0 is selected GOP Length Configures ...

Page 17: ...y Configures the video quality of the stream The options are High Nor mal and Low Frame Rate Adjusts the frame rate of the video stream the range is 1 30FPS The stream will be off if 0 is selected Save Save button to apply the configurations click on this button once all the settings are confirmed for the new changes to take effect Video Configuration Cont ...

Page 18: ...Control and BLC cannot be edited Only Exposure Time can be edited the range is 1 7 1 20000 Adjustment Adjusts the weighting from 0 255 Users can enter the value or adjust it through the slider bar Exposure Time Control The available options are OFF 1 30 1 15 1 7 5 and User Define Select User Define to enter the values of Maximum Exposure Time the range is 1 7 1 30 and Minimum Exposure Time the ran...

Page 19: ...o bright backlight glare or high contrast lighting The available options are OFF Auto and 1 10 values AWB Mode Auto White Balance Mode White balance allows the camera to produce more accurate colors under different lighting conditions The default setting is Auto White Balance which automatically adjusts the white balance to suit the current lighting condition You can also adjust the white balance ...

Page 20: ...e Night and Switch Schedule IR Control Select the IR control mode to use The available options are High Medium and Low IR Cut Control Select the IR cut control mode to use The available options are Auto Force Day and Force Night Save Save button to apply the configurations click on this button once all the settings are confirmed for the new changes to take effect Note To make configuration simple ...

Page 21: ...vibrations caused by strong winds or earthquakes Sharpness Adjust Configures the sharpness of the image the range is 0 255 with 0 being the lowest sharpness Enter the values or adjust the bar to increase or decrease the values The default value is 127 Saturation Adjust Configures the color saturation of the image the range is 0 100 with 0 being the lowest saturation Enter the values or adjust the ...

Page 22: ...just Configures the overall hue of the image the range is 0 100 Increasing the value will adjust the image hue towards red Decreasing the value will adjust the image hue towards blue The default value is 50 Restore Settings to Defaults Discards all the settings applied to the image and reset to the default settings Default All Image Settings Discards all the settings applied to the image and rever...

Page 23: ...ROI zones that can be configured zone 1 zone 5 Switch to ON to enable ROI function The default is OFF 3 Set the image quality of the ROI in the Level drop down menu the options are Low Medium or High 4 Select the area to set the ROI by holding down the mouse button and drag to make a rectangular square release the button once the desired area is covered 5 Press the Set Area button for the setting ...

Page 24: ...one function The default is OFF 2 Select the area to set the privacy zone by holding down the mouse button and drag to make a rectangular square release the button once the desired area is covered 3 Press the Set Area button for the setting to take effect The masked area will be filled with black and the label Mask will be seen on the video stream 4 Press the Del Area button or select OFF to delet...

Page 25: ...llow Text Overlay There are 4 content positions Top Left Top Right Bottom Left and Bottom Right to display the camera name current date time and text overlay Content OFF The default setting is OFF Date Time Displays the current date time Camera Name Displays the device name Camera Name Date Time Displays the device name and date time Custom Text A customized text can be specified here Save Save bu...

Page 26: ...ateway primary and secondary DNS server address System Settings HTTP Port Configures the HTTP port number of the web configuration menu HTTPS Port Configures the HTTPS port number of the web configuration menu Hardware Address Unique MAC address for each camera device IPv6 Settings Enables or disables IPv6 function To manually input an IP address enable IPv6 and input the address prefix default ro...

Page 27: ...Basic Cont RTMP Settings RTMP Enables or disables RTMP function URL Configures the web URL address Save Save button to apply the configurations click on this button once all the settings are confirmed for the new changes to take effect ...

Page 28: ...s inserted You can access files in the SD card attached to the IP camera Password Specifies the FTP login password to access the IP camera Max Connection Specifies the maximum number of FTP connections the IP camera can support Save Save button to apply the configurations click on this button once all the settings are confirmed for the new changes to take effect ...

Page 29: ...ly Optional Support for http https Required Support for https only Certificate Select Certificate Install Method Provides options to install a new CA certification Save Save button to apply the configurations click on this button once all the settings are confirmed for the new changes to take effect ...

Page 30: ...tions Enable Enables or disables SSH access to this camera Password Specifies the SSH login password to access the IP camera Save Save button to apply the configurations click on this button once all the settings are confirmed for the new changes to take effect ...

Page 31: ...tocols to enable 802 1x function The available protocols are EAP MD5 EAP TLS EAP TTLS or EAP PEAP After the protocol has been selected manually configure the username password and other required information Save Save button to apply the configurations click on this button once all the settings are confirmed for the new changes to take effect ...

Page 32: ...3 Enables or disables SNMPv3 support User Configures the SNMPv3 username Authentication Mode Configures the Authentication mode The options are None MD5 and SHA Privacy Configures encryption for SNMPv3 The options are DES and AES Trap Configuration Specifies the destination IP address to send SNMP trap messages Download MIB Download MIB file for SNMP Save Save button to apply the configurations cl...

Page 33: ...p down menu to specify the type of filtering rule applied to the IP address entered Address1 to Address8 The IP address and associated protocol TCP UDP or None to filter can be entered here A total of 8 IP addresses can be added to the list Save Save button to apply the configurations click on this button once all the settings are confirmed for the new changes to take effect ...

Page 34: ...se this feature if the camera is connected to a network with LDAP server After enabling LDAP manually configure the LDAP server and other required information Save Save button to apply the configurations click on this button once all the settings are confirmed for the new changes to take effect ...

Page 35: ...ider from the drop down menu the available providers are DynDNS NO IP and Two DNS The default option is DynDNS Username Username of the DDNS account Password Password of the DDNS account Re type Password Type the same password again for confirmation Save Save button to apply the configurations click on this button once all the settings are confirmed for the new changes to take effect ...

Page 36: ...ogin account and password Port Configures the port number for stream 1 to stream 3 The range is 554 1025 65535 Stream 1 to Stream 3 Enables or disables RTSP unicast for stream 1 to stream 3 The RTSP port number and pathname for each stream can be configured here Default URL Path of Stream 1 to Stream 3 Stream 1 rtsp cameraIP stream1 Stream 2 rtsp cameraIP stream2 Stream 3 rtsp cameraIP stream3 ...

Page 37: ...stream to start multicast streaming without using RTCP Video IP Configures the multicast address to stream video Video Port Configures the port number of the video stream Audio IP Configures the multicast address to stream audio Audio Port Configures the port number of the audio stream Meta IP Configures the multicast address for the html meta Meta Port Configures the port number of the html meta ...

Page 38: ...address of the video stream TTL Configures the time to live threshold of the multicast datagram before it is discarded by the router Save Save button to apply the configurations click on this button once all the settings are confirmed for the new changes to take effect ...

Page 39: ...ons Enable Enables or disables GB28181 settings After enabling GB28181 manually configure the related information for GB28181 settings Save Save button to apply the configurations click on this button once all the settings are confirmed for the new changes to take effect ...

Page 40: ... setting to enable NTP information retrieval Manual Select this option to configure the NTP server address manually for date and time synchronization Manually setting Manually define the date and time The format is yyyy mm dd or hh mm ss Sync with computer time Manually synchronize with the current computer date and time Time Zone Setting Time Zone Select the time zone relevant to your location in...

Page 41: ...amera s firmware click on the Browse button and locate the firmware image file once the file is selected press the Upload button to begin CAUTION CAUTION CAUTION During update please do not disconnect the network cable reset or power off the IP camera as you may damage the device Reboot Camera Click this button to reboot the camera Reset to Default Click this button to restore all the camera s set...

Page 42: ... is connecting to the PC Downloads the log file to the computer as a text file Backup Download Now Downloads the current camera settings to a backup file Restore Update and Restore Click on the Browse button and locate the backup file once the file is selected press the Update and Restore button to restore camera settings Video System Options to switch between NTSC or PAL video system The camera w...

Page 43: ...or s authorization Re type Password Retype the same password to confirm User List Displays user accounts available on the camera Press New User to add a new account and set up the authorization level of this user from the following User Information Press Give Up to delete the new user if you do not want to set up continually To delete an account press the Delete User button ...

Page 44: ...trol read write over every configuration menu item Views Only has access read to the live view of the camera main screen User Name Username must be at least 1 and up to 16 characters Password Password must be at least 1 and up to 16 characters Re type Password Retype the same password to confirm Save Save button to apply the configurations click on this button once all the settings are confirmed f...

Page 45: ... holding down the mouse button and clicking the time block to enable the schedule settings on the selected time A light blue color on the time block indicates that the alarm schedule is enabled while a light grey color indicates that the alarm schedule is disabled Alternatively you can manually enter numbers to configure the hours and minutes from start to end for all weekdays Save Save button to ...

Page 46: ...yout to use for motion detection You can configure up to 5 zones The instructions below illustrate how to set up 5 zones 1 To create zone 1 on the live video screen select the area to set the zone by holding down the mouse button and drag to make a rectangular square release the button once the desired area is covered 2 Press the Set Area button in zone 1 to set this area as motion zone 1 3 Repeat...

Page 47: ...king the time block to enable the schedule settings on the selected time A light blue color on the time block indicates that the alarm schedule is enabled while a light grey color indicates that the alarm schedule is disabled Alternatively you can manually enter numbers to configure the hours and minutes from start to end for all weekdays Save Save button to apply the configurations click on this ...

Page 48: ...settings automatically Configure the scheduled time by holding down the mouse button and clicking the time block to enable the schedule settings on the selected time A light blue color on the time block indicates that the alarm schedule is enabled while a light grey color indicates that the alarm schedule is disabled Alternatively you can manually enter numbers to configure the hours and minutes f...

Page 49: ...triggering events on the live video screen select the area by holding down the mouse button and draw the Line crossing lines release the button once the desired area is covered Then select the Two way or One way option trigger method from the Direction drop down menu Note Object detection function must be enabled in the Network Storage menu to enable event triggers Zone counting To create a Zone c...

Page 50: ...tion of counting method Count Displays the counting result One way for Line Counting There will be two parallel lines red and green Only objects passing the green line first will be calculated and counted If the green line is on the right it will be counted as Right in Count if the green line is on the left it will be counted as Left in Count Two way for Line Counting There will be two parallel li...

Page 51: ...t Reset Resets all the counting results of Line Counting or Zone Counting to zero Setup Detection Area Enable Enables or disables the detection area for monitoring objects When enabled the minimum and maximum width and height of the detection area can be configured through the slider bars Save Save button to apply the configurations click on this button once all the settings are confirmed for the ...

Page 52: ...king the time block to enable the schedule settings on the selected time A light blue color on the time block indicates that the alarm schedule is enabled while a light grey color indicates that the alarm schedule is disabled Alternatively you can manually enter numbers to configure the hours and minutes from start to end for all weekdays Save Save button to apply the configurations click on this ...

Page 53: ...ion Trigger Sabotage Detection Trigger Object Detection Trigger Scheduled Remote Server Host Address Specifies the host name or IP address of the FTP server Port Specifies the port number of the FTP server Username Specifies the login username for the FTP server Password Specifies the login password for the FTP server Save Save button to apply the configurations click on this button once all the s...

Page 54: ...dress of the sender Trigger Event Configures which type of event trigger to enable and the SMTP server address that the camera will connect to The options are Trigger Alarm Detection Trigger Motion Detection Trigger Sabotage Detection Trigger Object Detection Message Specifies the message content Subject Specifies the subject of the message Attach JPEG Snapshot Enables or disables email delivery o...

Page 55: ...pecifies the login password for the SMTP mail server Authentication Mode Specifies the SMTP server authentication mode the options are NO_AUTH SMTP_PLAIN LOGIN and TLS_TLS Recipient List Specifies the email address to send the email when an event is triggered by Alarm Motion Sabotage or Object A maximum of 10 email addresses can be configured Save Save button to apply the configurations click on t...

Page 56: ...ra will connect to The options are Enable Trigger Alarm Detection Enable Trigger Motion Detection Enable Trigger Sabotage Detection Enable Object Detection Enable Trigger Scheduled Recipient Setup Network Storage Status Displays the current connection status with the network storage server not_mounted or ok Network Address Specifies the IP address of the network storage server Share Specifies the ...

Page 57: ...er All the video recordings or snapshots from event triggers will be uploaded to the network storage server After the setting is complete the Network Storage Status field will display ok Remove Delete the previous setting or set up a new one After the setting is removed the Network Storage Status field will display not_mounted Save Save button to apply the configurations click on this button once ...

Page 58: ...en a motion detection event is detected the Alarm out will be triggered Trigger Sabotage Detection When a sabotage detection event is detected the Alarm out will be triggered Trigger Object Detection When an object detection event is detected the Alarm out will be triggered Types The options are N O and N C Off Time Configure the seconds from 0 to 30 seconds Save Save button to apply the configura...

Page 59: ...nstalled this section will display information on the availability of the SD card Usage If an SD card is installed this section will display the percentage of the total storage used Format SD Card Formats the SD card all data stored on the SD card will be erased if this option is used Status Displays whether an SD card is installed or not If an SD card is detected ok will be displayed if an SD car...

Page 60: ... Snapshot Interval Configures the interval of post event snapshots The options are 1 3 5 and 10 FileName Prefix Configures a prefix to append to the filename The default prefixes for Alarm Motion Tamper and Object Detection are Alarm Motion Tamper and Object respectively The format of the filenames Alarm_yyyymmddhhmmss Motion_yyyymmddhhmmss Tamper_yyyymmddhhmmss Object_yyyymmddhhmmss Server Path C...

Page 61: ...larm Motion Tamper and Object respectively The format of the filenames Alarm_yyyymmddhhmmss Motion_yyyymmddhhmmss Tamper_yyyymmddhhmmss Object_yyyymmddhhmmss Post event Record Configures the length of the post event recording The range is 5 100 seconds Server Path Configures a folder name on the SD card The default folder names for Alarm Motion Tamper and Object Detection are Alarm Motion Tamper a...

Reviews: