background image

User Manual in Original

Dok. ref: 550A_GKF_am_sv_210525
DISPERATOR AB


Tel: 08-724 0160   


E-mail: [email protected]

Mälarvägen 9, 141 71 Segeltorp   


Web page: www.disperator.se

7 / 35

6 / 35

1.2.   Personnel Qualifications and Training

All personnel managing 

the below tasks for the machine as described in this manual, must have the 

necessary qualifications to carry out this work. 

Areas of responsibility, scope of authority and staff 

supervision must be carefully defined by the machine owner. If the personnel do not have the necessary 

qualifications for this, they must receive training and instructions. Such training can be provided by the 

manufacturer / supplier. Moreover, it is the responsibility of the machine owner to make sure that all 

users read and understand the content of this User Manual.

Moving the Machine

Staff responsible for moving the machine must have knowledge about the handling of the lifting gear 

and stopping devices and have knowledge of applicable safety regulations for these. If they lack this 

knowledge, they must receive the required training.

Installation

Personnel responsible for the installation of the machine must have knowledge equivalent to education 

in industrial mechanics/technician. The electric connection must be performed by trained and certified 

electrician.

Commissioning and Maintenance

Personnel responsible for commissioning, overhaul and maintenance of the machine must be familiar 

with all functions, and how to operate these functions. Furthermore, they must know of all safety 

precautions in this manual, and which in other respects also are valid where the machine is used. 

Operation

All persons who operate and maintain the machine must be aware of the risks that may occur with its use 

and as described in this manual.

Service and Repair

Responsible personnel for service and repair of the machine must have knowledge equivalent to 

education in industrial and design mechanics, and also know and understand the technical data of the 

machine described in this manual. Assisting personnel for these jobs must be trained and performed 

repair work must be checked by the machine owner.

Summary of Contents for EXCELLENT 550A-GKF Series

Page 1: ...ES Product Description Installation Safety Operation Service USER MANUAL User Manual in Original Dok ref 550A_GKF_am_en_210525 DISPERATOR AB Tel 08 724 0160 E mail info disperator se Mälarvägen 9 141 71 Segeltorp Web page www disperator se ...

Page 2: ......

Page 3: ...User Manual in Original Dok ref 550A_GKF_am_sv_210525 DISPERATOR AB Tel 08 724 0160 E mail info disperator se Mälarvägen 9 141 71 Segeltorp Web page www disperator se ...

Page 4: ..._______________________________ 13 6 1 1 Deployment of the Machine____________________________________________ 13 6 2 1 Supply Voltage______________________________________________________ 13 6 2 2 Mains Fuses________________________________________________________ 13 6 2 3 Wall Bulkhead Mounted Electrical Security Breaker________________________ 13 6 2 4 Cable Dimension___________________________...

Page 5: ...______________________ 21 9 3 2 Check of the Automatic Function for Collection of Glass Dust_________________ 21 9 3 3 Other Checks_______________________________________________________ 21 9 4 Dismantling of the Machine______________________________________________ 22 9 5 Assembly of the Machine________________________________________________ 26 9 6 Intervals for Overhaul and Maintenance_________...

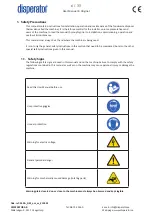
Page 6: ...e at hand where the machine is being used It is not only the general safety instructions in this section that need to be considered but also the other special safety instructions given in this manual 1 Safety Precautions 1 1 Safety Signs The following safety signs are used in this manual and on the machine Failure to comply with the safety regulations contained in this manual as well as on the mac...

Page 7: ... safety regulations for these If they lack this knowledge they must receive the required training Installation Personnel responsible for the installation of the machine must have knowledge equivalent to education in industrial mechanics technician The electric connection must be performed by trained and certified electrician Commissioning and Maintenance Personnel responsible for commissioning ove...

Page 8: ...r the food processing industry which enables efficient collection of communited food leftovers for anaerobic digestion or composting in subsequent stages which is of benefit to society With over 70 years of experience in the development and production of such equipment our devotion to this has resulted in the unique operational reliability required for the extreme conditions prevailing in the mari...

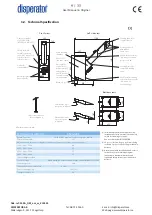
Page 9: ... ref 550A_GKF_am_sv_210525 DISPERATOR AB Tel 08 724 0160 E mail info disperator se Mälarvägen 9 141 71 Segeltorp Web page www disperator se 9 35 3 2 Technical Specification 616 82 1166 1318 848 365 365 145 455 295 89 35 1347 295 ...

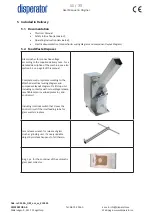
Page 10: ...ivered with two wheels which are mounted at the back of the bottom plate Upon delivery the glass cross can be moved by gently lifting its inlet feeding tube so that the front of the machine is lifted from the floor whereupon the machine can be rolled to its final installation site For marine installation of the glass crusher foot fixtures or vibration insulators are available as alternative to the...

Page 11: ...ram Start stop unit including contactor with zero voltage release resettable motor overload protector and control coil Including interlock switch that closes the control circuit if the inlet feeding tube for glass waste is in place Jam release wrench for release of glass crusher grinding unit if a non grindable object by mistake happens to fall therein Bag 1 pc for the container of the automatic g...

Page 12: ...sv_210525 DISPERATOR AB Tel 08 724 0160 E mail info disperator se Mälarvägen 9 141 71 Segeltorp Web page www disperator se 12 35 Reinforced plastic bag start package of 10 pcs for connection to the machine s outlet for collection of crushed glass ...

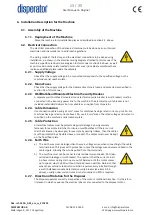
Page 13: ...but is available as an option from Disperator 6 2 4 Cable Dimension Use connection cable having 1 5 mm wires for machines having a rated current up to 14A For machines having a rated current above 14A use 2 5 mm wires The rated voltage and current is specified on the machine s serial number plate 6 2 5 Cable Protection All electrical cables must be protected against damage by being securely fasten...

Page 14: ...tion is not disturbed by foreign objects 4 Make sure that the safety interlock switch works properly according to section 6 2 8 above If the machine fails to operate see section 8 3 Trouble shooting in this manual Before the documentation and the jam release wrench for the crushing unit are handed over to the personnel responsible for the machine instruct this personnel about the operation and dai...

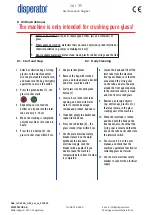
Page 15: ... stop button if e g metal caps or other non crushable materials accidentally are dropped into the crusher or if unfamiliar noises are heard See section 8 3 Trouble shooting in this manual 4 If the glass crusher is running even though the inlet feeding tube above the crusher is removed press the red stop button switch off and lock the main electrical safety switch and call for service 5 The main el...

Page 16: ...ty breaker placed on the wall bulkhead to disconnect electrical supply Lock the breaker with a padlock if you need to leave the machine temporarily before item 11 below is completed 8 Loosen the knob and lift off the inlet tube from the machine front panel Make sure that the area around the O ring seal on the tube and also the area around the front panel opening to the interlock switch is clean an...

Page 17: ... the crushing unit e g metal caps 9 Make sure that the area around the O ring on the inlet feeding tube and also the area around the front panel opening to the safety interlock switch is clean and free from crushed glass 10 Refit the inlet feeding tube and fix it by turning the knob At the same time ensure that the key mounted on the tube can easily slide into the safety interlock switch in the fr...

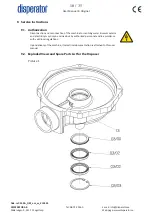
Page 18: ...e 1 9 Service Instructions 9 1 Authorization 9 2 Exploded Views and Spare Parts List for the Disposer Disconnection and reconnection of the machine to incoming water sewer service and electricity may only be carried out by authorized personnel and in accordance with valid local regulations Upon delivery of the machine its electrical documentation is attached to this user manual ...

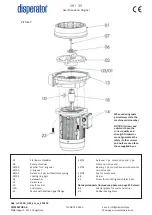
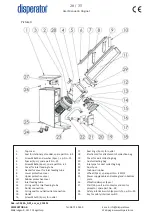
Page 19: ...an those supplied by us 01 Stationary shredder 02 Rotary shredder 03 00 Washer for V ring seal 03 01 V ring seal 03 02 Axle seal 2 pcs with stainless spring 03 03 Locking ring SgH 06 Axle washer 07 Axle screw 10 Key for carrier 13G End shield 14 Motor with drained upper flange 14 01 Axle seal 1 pc motor drive end 1 pc motor non drive end 14 02 Bearing 1 pc motor drive end 1 pc motor non drive end ...

Page 20: ...bber protective cover 11 Inlet feeding tube 12 O ring seal for inlet feeding tube 13 Outlet connection 14 O ring seal for outlet outlet connection 15 Outlet 16 Screw M5x10 4pcs for outlet 17 Seal rings 2pcs for outlet 18 Elastic cord for attachment of collection bag 19 Cover for dust collecting bag 20 Dust collecting bag 21 Inlet pipe for dust collecting bag 22 Dust hose 23 Toeboard rubber 24 Whee...

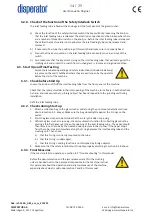
Page 21: ... slide into and out of the interlock switch 9 3 2 Check of the Automatic Function for Collection of Glass Dust While the glass crusher is running check its automatic function for collecting glass dust by placing a thin flat paper over the entire opening of the inlet feeding tube The paper should then remain on the tube by the created under pressure in the crusher If the paper drops it leaks somewh...

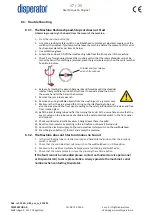
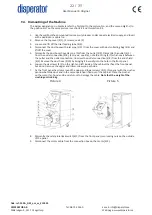
Page 22: ...let 4 5 from the outlet connection 4 8 4 screws see 4 6 note the O ring 4 7 which seals between the outlet and the outlet connection Unscrew the outlet connection 4 8 from the end shield 4 9 Remove the dust hose 4 10 by bringing it inwardly into the hole in the front panel 6 Loosen the six screws 5 1 on the right and left inside of the cabinet that fixes the front panel but do not remove the upper...

Page 23: ...aced when reassembling 11 Pry the stationary shredder 2 01 loose from the end shield 2 13 using a crowbar that levers against the large tooth on the inside rim and is supported by the rotary shredder 2 02 close to one of its two shredder blades See photos below 12 Loosen the axle screw 2 07 If the rotary shredder 2 02 keeps turning and cannot be held still manually use a pipe wrench to hold one of...

Page 24: ...n apply pressure to the washer 1 03 00 in order to get the two axle seals 1 03 02 out See below photos Again make sure that the surface of the washer 1 03 00 is in good condition Also examine the contact surface of the carrier 2 18 for wear caused by the axle seals 1 03 02 There should only be two small symmetrical tracks on the carrier if it has been running correctly Are tracks severe asymmetric...

Page 25: ...ole for possible condensation water should be provided through the upper motor flange see arrow on the photo below and see the existing motor for the location of this hole i e straight below the crusher outlet on the end shield 2 13 and 180 offset relative to the connection box on the motor 2 14 If drilling this hole in the motor it is important to drill at the correct angle so that there is no da...

Page 26: ...als shall be placed with the groove and stainless spring upwards towards the washer 1 03 00 Both photos show the end shield 1 13 with the mounted seals 2pcs from its lower side which will face the motor 9 The seals are fixated by fitting the locking ring 1 03 03 into the groove in the end shield 1 13 Tap on this ring to ensure that it is seated properly in the groove in the end shield 10 With a cl...

Page 27: ...essed down 21 Carefully position the stationary shredder 2 01 with its inner large tooth see the red arrow on picture 2 above at the opposite side of the outlet on the end shield 2 13 22 Tap around the top of the stationary shredder 2 01 with a plastic hammer to fix it in the end shield 2 13 and make sure that the stationary shredder is all the way down in the seat of the end shield 23 Secure the ...

Page 28: ... panel has slots for the upper and lower screws 8 1 Lift in the crusher in the cabinet by letting the lower screws enter the lower panel slots and thereafter in the same operation fold in the panel into the cabinet so that the upper screws enter the upper panel slots Be careful not to damage the power cable Note that the weight of the crushing unit is 60 kg 30 Assemble and tighten the screws 8 1 6...

Page 29: ... the outlet 9 5 on the outlet connection 4 screws 9 6 with the O ring 9 7 that seals between these two parts 34 Assemble the dust hose 9 10 with hose clamp on the outlet 9 5 35 Connect the dust hose with inlet pipe 9 11 to the cover with dust collecting bag 9 4 and refit it to the cabinet 36 Make sure that the O ring 3 12 on the inlet feeding tube 9 3 and its front panel sealing surface are clean ...

Page 30: ...e by the created under pressure in the crusher If the paper drops the dust collecting bag is clogged and must be replaced If the paper drops even though the bag is not clogged perform the checks as per section 9 3 2 Overhaul of interlock switch vacuum function for dust assembly First time after a month then when needed See section 9 3 in this user manual Preventive maintenance After crushing of ab...

Page 31: ...03 02 Axle seal with stainless spring 2 pcs 1 2 03 03 Locking ring 1 pc 2 04 Special grease for seals and carrier 1 pc 3 05 Seal for stationary shredder 1 pc 2 07 Axle screw 1 pc 2 09 Rubber sealing compound 1 pc 2 10 Key for carrier 1 pc 2 23 Screw for end shield assembly 4 pcs Service Package 2 Picture No Spare Part No Denomination Qty 2 01 Stationary shredder 1 pc 2 02 Rotary shredder 1 pc 1 2 ...

Page 32: ...astic cord for attachment of collection bag for crushed glass 1 pc 3 17 Seal rings for outlet 2 pcs 3 12 O ring seal for inlet feeding tube 1 pc 3 14 O ring seal for outlet outlet connection 1 pc 3 10 Rubber protective cover 1 pc 3 9 Rubber gasket for upper protective cover 1 pc 3 8 Rubber gasket for lower protective cover 1 pc 3 7 Gasket for cover for inlet feeding tube 1 pc 3 22 Dust hose 1 pc 3...

Page 33: ...are Parts Below spare part numbers refer to the exploded views of the machine in section 9 2 02 Rotary shredder 1pc 03 00 Washer for V ring seal 1pc 03 01 V ring seal 1pc 03 02 Axle seal with stainless spring 2pcs 03 03 Locking ring 1pc 04 Special grease for seals and carrier 1pc 05 Seal for stationary shredder 1pc 06 Axle washer 1pc 07 Axle screw 1pc 01 Stationary shredder 1pc 09 Rubber sealing c...

Page 34: ... end 1pc 14 02 Motor bearing drive end 1pc and non drive end 1pc 14 03 Key for motor shaft 1pc 18 Carrier 1pc 18 02 Screw for dismantling of carrier 1pc 23 Screw for mounting of end shield 4pcs 25 Screws spacer and washer for mounting front panel on the crusher unit 4pcs of each 31 Jam release wrench for rotary shredder 1pc 13 End shield 1pc 38 Start stop unit incl contactor with coil start contac...

Page 35: ... page www disperator se 35 35 38 3 Motor overload protector 1pc 39 Safety interlock switch key switch 1st 39 1 Key for interlock switch 1pc Bag for the container of the auto matic glass dust collector 1 set 5 pcs Reinforced plastic bag for connec tion to the machine s outlet for collection of crushed glass 1 set 100 pcs 38 2 Start contact 1pc ...

Reviews: