Dish TV satBox-mini S7030PVR User Manual Download Page 8


Note:  When  connecting  the  receiver  to  other  equipment,  e.g.,  TV,  VCR  and 
amplifier, make sure to refer to relevant user manuals for instruction. Also, make 
sure  you  disconnect  all  the  equipment  from  the  mains  supply  before  the 
connection is made 


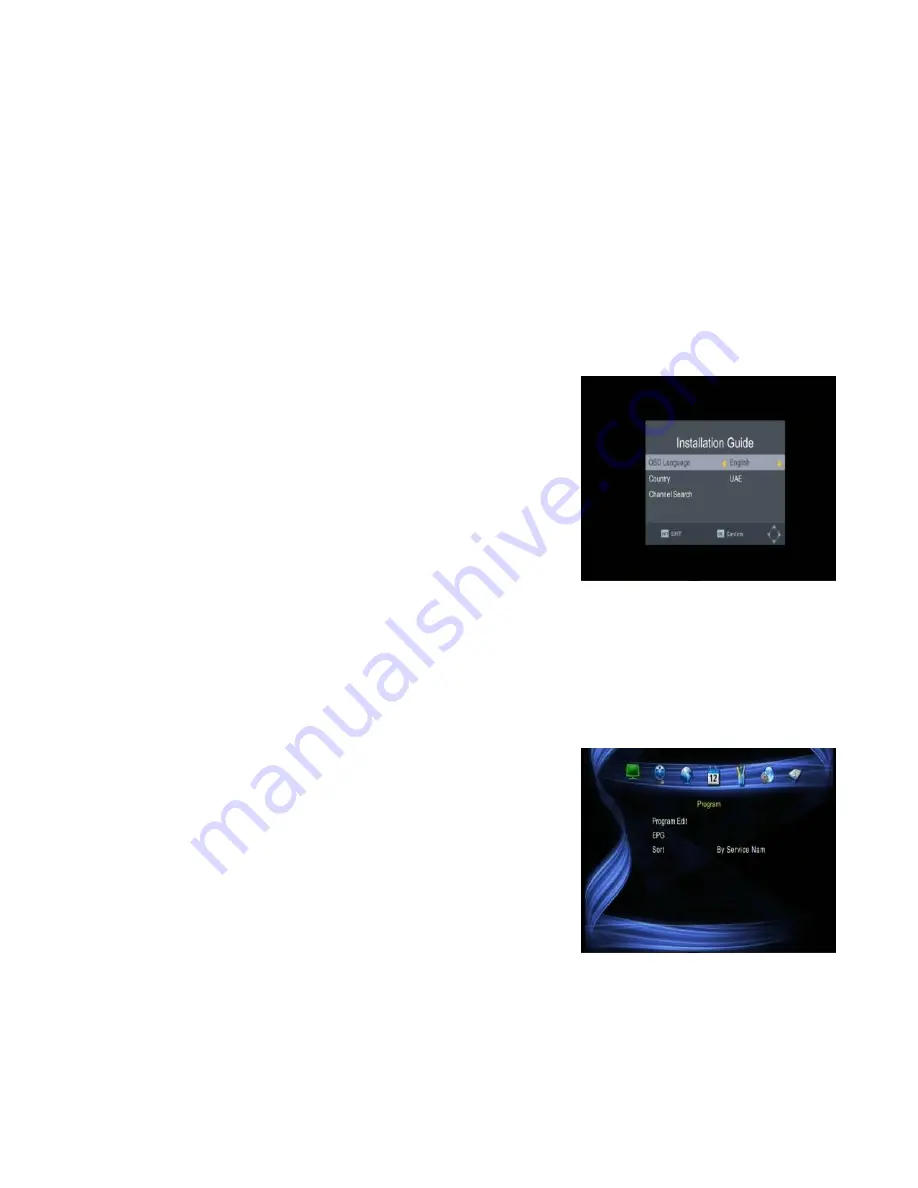
4 First Time Installation 

After  all  connections  have  been  made  properly, 
switch  on  TV  and  make  sure  the  receiver  is 
connected  to  the  main  power.  Press  the  power 
button  to  switch  receiver  on.  If  you  are  using  the 
receiver  for  the  first  time  or  restored  to  factory 
default,  the  main  menu  will  appear  on  your  TV 
screen. 

(1)

 Select [OSD Language] and press RIGHT/LEFT 

key to select a language.   

(2)

 Select [Dish Setup] and press RIGHT/LEFT/OK to   

Dish Setup menu. 

(3)

 Once channel tuning is complete, you will be 

ready to watch TV.   


4.1 Program Manager Settings 

To  access  the  menu,  press  the  MENU  button  and 
select  [Program].This  menu  provides  options  to 
adjust  the  program  settings.  Select  an  option  and 
press OK or RIGHT to adjust that setting. Press the 
EXIT button to exit the Menu. 


Summary of Contents for satBox-mini S7030PVR

Page 1: ...S7030PVR User Manual...

Page 2: ...ng is required when the apparatus has been damaged in any way such as power supply cord or plug is damaged liquid has been spilled or objects have fallen into the apparatus the apparatus has been expo...

Page 3: ...may be malfunction and need to reset by user WARNING The USB memory stick should be plugged in the unit directly USB extension cable should not be used to avoid failing of data transferring and inter...

Page 4: ...7 4 1 3 Sort 7 4 2 Video Setting 7 4 2 1 Aspect Ratio 7 4 2 2 Resolution 8 4 2 3 TV format 8 4 3 Channel Search 8 4 3 1 Satellite 8 4 3 2 Transponder 10 4 4 Time Setting 11 4 5 Option 11 4 6 System 11...

Page 5: ...LNB to receive the signal 3 RS232 For data transport 4 IR Used to connect the remote Sensor 5 HDMI This socket connects to HDMI in device 6 AV composite video and Audio L R 7 DC IN 12V Used to connect...

Page 6: ...ing media play 14 PLAY Starts or resumes media play 15 STOP Stops media play 16 STANDBY Switch the product to on or standby 17 VCR switch TV VCR 18 Audio Selects an Audio Language or Audio Mode 19 0 9...

Page 7: ...the front of the infrared sensor The remote control has a range of up to 7 meters from the infrared sensor at an angle of up to 60 degrees The remote control will not operate if its path is blocked Su...

Page 8: ...r button to switch receiver on If you are using the receiver for the first time or restored to factory default the main menu will appear on your TV screen 1 Select OSD Language and press RIGHT LEFT ke...

Page 9: ...ram 1 Press the favourite button and the favourite menu will appear 2 Press UP DOWN to select your favourite programs 3 Press OK to select your favourite program Delete a TV or Radio Program 1 Select...

Page 10: ...n on the remote control to access the guide You can use the UP DOWN key to select the preferred program If there is more than one page of information use the BLUE button for page up and the YELLOW but...

Page 11: ...channel settings Select an option and press RIGHT LEFT to adjust the settings Press EXIT to exit the menu 4 3 1 Satellite Configure the settings of satellites Satellites list Press Up Down to select...

Page 12: ...d to add a new satellite in which you must input a unique longitude and edit the satellite s name with soft keyboard Edit satellites Press Green to edit the selected satellite Delete satellite Press Y...

Page 13: ...Red to add a new transponder It can t save an existing TP under the same satellite Edit transponder Press Green to edit the selected transponder It can t save an existing TP under the same satellite D...

Page 14: ...s this Menu press MENU and select Option The menu provides options to adjust the OSD Language Subtitle Language and Audio Language Select an option and press RIGHT LEFT to adjust the setting Press EXI...

Page 15: ...n which support multi recall program switching 4 6 5 Software update Select to start software update if USB is connecting and there s an upgrading file 4 7 USB To access the Menu press the MENU button...

Page 16: ...btitle in grey background Yellow green Displays the subtitle in yellow green background Subtitle Font Color Red Displays Subtitle in red font Blue Displays Subtitle in blue font Green Displays Subtitl...

Page 17: ...ound Switch on the correct volume control Incorrect sound track Try another sound track Only sound no image on the screen No or incorrect connection with AV cable Connect the audio cable correctly The...

Page 18: ...tions LNB IN F connector USB USB 2 0 IR Extender Receive the signal for the RC HDMI Connects to HDMI in device Power Input 100 240V 50 60Hz Consumption Max 10W Display Decoder Module PAL NTSC Resoluti...

Page 19: ...16...

Reviews: