background image

Changing the Remote Control Address

16

104333 

C

HANGING


THE

 R

EMOTE

 C

ONTROL

 A

DDRESS

Note:

  Do not change the address of the remote unless absolutely 

necessary

because the remote cannot control the receiver if the two 

devices have different addresses.  If you start doing this procedure and 
then do not press any button for 20 seconds, the remote will end the 
procedure.  Just start over again.

Note:

  This procedure shows examples of menu options.  The options 

that you see may differ.

8. If the code you entered does not work, repeat steps 3 through 7 

using another code from the tables.

9. If you have tried all of the codes listed for the device without 

success, or if you cannot find the device brand name in the 
tables, see Device Code Scan on pag e20.

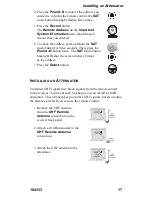
1. Display the 

Important System Information

 menu.  

Note the 

Remote Address

 shown on this menu.

To do this:

Either:

  Press the 

System Information


button.

or:

  a)  Press the 

Menu

 button.

       b)  Select the 

System Setup

 option.


Note:

  This step does not apply 

            to some receivers.
       c)  Select the 

Installation

 option.

      d)  Select the 

System Info

 option.

or:

2. Press and hold the 

SAT

 mode button about three 

seconds, until all the mode button backlights 
come on, and then release the 

SAT

 button.

3. Use the number buttons to enter a number 

from 1 to 15.  The 

SAT

 mode button backlight 

will blink off after you enter each digit, and then 
come on again.

Summary of Contents for 104333

Page 1: ...AUX Auxiliary Mode for Tuner or Amplifier page 13 Remote Control Procedures page 15 Controlling a Device page 15 Changing the Remote Control Address page 16 Installing an Attenuator page 17 Controllin...

Page 2: ...signals travel so far the receiver may respond to signals from other nearby remote controls To handle this problem see Changing the Remote Control Address on page16 If this does not work see Installi...

Page 3: ...OTE CONTROL MODES To use the remote to control a device such as the satellite receiver or a TV you must first set up the remote to control the device and then set the remote to the right mode for that...

Page 4: ...in SAT mode you can press the AUX mode button to turn the television ON or OFF This allows you to turn the TV on or off without leaving SAT mode TV VIDEO BUTTON If you connect the receiver using only...

Page 5: ...Program Guide a Themes menu a Favorite List an Event Timers list or a list of channels MUTE BUTTON Press this button to turn off the sound Press it again to restore the sound VOLUME BUTTON Press the l...

Page 6: ...more choices When the Program Guide is open press these buttons to move the highlight among the programs To enter a number in a menu highlight the place where you need to enter the number Then press...

Page 7: ...on that program When the receiver is OFF press this button to display the Important System Information menu VIEW BUTTON Press this button to return to watching a program If you are watching a program...

Page 8: ...then pressing the Select button Use these buttons to enter numbers in a menu To do this first highlight the place where you need to enter the number Next press a number button or you can use theUp Dow...

Page 9: ...the remote inTV mode to use the buttons as described in this section TV VIDEO BUTTON If the TV has video input options use this button to switch the TV among those options POWER BUTTON Press this butt...

Page 10: ...To use the remote to operate a VCR you must first set up the remote to control the VCR See Controlling a Device on pag e15 Then you must press the VCR mode button to set the remote to VCR mode The VC...

Page 11: ...OWN LEFT RIGHT ARROW BUTTONS The Up arrow button works as the Stop button Press this button to stop a videotape The Down arrow button works as the Pause button Press this button to pause a videotape P...

Page 12: ...how that the remote is set to AUX mode Make sure to keep the remote in AUX mode to use the buttons as described in this section MUTE BUTTON Press this button to turn off the sound Press it again to re...

Page 13: ...ng Press it again to switch between the last two channels that you watched NUMBER BUTTONS Use these buttons to enter numbers in a menu STAR BUTTON Use this button to set up the remote control inAUX mo...

Page 14: ...sure to keep the remote in AUX mode to use the buttons as described in this section MUTE BUTTON Press this button to turn off the sound Press it again to restore the sound VOLUME BUTTON Press the lef...

Page 15: ...hat start on page 22 If the brand is not listed seeDoing the Device Code Scan on pag e20 3 Press and hold the mode button for the device that you want the remote to control for about three seconds Whe...

Page 16: ...9 If you have tried all of the codes listed for the device without success or if you cannot find the device brand name in the tables see Device Code Scan on pag e20 1 Display the Important System Info...

Page 17: ...rol the SAT mode button backlight flashes three times 5 Press the Record button The Remote Address on the Important System Information menu should match the one that you entered 6 To check the address...

Page 18: ...at the receiver remotecan control the sound volume To change the way sound volume is controlled do the following Note This procedure shows examples of menu options The options that you see may differ...

Page 19: ...me setting using any remote mode do the following To switch back to TV volume control do the following 1 Press and hold the AUX mode button for three seconds then release it 2 Press the Pound button 3...

Page 20: ...uttons to enter a number as follows 0 is for a second TV 1 is for a second VCR and 2 is for an audio amplifier or cable TV box Then press the Star button 3 Press the Power button 4 Press the Up or Dow...

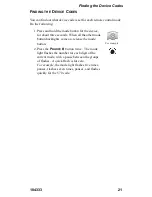
Page 21: ...for about three seconds When all the other mode button backlights come on release the mode button For example 2 Press the Pound button twice The mode light flashes the number for each digit of the cur...

Page 22: ...698 712 719 Daytron 526 695 Dixi 532 588 620 Dumont 695 Electrohome 526 573 709 713 Elta 532 Emerson 526 527 528 533 534 535 536 537 538 539 540 541 573 622 691 692 695 696 699 720 Envision 506 712 Et...

Page 23: ...2 609 SBR 588 Schneider 588 Scott 526 534 537 541 593 600 691 696 701 Sears 503 523 534 542 563 589 590 594 595 596 598 599 601 602 603 604 617 695 703 Seimitsu 695 Sharp 526 585 591 605 606 607 608 6...

Page 24: ...1 607 608 609 MTC 544 580 588 Multitech 588 589 591 NAD 573 NEC 530 531 532 562 592 594 599 600 601 602 603 604 Olympic 553 Optonica 585 Orion 506 507 Panasonic 521 522 523 524 526 553 554 598 614 628...

Page 25: ...wood 2676 Luxman 2681 LXI 2665 Marantz 2651 Memorex 2675 NAD 2669 Nakamichi 2671 Onkyo 2660 2662 2678 Optimus 2664 Panasonic 2652 Pioneer 2658 2675 2679 Proton 2654 Quasar 2652 RCA 2655 Realistic 2665...

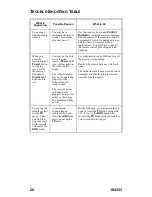
Page 26: ...s on if other lights in the room are too bright The remote control may not be operating properly or the batteries may be weak or dead The receiver power cord may not be plugged into a power outlet or...

Page 27: ...extenders called pyramids Electronic devicesexhibit ultra high frequency UHF interference The extenders use UHF signals to transmit signals from one room of the building to another These signals may...

Page 28: ...institutional use improper or neglected maintenance equipment sold AS IS or WITH ALL FAULTS equipment removal or reinstallation shipping damage if the equipment was not packed and shipped in the manne...

Page 29: ...card If you do not ship the defective equipment back to EchoStar within ten days after receiving the replacement your credit card will be charged the market price of the replacement If you return the...

Page 30: ...equipment properly Follow the instructions that the Representative gives you 7 Write the RA number in large clearly visible characters on the outside of the shipping box used to return the equipment...

Page 31: ...104333 31 Notes...

Page 32: ...32 104333 Notes...

Reviews: