background image

Warranty & Specifications 

IMPORTANT NOTICE

We, the manufacturer, reserve the right to change the product and/
or specifications in this manual without notification. The manual is for 
information usage only and the pictures and drawings depicted herein are 
for reference only.

Warranty Repair and Service

Do not return this product to the store for warranty issues or repair. Call 
our customer service department at 

720-287-5182,  1-877-487-8275, 

 or 

visit


www.dirtyhandtools.com

 for the location of the nearest service center.

Record the information below for future reference.

Model No.

Serial No.

Date of Purchase

Place of Purchase

Specifications


SKU/Part No. 

10071 (22-Ton) 

100408 (27-Ton) 

100342 (28-Ton)

%FTDSJQUJPO

7FSUJDBM)PSJ[POUBM-PH4QMJUUFS

.BYJNVN4QMJUUJOH'PSDF 5POT

5POT

5POT

 Engine

1

)1$$,PIMFS4) )1$$,PIMFS4) )1$$,PIMFS$)

 Maximum Log Length 

25” 

25” 

25” 

$ZDMF5JNF

4FDPOET%PXO#BDL 4FDPOET%PXO#BDL 4FDPOET%PXO#BDL

$ZMJOEFS

w%JBNFUFSYw4USPLF

w%JBNFUFSYw4USPLF

w%JBNFUFSYw4USPLF

1VNQ

5XP4UBHF(BMMPOT.JOVUF 5XP4UBHF(BMMPOT.JOVUF 5XP4UBHF(BMMPOT.JOVUF

)ZESBVMJD$BQBDJUZ

(BMMPOT.BYJNVN4ZTUFN(BMMPOT0QFSBUJPOBM

8FEHF

w)JHI)FBU5SFBUFE4UFFM

#FBN

w'PPU1MBUF3FNPWBCMF4USJQQFS1MBUFT

7BMWF

"VUP3FUVSOXJUI"EKVTUBCMF%FUFOU

 Wheels 

D.O.T. Approved 16” O.D. Road Tires

$PVQMFS

w#BMMXJUI4BGFUZ$IBJOT

"DDFTTPSJFT

8BZ8FEHF'FOEFST4UPSBHF$PWFS

 Replacement Filters 

Part # 100116 Return Filter

1BSU4VDUJPO4DSFFO

4IJQQJOH8FJHIU

-CTXJUIPVU'MVJET

605 Lbs. without Fluids 

633 Lbs. without Fluids


634 Lbs with Fluids 

644 Lbs. with Fluids 

674 Lbs. with Fluid

 Warranty, Limited 

3 Year / 2 Year / 1 Year 

3 Year / 2 Year / 1 Year 

3 Year / 3 Year / 1 Year

1

&1"$"3#"QQSPWFE4UBUF-FHBM

"TSBUFECZFOHJOFNBOVGBDUVSFS

5POOBHFBOEDZDMFUJNFTNBZWBSZEFQFOEFOUVQPONFDIBOJDBMBOEFOWJSPONFOUBMDPOEJUJPOT

1JFSDF"WFOVFt4VJUF#

-PVJTWJMMF$0t

Dirty Hand Tools is a brand of

'PS4FSWJDFPS2VFTUJPOT

Call 1-877-487-8275

720-287-5182

www.dirtyhandtools.com

Summary of Contents for 100171

Page 1: ...ers This safety alert symbol identifies important safety messages in this manual Failure to follow this important safety information may result in serious injury or death MODEL s 100171 22 Ton 100408...

Page 2: ...1JFSDF WFOVF t 4VJUF PVJTWJMMF 0 t PS 4FSWJDF PS 2VFTUJPOT Call 1 877 487 8275 720 287 5182 www dirtyhandtools com Dirty Hand Tools is a brand of...

Page 3: ...verview 11 2 Unpacking the Container 12 3 Tank and Wheel Assembly 14 4 Tank and Tongue Assembly 15 FBN SBDLFU TTFNCMZ 16 FBN BOE 5BOL TTFNCMZ 17 7 Hydraulic Line Connection 18 8 Log Catcher Installati...

Page 4: ...82 1 877 487 8275 or visit www dirtyhandtools com if you have any questions or concerns about the safe operation of this equipment INTENDED USE Do Not Use the log splitter for any purpose other than s...

Page 5: ...re attached and in readable condition Replace missing or defaced decals Contact Dirty Hand Tools at 1 877 487 8275 for replacement decals Operator Zone Decal Part 100399 Oil Level Decal Part 100207 Op...

Page 6: ...MPH TIPVME CF DVU BT TRVBSF BT QPTTJCMF UP QSFWFOU the log from rotating out of the splitter during operation Do not split logs greater than 25 in in length WORK AREA R55 5 operate the log splitter o...

Page 7: ...over the log splitter during operation 55R55 5 reach or bend over the log splitter to pick up a log 55R5 5 attempt to split two logs on top of each other 55R5 5 attempt to cross split a log 55R55 5 at...

Page 8: ...he log splitter requires careful inspection BMPOH XJUI UIF NFDIBOJDBM QBSUT F TVSF UP SFQMBDF GSBZFE LJOLFE cracked or otherwise damaged hydraulic hoses or hydraulic components 55R55 5 5 3 5 5 5by pas...

Page 9: ...n the fuel tank prior to storage to avoid the potential fire IB BSE 4UPSF HBTPMJOF JO BO BQQSPWFE UJHIUMZ TFBMFE DPOUBJOFS 4UPSF UIF DPOUBJOFS JO B DPPM ESZ QMBDF 55R Turn the fuel shut off valve on t...

Page 10: ...d on the log splitter 55R5 5 allow anyone to sit or ride on the log splitter 55R Disconnect the log splitter from the towing vehicle before operating it 55R Use care when backing up with the log split...

Page 11: ...FODI PS TPDLFU XSFODI t NN XSFODI PS TPDLFU XSFODI t NN BOE NN XSFODIFT PS DSFTFOU XSFODI t NN TPDLFU XSFODI Item Part Description Qty 1 100104 Tank Engine Assembly 1 5BOL OHJOF TTFNCMZ 5PO 5POHVF 4UB...

Page 12: ...from the plywood shipping crate shown above Due to the use of wood staples it may be necessary to use a hammer and or a crow bar to fully remove the packaging top and sides Step 2 Remove the log catch...

Page 13: ...s shown below Please note that the two hex bolts are located diagonally opposed to each other 13 Step 5 Remove Tank Engine Assembly from crate then SFNPWF UIF FBN ZMJOEFS TTFNCMZ JGU FBN Cylinder Asse...

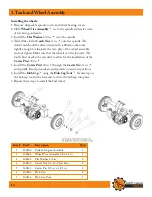
Page 14: ...spindle 4 Thread the slotted Castle Nut in onto the spindle The slotted nut should be driven down with a 28mm socket only UJHIUMZ FOPVHI UP FMJNJOBUF UIF GSFF QMBZ PG UIF XIFFM BTTFNCMZ and not tighte...

Page 15: ...r M12 and Hex Nut M12 x 1 75 in two places Tighten securely using 19mm socket wrenches Item Part Description Qty 1 100104 Tank Engine Assembly 1 5BOL OHJOF TTFNCMZ 5PO 5POHVF 4UBOE TTFNCMZ 5POHVF 4UBO...

Page 16: ...s 2 Attach the 0 5 to the Beam Cylinder Assembly VTJOH UIF GPVS CPUUPN IPMFT XJUI FY PMU Y Y NN Flat Washer M12 Lock Washer M12 and Hex Nut M12 x 1 75 in four places Tighten securely using 19mm socket...

Page 17: ...5 8 in x JO from the assembled unit as shown below 4MPXMZ CBDL UIF BTTFNCMFE VOJU VQ UP UIF FBN ZMJOEFS TTFNCMZ MJHO UIF 5POHVF SBDLFU PG UIF BTTFNCMFE VOJU UP UIF 1JWPU SBDLFU PG UIF FBN TTFNCMZ 4 On...

Page 18: ...fitting threads Install the ends of the two Hydraulic Hoses and to the Valve BT TIPXO JO EFUBJM ESBXJOH 4FDVSFMZ UJHIUFO UIF mUUJOH connections using 22mm and 24mm wrenches Item Part Description Qty...

Page 19: ...5 BOE VUUPO 4DSFX Y Y NN in 2 places Tighten hex nuts securely with a 17mm socket wrench and tighten button screws with 6mm hex key wrench Item Part Description Qty 1 100173 Log Catcher Assembly 1 FY...

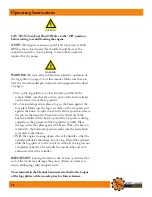
Page 20: ...safe operation of this equipment CAUTION Oil must be added to the hydraulic reservoir and the engine before starting or operation STEP 1 Fill the hydraulic reservoir with oil AW32 hydraulic oil is rec...

Page 21: ...all air has been expelled STARTING INSTRUCTIONS NOTE Refer to the Engine Owner s Manual for complete information on starting maintenance and troubleshooting 1 Move the fuel valve lever to the ON posit...

Page 22: ...t the beam To split wood in the vertical position release the pin on the beam latch located on the front end of the beam Carefully tilt the beam up until the foot plate is sitting squarely on the grou...

Page 23: ...the operating and maintenance instructions of the engine manufacturer for engine care and maintenance 2 1 3 5 5 5 5 0 5 5 5 3 5 0 5 5 operation Operating the log splitter without an adequate oil supp...

Page 24: ...4 NPT to 1 in Tube 1 8 100112 Fitting M 3 4 NPT M 3 4 NPT 1 JMUFS BTF 15 6 10 100118 Elbow M 3 4 NPT F 1 2 NPT 1 11 100116 Hydraulic Oil Filter DHT logo 1 100448 Hydraulic Oil Filter Generic logo 1 PT...

Page 25: ...42 JO Y JO BS FZ 4UPDL 42 JO Y JO 5PO 3 100127 Lock Washer M8 4 FY PMU JO Y JO FY PMU Y Y NN 6 100128 Hex Nut Nylock M8 x 1 25 G8 8 4 1VNQ 4UBHF 1 1VNQ 4UBHF 1 5PO BX PVQMFS TTFNCMZ JO PSF 1VNQ PVOU...

Page 26: ...NPT 1 7BMWF EKVTUBCMF FUFOU 14 6 100029 Elbow 1 2 NPT 1 2 Flare Tube 2 5VCF 0 MBSFE JO VUT 8 100033 Clevis Pin Assembly 1 in OD w clips 1 FY PMU Y Y NN FY PMU Y Y NN 11 100181 Flat Washer M12 4 12 100...

Page 27: ...F 5POHVF 4UBOE 5POHVF 4UBOE XJUI BDL 5PO 4 100084 Manual Canister 1 FY PMU Y Y NN 6 100445 Fender Washer M6 3 4 0 NN NN Y NN 3FUBJOJOH 3JOH YUFSOBM NN 4IBGU FY PMU Y Y NN 10 100161 Flat Washer M10 4 1...

Page 28: ...POET PXO BDL 4FDPOET PXO BDL 4FDPOET PXO BDL ZMJOEFS w JBNFUFS Y w 4USPLF w JBNFUFS Y w 4USPLF w JBNFUFS Y w 4USPLF 1VNQ 5XP 4UBHF BMMPOT JOVUF 5XP 4UBHF BMMPOT JOVUF 5XP 4UBHF BMMPOT JOVUF ZESBVMJD B...

Reviews: