Dimplex DCF44GS Owner'S Manual Download Page 14

14  

www.dimplex.com


Maintenance

Light Bulb Replacement

Allow at least five (5) minutes for 

light bulbs to cool before touching 

bulbs to avoid accidental burning 

of skin.
Light bulbs need to be replaced 

when you notice a dark section 

of the flame or when the clarity 

and detail of the log ember bed 

exterior disappears. There are 

three (3) bulbs under the log set, 

which generate the flames and 

embers, and two (2) bulbs above 

the log that illuminate the log 

exterior.

Lower Light Bulb Requirements

Quantity of three (3) clear 

chandelier or candelabra bulbs 

with an E-12 (small) socket base, 

60 Watt rating. Example: GE 

60BC or Philips 60 CTC.

Do not exceed 60 Watts per 

bulb

Helpful Hints

It is a good idea to replace all 

light bulbs at one time if they are 

close to the end of their rated life.  

Group replacement will reduce 

the number of times you need 

to open the unit to replace light 

bulbs. Care must be taken when 

removing the logset as the logset 

contains LED’s and wires. 


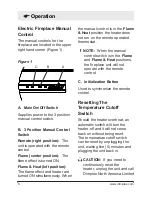
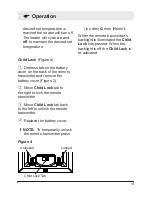
To access the lower light bulb 

area (Figure 5):


Figure 5

upper Bulbs

Log Set

Lower Bulbs

LED  

Wire Harness

Front 

Glass

  Remove front glass assembly.

  Pull the front edge of the 

plastic ember bed or plastic grate 

up and forward until the rear tab 

releases from the ledge located at 

the bottom of the mirror. 

!

IMPORTANT:  

only handle the  

  logset by the emberbed.


!

NOTE:  

Logset fits tightly into  

  firebox, some force may be    

  necessary to remove.

Summary of Contents for DCF44GS

Page 1: ...www dimplex com 7210050100R01 IMPORTANT SAFETY INFORMATION Always read this manual first before attempting to install or use this fireplace For your safety always comply with all warnings and safety...

Page 2: ...ON Procedures and techniques which if not carefully followed will result in damage to the equipment Warning Procedures and techniques which if not carefully followed will expose the user to the risk o...

Page 3: ...void the warranty Please record your model and serial numbers below for future reference model and serial numbers can be found on the Model and Serial Number Label of your fireplace Model Number Seria...

Page 4: ...has malfunctioned or if the electric fireplace has been dropped or damaged in any manner Return heater to authorized service facility Important Instructions for examination electrical or mechanical a...

Page 5: ...n wood or other materials in the electric fireplace Do not strike the fireplace glass Always use a certified electrician should new circuits or outlets be required Always use properly grounded fused a...

Page 6: ...re designed to provide reasonable protection against harmful interference in a residential installation This equipment generates uses and can radiate radio frequency energy and if not installed and us...

Page 7: ...mply with local building codes and other applicable regulations to reduce the risk of fire electric shock and injury to persons Do not attempt to wire your own new outlets or circuits To reduce the ri...

Page 8: ...anual control is in the Flame Heat position the heater does not run on the remote operated thermostat NOTE When the manual control switch is in the Flame and Flame Heat positions the fireplace unit wi...

Page 9: ...Batteries Child Lock Install two 2 AAA batteries into the remote control included Ensure child lock is in the unlocked position Replace the battery cover NOTE When the BAT symbol is present on the re...

Page 10: ...ence If the fireplace does not respond properly to the remote control the remote operating frequency may have to be reset The remote control can send another frequency code to the circuit board to eli...

Page 11: ...1 4 7 3 14 13 8 6 A Room Temperature B Set Temperature C Dimmer D Flame Speed Control E Sleep Timer F Flame Heat On Off G Temperature Down H Temperature Up I Dimmer Down J Dimmer Up K Flame Speed Down...

Page 12: ...turn the fireplace ON To set the sleep timer press the N button Set the timer from 30 minutes through 8 hours The fireplace will automatically turn off when the sleep timer reaches zero 0 minutes The...

Page 13: ...the battery cover Figure 2 Move Child Lock tab to the right to lock the remote transmitter Move Child Lock tab back to the left to unlock the remote transmitter Replace the battery cover NOTE To temp...

Page 14: ...xample GE 60BC or Philips 60 CTC Do not exceed 60 Watts per bulb Helpful Hints It is a good idea to replace all light bulbs at one time if they are close to the end of their rated life Group replaceme...

Page 15: ...assembly Upper Light Bulb Requirements Quantity of two 2 clear chandelier or candelabra bulbs with an E 12 small socket base 15 Watt rating Do not exceed 15 Watts per bulb To access the upper light bu...

Page 16: ...rritories or in any of the 50 States of the USA and the District of Columbia except for Hawaii and Alaska This limited warranty applies to the original purchaser of the product only and is not transfe...

Page 17: ...ith an incorrect power source What you must do to get service under this limited warranty Defects must be brought to the attention of Dimplex Technical Service by contacting Dimplex at 1 888 346 7539...

Page 18: ...WHETHER IN CONTRACT IN TORT OR ON ANY OTHER BASIS FOR ANY INDIRECT SPECIAL PUNITIVE EXEMPLARY CONSEQUENTIAL OR Warranty INCIDENTAL LOSS COST OR DAMAGE ARISING OUT OF OR IN CONNECTION WITH THE SALE MA...

Page 19: ...200KIT Flicker Rod 5902150100RP Heater Assembly 2000330200RP On Off Switch 2800070200RP Remote Control Switch Board 3000300300RP Remote Transmitter 3000350100RP Remote Receiver 3000300200RP Cord Set 4...

Reviews: