Warp the Green and Red Channels Together
When we have the Amps and Cabinets in our Green and Red Channels dialed in to suit our taste, we can Warp
them together to create our new HyperModel™. Make sure your GNX1 is in yellow mode (indicated by the Status
LED lighting yellow). If it is not in yellow mode, press the Status or Exit button until yellow mode has been
accessed.Then rotate the Number 3 (Warp) Knob to achieve the desired blend of the Amps and Cabinets in our
Green and Red Channels.
Save the HyperModel™
Now that we have designed our own Amp/Cabinet HyperModel™, we need to save our creation to one of the 16
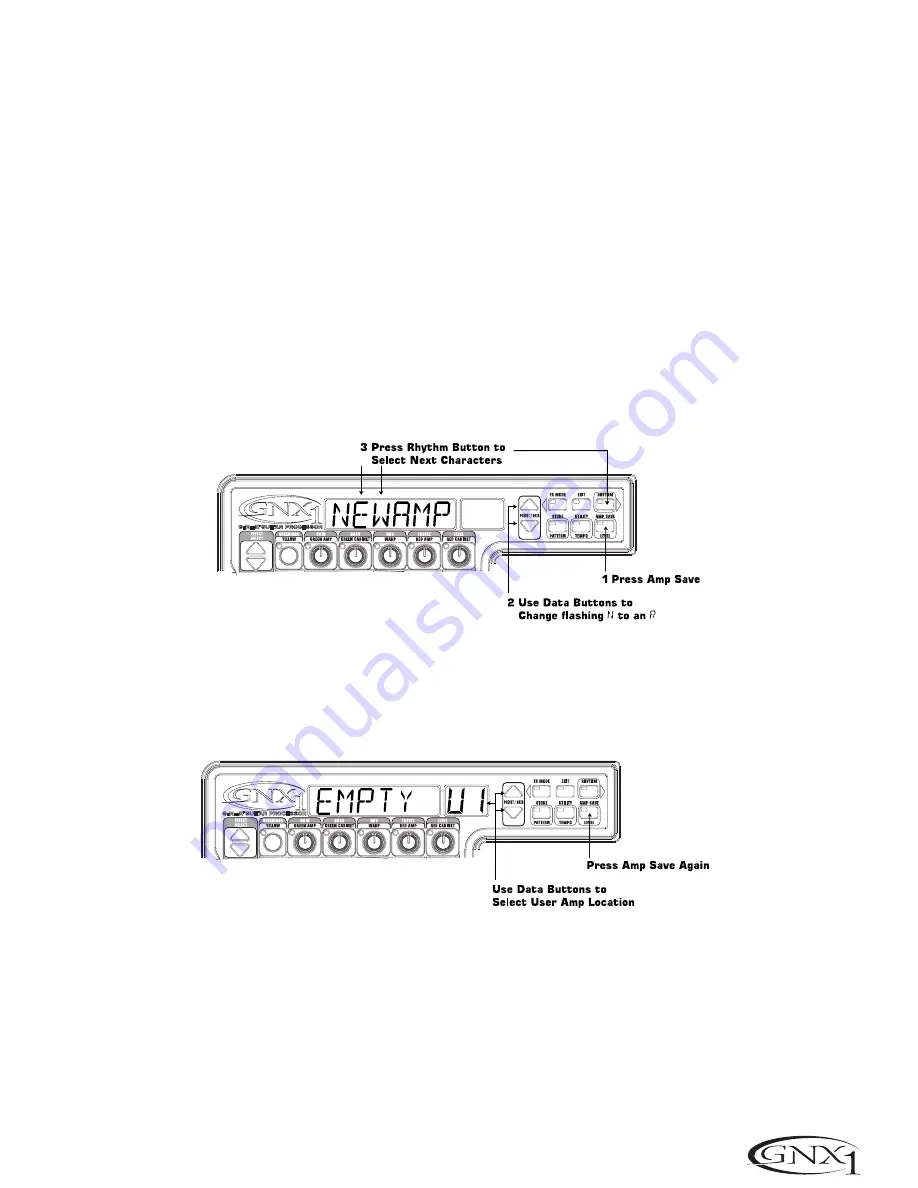
User HyperModel™ locations.This will enable us to use it in Presets. Press the Amp Save button once.The
Display will read
NEWAMP
(New Amp) and the first letter (N) will be flashing.This is asking us to name the new
HyperModel™. For the sake of this example, let’s name the HyperModel™ “Rectwd” (Rectified Tweed). Press the
Data Up/Down buttons to select R as the first letter.Then press the Rhythm button to select the next charac-
ter in the Display.This character should already be an E because we started out with the name “NEWAMP.” If it is
not an E, press the Data Up/Down buttons to select E as the character. Continue to use the Rhythm button to
select the next character location in the Display, and the Data Up/Down buttons to select the alphabetic charac-
ters until the Display reads
RECTWD
.
Then press the Amp Save button again.This will take us to the second step of saving a HyperModel™, which is
choosing one of the 9 User HyperModel™ locations.The alpha-numeric Display should read
EMPTY
(Empty) and
the red numeric Display should read
U1
because this is the first HyperModel™ stored to your GNX1. Press the
Amp Save button again to store this new creation to this Amp location.The Display will briefly read
AMPSVD
(Amp Saved) and then return to showing the name of the currently selected Preset.
Assign Models to the Preset Channels
In the previous steps, we assigned a Tweed to the Green Channel and a Rectified Model to the Red Channel.Then we
Warped the two together to create our HyperModel™.This HyperModel™ is now saved as an amp type that we
named Rectwd, but it is not currently a part of our Preset. In this example Preset, we were going to have the ability to
toggle between an acoustic guitar simulation and our new HyperModel™.To do this we need to assign the acoustic
model to the Green Channel and our new Rectwd to the Red Channel of our Preset.The LED next to the Status but-
ton should currently be yellow. If it is not, press the Exit button. Now rotate the Number 1 Knob until the Display
reads
ACOUST
.This is the Green Channel Model for the Preset. Now rotate the Number 4 Knob until the Display
reads
RECTWD
(our new HyperModel™).This is the Red Channel Model for the Preset.We will now be able to toggle
between these two sounds using the Amp Footswitch.
27
S
ECTION
F
OUR
- T
UTORIAL


