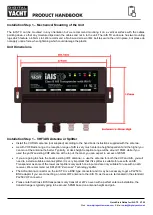
Quick Start Guide for iAIS TX V1.00
E-Mail:
•
If this is the first time that the iAIS TX has been powered up or the MMSI number has not yet been programmed,
then the Red
“Status” LED should be ON and the Yellow “Timeout” LED will flash until it gets a GPS fix (typically
< 1 minute). Regardless of the status of the transponder, you should see a flashing Wi-Fi and Data LED.
•
On your mobile wireless device, scan for wireless networks and confirm that you can see a new network called
“
DY-AIS-xxxx
” where
xxxx
is a four-digit code unique to your iAIS TX unit.
•
Make your device join this network and you will be asked to enter a password which
is “
PASS-xxxx
” where
xxxx
is the same four-digit code as in your network name. You can change both the network name and password in
the iAIS TX unit’s web interface, which will be explained later in this manual.
•
Installation is now complete, but before it will start to transit your position to other vessels, the iAIS TX needs to
be configured using its web interface
– see next section.
4. Configuration
The iAIS TX transponder must be correctly configured with the MMSI and static data for your vessel before operation. All
configuration information must be entered carefully as this information will be transmitted to other AIS equipped vessels
and shore stations.
In the United States of America, the MMSI and static data must only be entered by a competent installer.
The end user of the equipment is not authorised to enter their own vessel data. If you are a US resident
and intend to use your AIS class B transceiver in US waters, you should make sure that your retailer has
configured your product prior to supplying it to you. If your AIS transceiver has not been pre-configured,
please contact your dealer for details of how to have it configured.
The iAIS TX has a simple web interface that allows configuration of the MMSI and static data via any modern web
browser, without the need of any special app or software. This same web interface can be used to configure the Wi-Fi
network, set the data protocol (TCP or UDP), remotely turn on/off the transponders “Silent Mode” and monitor the correct
operation of the transponder.
To access the web interface, connect to the iAIS TX wireless network, open a web browser (Safari, Chrome, Firefox,
Edge, etc.) and e
ither enter the IP address of the iAIS TX…
…or if your device supports Bonjour/mDNS you can enter the following URL…
…which is useful if you have connected the iAIS TX to another wireless network and don’t know what IP address it has
been given.
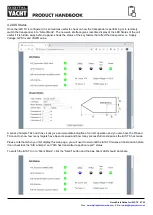
You should now see the iAIS TX web interface, which is shown on the next page.
The page is in four sections…
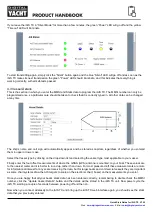
4.1 Network Settings
By default, the iAIS TX unit
is in “Access Point” mode, that means it creates its own password protected wireless network
and automatically provides network settings to any device that connects to it (via DHCP). You can change the default
network name and password, if required, and the wireless channel that the iAIS TX uses (Channel 1 by default).
If you already have a wireless network on the boat and you would prefer the iAIS TX to be part of this network, rather than
create another wireless network of its own, you can make it ope
rate in “Station” mode. Select “Station” mode and then
select from the drop down list the network you would like to join and enter that network’s password.
Once you are happy that everything is correct, click the “Update Settings” button and the iAIS TX will store the new


