background image

2 0

E x p o r t   I m a g e   ( O n   S u p p o r t e d   M o d e l s )

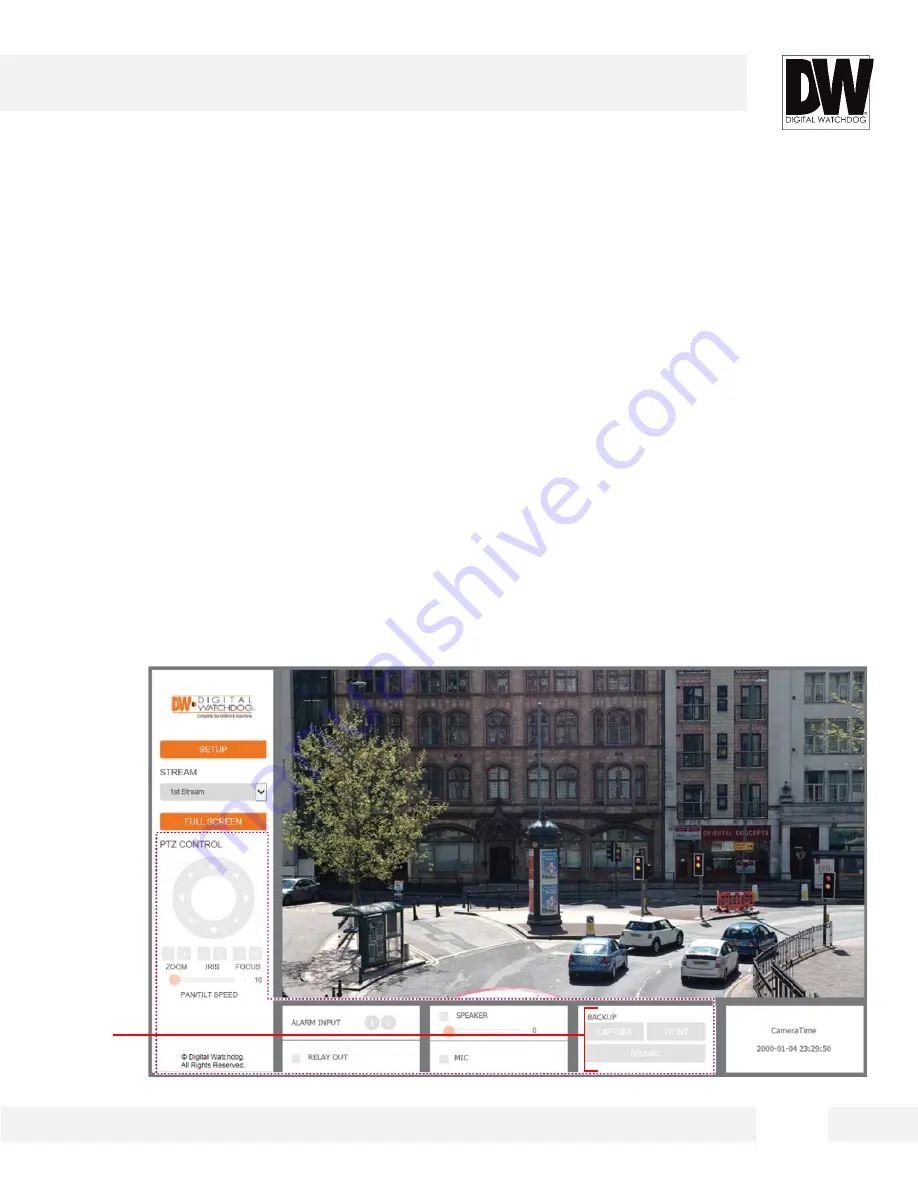
E x p o r t   a   s c r e e n s h o t   o f   t h e   c u r r e n t   l i v e   v i d e o   t o   y o u r   c o m p u t e r .  

1.

Export a screenshot of the camera’s view with date/time and camera’s name overlay by 
pressing the CAPTURE button. 

2.

You can also print the camera’s view for your records by pressing the PRINT button. The 
printing setup page will appear, allowing you to adjust the printer’s options, add notes and the 
camera’s information as text overlay.

*NOTE: Some of these features may be disabled for cameras that do not support these functions. 

WEBVIEWER* 

[Backup & 
Export]

Summary of Contents for DWCA-C128-64

Page 1: ...Before installing or operating the camera please read and follow this manual carefully DWCA C128 64 DWCA C12C 64 MEGApix CaaS Box IP Camera REV 03 16 ...

Page 2: ... the temperature may rise to high levels Cleaning To remove dirt from the case moisten a soft cloth with a soft detergent solution and wipe Mounting Surface The material of the mounting surface must be strong enough to support the camera This equipment has been tested and found to comply with the limits for a Class B digital device pursuant to Part 15 of the FCC rules These limits are designed to ...

Page 3: ...nder 11 Using DW IP Finder 12 13 Network Options 14 Camera Reboot 15 MEGApix CaaS Camera Web Viewer 16 Accessing the Camera s Web Viewer 16 GUI Description 17 First Second Stream 18 Export Print Image 19 Instant Recording 20 Audio Control 21 Alarm Relay Control 22 MEGApix CaaS Camera Setup 23 Basic 23 25 DW Spectrum CaaS 26 28 Camera 29 31 System 32 36 Specifications 37 38 Troubleshooting 39 42 Wa...

Page 4: ...Noise Reduction Network Failover and Redundancy Dual On board SDXC Card Slots up to 512GB 64GB SD Card Included True Day Night with Mechanical IR Cut Filter Auto Gain Control AGC Backlight Compensation BLC Auto White Balance AWB Motion Detection Two Way Audio with Microphone Built in Alarm Sensor Input Relay Output Remote IR Configuration Interface Power over Ethernet PoE DC5V Compatible with CS M...

Page 5: ...PARTS DESCRIPTIONS 5 ...

Page 6: ...DIMENSIONS 6 ...

Page 7: ...The following items are included with the MEGApix CaaS camera INSIDE THE BOX 7 ...

Page 8: ... 1 Using a PoE Enabled Switch The MEGApix CaaS Camera is PoE Compliant allowing transmission of power and data via a single Ethernet cable PoE eliminates the need for the different cables used to power record or control the camera Follow the illustration below to connect the camera to a PoE enabled switch using an Ethernet cable 2 Using 12VDC If a PoE injector is not available use a power adaptor ...

Page 9: ...e necessary holes to mount the bracket to a wall or ceiling 4 4 Attach the mounting bracket to the surface using machine screws 5 Pull wires through and make all necessary connections NOTE For the DWCA C12C 64 model please add a CS Mount lens not included Secure the lens to the front of the camera by rotating it clockwise 6 Secure the box camera to the mounting bracket s screw to complete the inst...

Page 10: ...mera s SD Card locate the SD card slot in the back of the camera module 2 Insert a class 10 SD card into the SD card slot by pressing the SD card slot 3 To remove the SD Card press the card inward to release from the card slot 1 0 NOTE 64GB SD Card Class 10 is already included with your camera To upgrade the card please follow the instructions above SanDisk 16 128GB Over Class 10 Micro SD SDXC Car...

Page 11: ... can be found on the included User Manual CD Run DW Desktop Tool and install onto your PC 2 When setup is complete launch DW Desktop Tool 3 The software will automatically search your network for all Digital Watchdog supported devices Your camera will appear for example as DWCA VF25WIR4 4 Double click on the camera name and select View Camera Website to launch the camera web viewer Install the DW ...

Page 12: ... h a n g e t h e b a s i c s e t t i n g s o f y o u r M E G A p i x C a a S c a m e r a u p d a t e f i r m w a r e f o r m u l t i p l e c a m e r a s s i m u l t a n e o u s l y o r c o n n e c t t o y o u r M E G A p i x C a a S c a m e r a DW IP FINDER 1 2 ...

Page 13: ...e internal network For further explanation on DHCP please see page 17 2 Static IP Select Static to connect to the camera from an external network For further explanation on Static please see page 17 3 If STATIC IP is selected manually enter the camera s IP address netmask and gateway These need to match the settings of your network Please contact your network administrator for more information 4 T...

Page 14: ...xternally via the internet If Static is selected you must manually enter the correct network settings for your MEGApix CaaS camera The settings will correspond with your network To set your camera to a static IP address we recommend that you 1 setup the camera to DHCP 2 allow it to configure itself according to your network and 3 change the settings to a static IP address 1 To set your MEGApix Caa...

Page 15: ... to use 3 Select all the cameras you would like to upgrade You can select multiple cameras by clicking on multiple camera models while holding down the Ctrl button 4 Click Update Cameras 5 The system will indicate if the upgrade was successful or not for each camera 6 When all cameras have been upgraded restart the cameras to apply the new firmware 7 Allow up to 60 seconds for the cameras to reboo...

Page 16: ...c t o r y d e f a u l t P r e v i o u s s e t u p f o r I P d e f a u l t t i m e e t c w i l l b e d e l e t e d I f a s y s t e m s I P a d d r e s s i s l o s t r e s e t t h e c a m e r a b a c k t o f a c t o r y d e f a u l t The following are the default network settings CAMERA REBOOT IP Mode DHCP IP Address 169 254 X Y Subnet Mask 255 255 255 0 Gateway HTTP Port 80 Frequent use may cause s...

Page 17: ...Explorer window Example http 192 168 1 123 Factory Default 2 Enter Username and Password Default Username admin Password admin 3 The web browser may ask to install FbVLC to view video from the camera Once it has been installed Internet Explorer will display video images from the camera 4 The Web Client is also available in Google Chrome Safari and Firefox web viewers Please note that features may ...

Page 18: ...play This is the region for live video stream from the camera 2 Setup Menu Setup the camera s Video Network Events System etc 3 Stream selection Select a stream to display it in the viewing area 4 Full Screen Expand the camera s view into full screen 5 Menu options such as PTZ audio sensor and backup options will be disabled for cameras that do not support those functions ...

Page 19: ...r secondary Stream settings The camera supports the setup of up to two 2 different streams with different resolution and FPS for maximum network control Select which stream to view in the camera s main menu by selecting one of the options from the drop down menu Streams that are not enabled in the Streams Setup page will not appear in the drop down menu For Setup Stream Settings refer to page 25 2...

Page 20: ...ime and camera s name overlay by pressing the CAPTURE button 2 You can also print the camera s view for your records by pressing the PRINT button The printing setup page will appear allowing you to adjust the printer s options add notes and the camera s information as text overlay NOTE Some of these features may be disabled for cameras that do not support these functions WEBVIEWER Backup Export ...

Page 21: ...evices or includes a microphone built in 3 If needed adjust the camera s volume using the volume bar Microphone 1 For supported cameras enable audio to be transmitted from the web viewer to the camera by checking the box next to MIC 2 Make sure your camera supported external devices for audio Please note that audio from the camera and microphone from the viewer cannot operate at the same time To e...

Page 22: ...n and be displayed in color This function will be available for supported cameras that support alarm input Relay Out 1 For cameras that support relay output control enable or disable the relay directly from the camera s web viewer Relay output will be disabled when the check box next to it is unchecked When the check box is checked the relay output will be activated This function will be available...

Page 23: ... of saved images MJPEG the lowest Compression type will provide the highest image quality but also will cause the image size to be the largest and take up the most bandwidth H 264 Mainline Profile is the default codec If OFF is selected this stream will not be enabled 2 Resolution Set Resolution for each stream The better the resolution the more bandwidth it will require to stream images 3 Encode ...

Page 24: ...rate control option from the drop down menu options c Minimum and Maximum Bitrate Set the min and max values for the camera s bitrate range d Min Max Bitrate If VBR Bitrate mode is selected adjust the minimum and maximum bitrate levels Frist Stream Max 8Mbits Min 1 Mbit Second Stream Max 6Mbits Min 0 5 Mbits e Average Bitrate If CBR Bitrate mode is selected adjust the average bitrate 2 Advanced St...

Page 25: ...lue layer If you have more than one region setup the region in current setup will be highlighted with a yellow border 3 Type Select whether this region will include motion detection or exclude it If exclude is selected motion in this region WILL NOT be detected 4 Size Select the size of the object you want to detect motion The larger the percentage the larger the object causing motion will have to...

Page 26: ... not appear in the table try rebooting the camera and re inserting the card 3 The system will display the SD Card s total size current used and free space format type and current recording status 4 To format the SD Card press the Format SD Card button This will erase any data on the SD Card and format it 5 To add the edge capability to the camera please install the DW Spectrum CaaS software This s...

Page 27: ...s the INSTALL button 2 In the new popup window press the Choose File button and select the appropriate file 3 Press the UPLOAD button 4 The system will upload the file SUCCESS will appear once the installation is complete 5 Once the DW Spectrum CaaS software is installed on the camera you can stop or restart the now installed DW Spectrum CaaS server update the software or remove it from the camera...

Page 28: ... such all settings for the camera s recording playback backup and further software updates can be done from the DW Spectrum client 1 To access the camera via DW Spectrum client please install the client software included in the accessory CD 2 Run the DW Spectrum software 3 Enter the camera s IP address in the login screen 4 See the DW Spectrum manual for more information on DW Spectrum operation 2...

Page 29: ...the camera s True Day Night IR cut filter the camera s view to day mode regardless of the light levels in the camera s FoV c Force Night Manually removes the True Day Night IR cut filter from the camera s lens and turns the camera s view to night mode regardless of the light levels in the camera s FoV 2 Advanced Settings The camera will switch by default to B W in night mode You can manually selec...

Page 30: ...rol is set to 60GHz 2 EXPOSURE SETTING a Slowest Level Set the shutter speed from the available options between 1 7 5 and 1 8000 Select 1 7 5 to set more exposure time to light This setting is used to make movements look natural unfrozen Select 1 8000 to set less exposure time to light This settings is used to catch fast moving objects b Sensor Max Gain Maximum light gain settings in low light con...

Page 31: ...r the number the camera s image will use warmer tones The lower the number the camera s image will use cooler color tones Default value is 0 4 Contrast Set the camera s contrast between 0 128 The higher the number the contrast between the dark and bright areas in the camera s FoV will be more distinct Default value is 64 5 Sharpness Sets the image sharpness between 0 255 The higher the number the ...

Page 32: ...Uptime how long the camera has been operating since its last power cycle 3 Code Version camera s firmware version 4 MAC IP Address the camera s address information 5 Camera Name display the camera s name 6 Camera Model displays the camera s model number 7 SD Card Information displays the size of all SD cards currently mounted on the camera 8 Port displays the web port for the camera 9 SD Card Stat...

Page 33: ... 2 IP Address Enter an IP address for the camera 3 Netmask default is 255 255 255 0 4 Gateway This is your router s external IP address This address is used when accessing the camera remotely from outside the network The router will channel the data request to the appropriate port associated with the camera 5 DNS Enter a DNS address The Domain Name Server translates a web addresses to an IP addres...

Page 34: ...e Select the appropriate time zone from the drop down menu 3 NTP Server Set the camera to sync its time with an NTP server by pressing the SYNC button 4 Computer Time You can also set the camera to sync its time with your computer s settings by pressing the SYNC button Setup System User Setting Use the User Setting page to set a new password for the camera s admin user To change the admin s passwo...

Page 35: ...k for the latest firmware click on the link to Digital Watchdog s website or go to www digital watchdog com To start the upgrade process 1 Download the latest firmware from the Digital Watchdog website 2 Click the Browse button and select the firmware file 3 Press the Upload button 4 The system will automatically start the upgrade process 5 You can track the upgrade process in the update status pa...

Page 36: ... reset the camera s settings back to factory default If this option is selected all settings except for the camera s network settings with be deleted and reset to their factory default Press OK in the confirmation window to complete the reset 3 Factory Reset with IP Select to reset the camera s settings back to factory default If this option is selected all settings including the camera s network ...

Page 37: ...phone Built In OPERATIONAL Brightness 255 255 Shutter Mode Auto Manual Shutter Speed 1 7 5 1 15 1 25 1 30 1 50 1 60 1 100 1 120 1 240 1 480 1 960 1 1024 1 8000 1 16000 1 32000 sec Digital Slow Shutter DSS Off 2x 4x Smart DNR Digital Noise Reduction Off Low Middle High Auto Gain Control Max 41dB BLC Back Light Compensation Off On Digital Wide Dynamic Range DWDR Auto Off Day and Night Auto Day Color...

Page 38: ... Yes Web Viewer Supported OS Windows XP Windows Vista Windows 7 MAC OS Supported Browser Internet Explorer Google Chrome Mozilla Firefox Safari Video Management Software DW Spectrum ONSSI Milestone Genetec ENVIRONMENTAL Operating Temperature 20 C 50 C 32 F 122 F Operating Humidity Less than 90 Non Condensing IP Rating IP66 Certified Weather Resistant Other Specifications CE FCC RoHS Electrical Pow...

Page 39: ...h is it connected to a proper internet outlet and operating properly Make sure the PoE Switch is connected to a router modem and the ports that have devices connected to them have a green LED on If Yes is the computer on the same network as the MEGApix CaaS camera Camera and computer should be connected to the same router Contact your network administrator if you have more than one network availab...

Page 40: ...uld be connected on the same router Contact your network administrator if you have more than one network available If Yes try pinging the MEGApix CaaS camera s IP address as it appears on the IP finder From your desktop go to Start Programs Accessories Command Prompt Type ping followed by the camera s IP address then press Enter If you get the message Request timed out camera is not connected If y...

Page 41: ...allows the camera to stream its video to the web client When you connect to your MEGApix CaaS camera for the first time your browser will ask you to install FbVLC Make sure your Web Browser s security settings do not block pop up windows and allows FbVLC files to be installed and used Setup may vary depending on the browser you use If Yes make sure nothing is blocking the camera s lens W e b V i e...

Page 42: ...255 255 255 0 The MEGApix CaaS camera can also connect to the web viewer using a static IP address This will allow you to set your own IP address manually Setup the Network Protocol on your PC 1 Go to Network icon on your PC 2 Right click and select Properties 3 Double click Local Area Connection 4 Click Properties 5 Double click Internet Protocol Version 4 TCP IPv4 6 Select Obtain an IP address a...

Page 43: ...ipt or other proof of the date of the original purchase is required before warranty service is rendered This warranty only covers failures due to defects in materials and workmanship which arise during normal use This warranty does not cover damages which occurs in shipment or failures which are caused by products not supplied by the Warrantor or failures which result from accident misuse abuse ne...

Page 44: ...xclusion or limitation of incidental or consequential damages or limitations on how long an implied warranty lasts so the above exclusions or limitations may not apply to you This warranty gives you specific legal rights and you may also have other rights from vary from state to state If the problem is not handled to your satisfaction then write to the following address Digital Watchdog Inc ATTN R...

Page 45: ...ritos California USA 90703 PH 866 446 3595 FAX 813 888 9262 www Digital Watchdog com technicalsupport dwcc tv Technical Support PH USA Canada 1 866 446 3595 International 1 813 888 9555 French Canadian 1 514 360 1309 Technical Support Hours Monday Friday 9 00am to 8 00pm Eastern Standard Time ...

Reviews: