Digital Touch Systems DTS-3250LA User Manual Download Page 8

- 12 -

- 13 - 

OLS-3250LA | OLS-4240LL | OLS-4650LA | OLS-5541LL
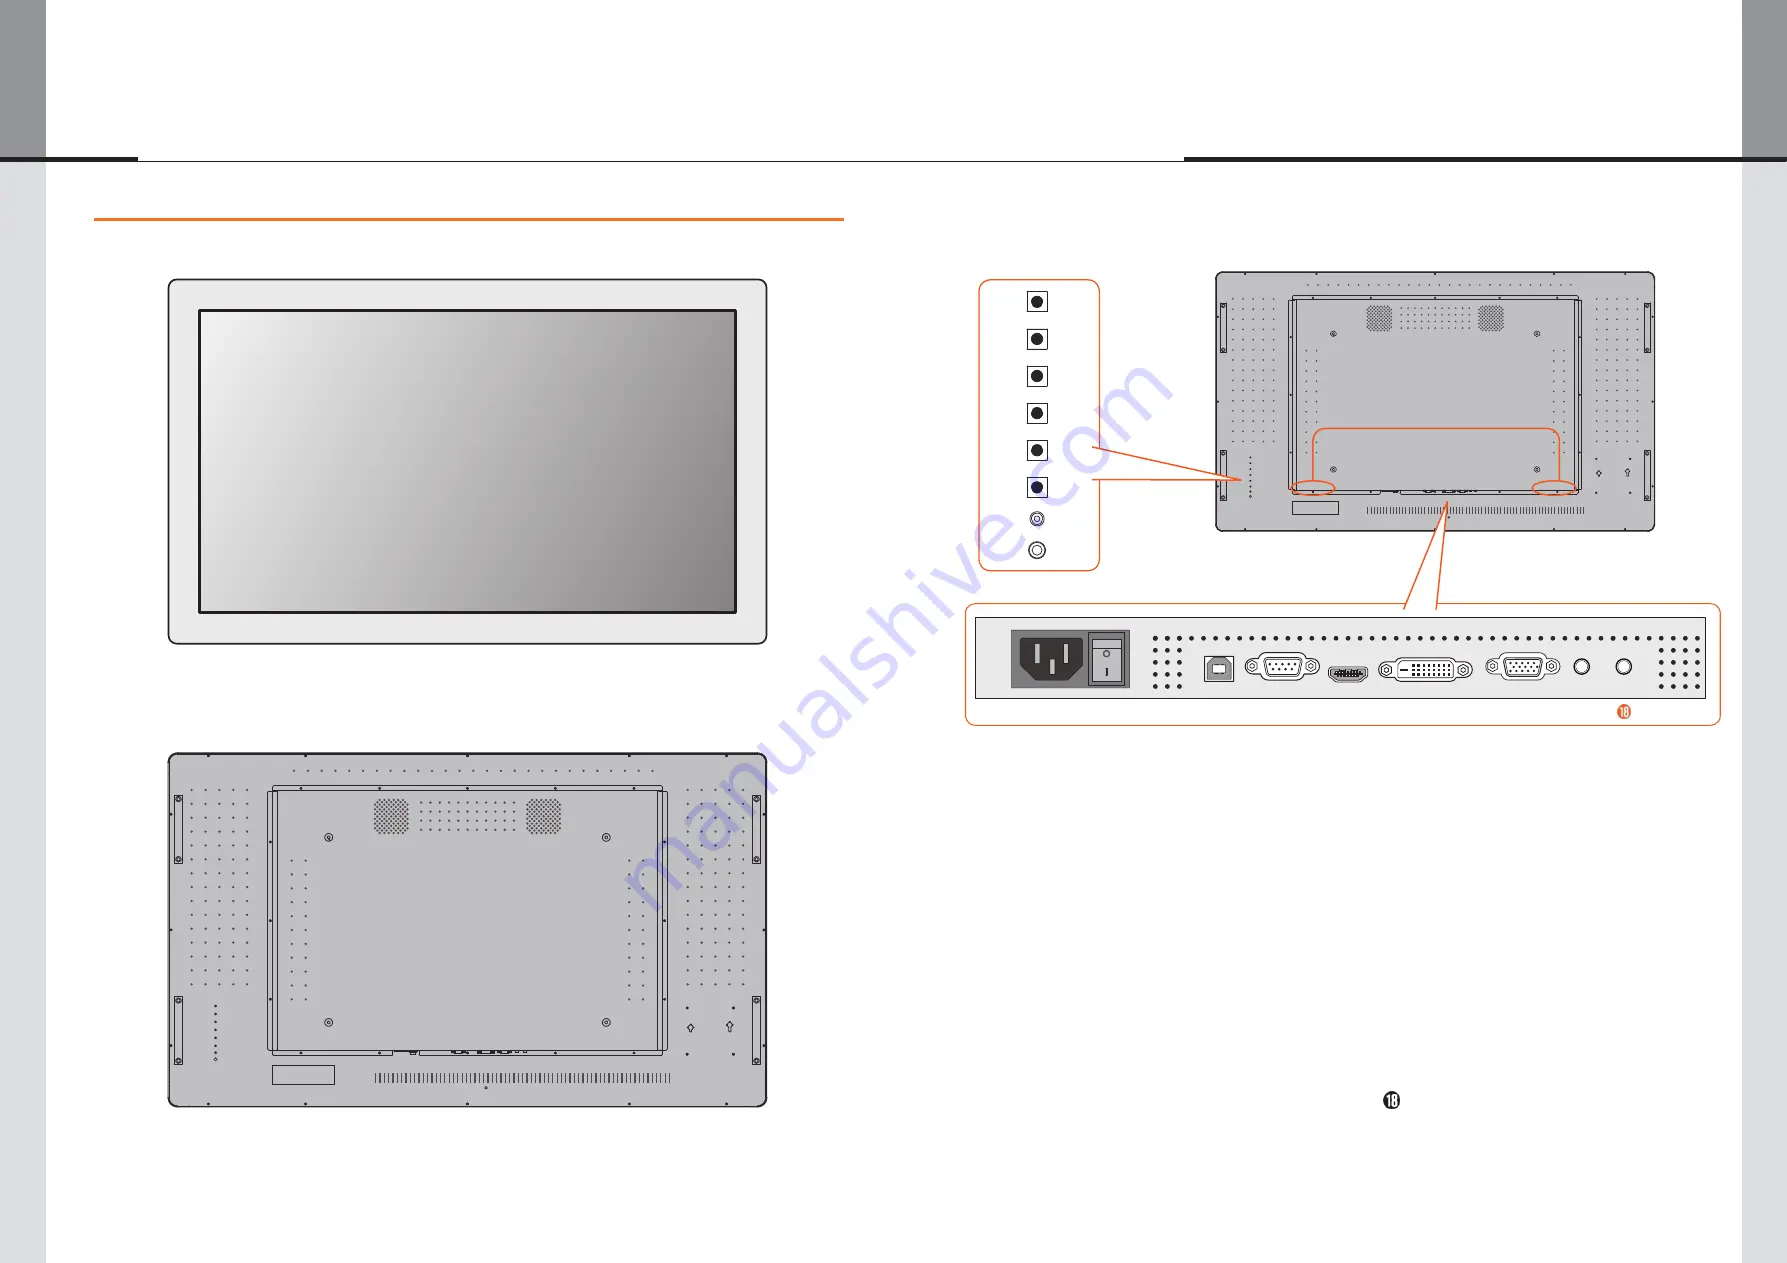
 

4. Names

Front

Rear

Input Ports

POWER

UP

DOWN

AUTO/EXIT

SOURCE/OK

MENU

LED

IR

AUDIO

IN

IR

VGA

IN

DVI

IN

HDMI

IN

COM

IN

USB

AC

IN

POWER


Power

Button 

UP

Up/ Button 

DOWN

Down/Volume - Button 

AUTO / EXIT

Auto/Exit Button 

SOURCE / OK

Input Select/OK Button 

MENU

Menu Button 

LED

Green : Normal Operation Orange : 

Power Management 

IR

Remote Sensor 

SPEAKERS


Speakers 

AC IN

AC-INLET :

AC Connector(~ : Alternating current) (AC-IN) 

 AC SWITCH (- ON) / 

OFF)


     MAIN POWER : Main Power Switch

 USB

Touch USB Connector

 COM IN

D-SUB 9pin, RS232C Connector

 HDMI IN

HDMI Connector

 DVI IN

DVI-D 24pin Connector

 VGA IN

VGA(D-sub) mini 15pin Connector

 AUDIO IN

PC Audio In, Mini Jack, Audio Connector

POWER

UP

DOWN

AUTO/EXIT

SOURCE/OK

MENU

LED

IR

POWER

UP

DOWN

AUTO/EXIT

SOURCE/OK

MENU

LED

IR


AUDIO

IN

IR

VGA

IN

DVI

IN

HDMI

IN

COM

IN

USB

AC

IN

 IR

Mini Jack, IR Extender Connector

Summary of Contents for DTS-3250LA

Page 1: ...PCAP Touch Screen Displays User Manual...

Page 2: ...ODS Office User s manual CD Power Cable H D M I C a b l e USBCable 1 Read these instructions 2 Keep these instructions 3 Heed all warnings 4 Follow all instructions 5 Do not use this apparatus near w...

Page 3: ...other than that contained in the operating instructions unless you are qualified to do so This symbol is intended to alert the user to the presence of uninsulated dangerous voltage within the product...

Page 4: ...derecolhade quipamentosel ctricoseelectr nicos paraposterior reciclagem Aogarantir a correctaelimina odesteproduto estar aevitar consequ ncias potencialmente negativastanto paraoambientecomoparaasa de...

Page 5: ...ed outdoors If you use a cable longer than the supplied one the picture quality is not guaranteed Touch function can be disrupted if the USB cable length exceeds 3m WARNING If you drop any materials o...

Page 6: ...y or smoky areas as it may cause fire electric shock or damage You should also avoid areas where the sun shines directly on the monitor DO NOT PLACETHE MONITOR IN A HAZARDOUS POSITION The monitor may...

Page 7: ...mounting stage needs to be taken Tighten the M6 Screw with washer which L length is 10mm to fasten the monitor Using a screw longer than this may cause electric shock or damage because it may contact...

Page 8: ...ration Orange Power Management IR Remote Sensor SPEAKERS Speakers AC IN AC INLET AC Connector Alternating current AC IN AC SWITCH ON OFF MAIN POWER Main Power Switch USB Touch USB Connector COM IN D S...

Page 9: ...mote Control by pointing it toward the Remote Sensor on the monitor Other manufacturers remote control will not work with this monitor Use the provided Remote Control ONLY Used batteries needed to fol...

Page 10: ...the Remote Control Select adjustment by pressing the UP DOWN Button on the monitor or the Button on the Remote Control while the menu page is displayed on the screen Turning the monitor ON Turning the...

Page 11: ...is for a standard connector If a special cable is required please contact your local dealer or regional office For connection to Macintosh computers contact your local dealer or regional office for a...

Page 12: ...ck drag selection double click right click click and visual feedback 3 Digitizer with Windows 7 multi touch gestures 4 Windows 7 Starter and Home Basic version 5 Windows 7 Home Premium Professional En...

Page 13: ...TION FUNCTION Palm rejection is a way to disregard signal from finger while using the pen mode When you touch the screen with a pen palm rejection is activated and the screen does not recognize touch...

Page 14: ...ut 2 For best results use the Auto Adjust in conjunction with the adjustment pattern See page 23 for SCREEN ADJUSTMENTS 3 See page 23 for SCREEN ADJUSTMENTS Adjustment Item Problem Option Button to Pr...

Page 15: ...preset data Off Return to Menu To activate the option mark it in the setup menu To deactivate it remove the marking Adjustment Item Problem Option Button to Press Date and Time Auto Select the signal...

Page 16: ...is not described below or you cannot correct the problem discontinue using the monitor and contact your dealer or service center for further assistance Problem 1 The picture does not appear The power...

Reviews: