background image

Digital Projection Ltd. E-Vision Laser 13000 WU Series

Using the projector

Black level uplift

Black Level Uplift

Select Area

Top

0

Bottom

0

Left

0

Right

0

Color Adjustment

All

Red

0

Green

0

Blue

0

Enable

Align Pattern

from

the

Edge Blend

menu to

see the black level uplift
area.

Black in the blended regions appears less dark than in the rest of the image. To compensate for this, use this
menu to raise the black levels of the rest of the image:

l

Set

All

to the required amount of black level correction. This will apply equal correction to the black

levels of all colors

l

If necessary, use the individual color sliders (

Red

,

Green

and

Blue

) for fine adjustment.

1

2

3

4

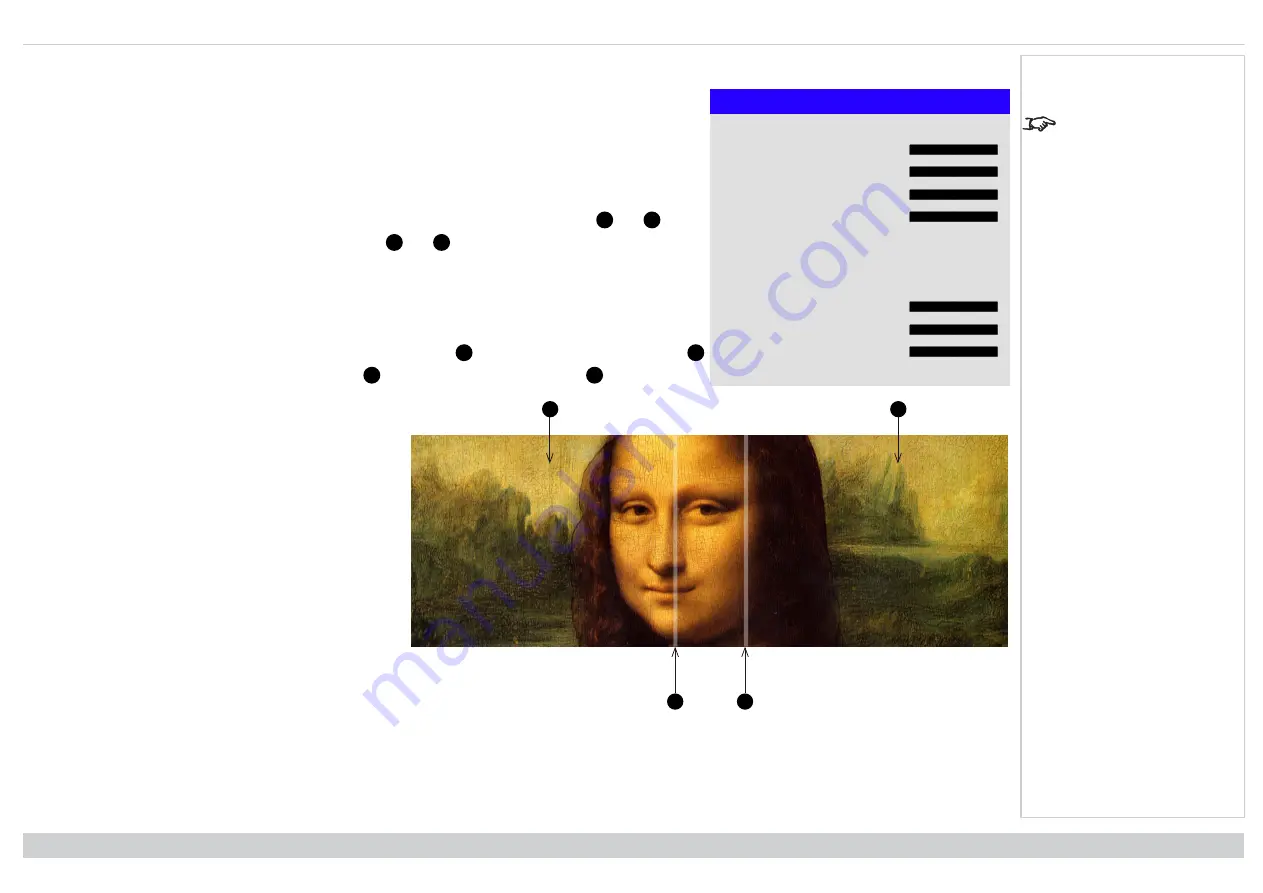
You may experience artifacts at the edges where the blended region of one projector overlaps the

pond of

mirrors

of its neighbor. In the example below, the blended image comes from

two projectors

,

1

and

2

. Both

images have black level uplift applied; as a result,

artifacts

3

and

4

have emerged at the edges where the

black level uplift region of one projector overlaps the pond of mirrors of the other.

To remove the artifacts, you need to slightly reduce the size of the black level uplift region of each projector so it
does not overlap the pond of mirrors of the other projector.

l

Depending on your array, use

Top

,

Bottom

,

Left

and/or

Right

to reduce the black level uplift size. In the

example below, use the

Right

slider of the

projector on the left

1

to remove the

artifact on the right

4

, and the

Left

slider of the

projector on the right

2

to remove the

artifact on the left

3

.

Rev A June 2019

page 70

Operating Guide

Notes

Summary of Contents for E-Vision Laser 13000 WU Series

Page 1: ...Rev A June2019 E Vision Laser 13000 WU Series High Brightness Digital Video Projector INSTALLATION QUICK START GUIDE CONNECTION GUIDE OPERATING GUIDE REFERENCE GUIDE 119 946A...

Page 2: ...llowed LASER WARNING this symbol indicates that there is a potential hazard of eye exposure to laser radiation unless the instructions are closely followed NOTE this symbol indicates that there is som...

Page 3: ...ION DIRECTE DANGEREUSE POUR LES YEUX APPAREIL LASER DE CLASSE 3R longueur d onde 450 460 nm Bleu maximum nergie de impulsion 0 45 mJ Bleu dur e de impulsion 0 87 ms Bleu longueur d onde 636 646 nm Rou...

Page 4: ...ght to prevent exposures of spectators eyes within the hazard distance Hazard Distance The hazard distance is the distance measured from the projection lens at which the intensity or energy per unit o...

Page 5: ...High Definition Video up to 100 m from the source l 3G SDI with loop through l Edge Blend with black level correction l Red laser assist for enhanced color fidelity l Blanking control for custom inpu...

Page 6: ...ector 23 Switching the projector on 23 Switching the projector off 23 Selecting an input signal 23 Selecting a test pattern 23 Adjusting the lens 24 Lens menu 24 Remote control 24 Adjusting the image...

Page 7: ...tching 49 Color matching parameters explained 50 Color temperature 51 Gains and lifts 51 Geometry menu 52 Aspect ratio 52 Theaterscope setting 53 Digital zoom 54 Overscan 55 Blanking 56 Keystone 57 Ke...

Page 8: ...image to the display 100 WUXGA images displayed full width 100 WUXGA images displayed with a height of 1200 pixels 100 WUXGA images displayed full height 101 Diagonal screen sizes 101 Positioning the...

Page 9: ...Rev A June2019 E Vision Laser13000 WU Series High Brightness Digital Video Projector INSTALLATION QUICK START GUIDE 119 946A...

Page 10: ...ed with the projector Projector P ic M u te O F F O N M E N U E X IT IN F O H D M I1 O K O F F O N A LT L E N S F O C U S Z O O M IN O U T IN O U T S H IF T 2 1 3 H D M I2 D V I D IS P LA Y P O R T H...

Page 11: ...able carefully and avoid sharp bends Do not use a damaged power cable 1 2 1 Adjust the VOLTAGE SELECT switch to the required voltage 1 2 Firmly push the mains connector into the socket 2 Voltage selec...

Page 12: ...r View 12 Bottom View 1 2 4 3 Front View 1 Air inlet 2 Front infrared window 3 Lens mount 4 Air inlet 5 Rear infrared window 6 Air outlet 7 Connections panel 8 Control panel 9 Adjustable feet 10 Volta...

Page 13: ...IC MUTE Shows and hides the projected image When muted the light source is completely switched off and the screen is black 7 MENU Displays and exits the OSD 8 Arrow buttons ENTER Navigation buttons us...

Page 14: ...six flashes light module failure On red light module has reached end of life On green light is switched on STATUS Off no problem Flashing red continuously cover error Flashing red cycles of four flash...

Page 15: ...ol whether to show the OSD during projection 4 MENU Access the OSD If the OSD is open press this button to go back to the previous menu 5 Navigation arrows and OK Navigate through the menus with the a...

Page 16: ...ET A B C D Load user presets 13 ALT Press and hold this button to access alternative functions for all buttons with a green label This projector does not use the following options on the remote DVI VG...

Page 17: ...1 ADDR ALL with red indicator at the top Assign and unassign an IR remote address l To assign an IR remote address 1 Press and hold this button until the red indicator starts flashing 2 Release this b...

Page 18: ...rared reception 40 40 The projector has infrared sensors at the front and back The angle of acceptance is 40 Make sure that the remote control is within the angle of acceptance when trying to control...

Page 19: ...ble feet to hang or mount the projector 1 Install the screen ensuring that it is in the best position for viewing by your audience 2 Mount the projector ensuring that it is at a suitable distance from...

Page 20: ...The projector can be operated in numerous positions 360 2 Pitch 30 330 2 1 Roll In portrait mode it is recommended to position the projector with inputs facing upward as shown in the diagram 1 Recomme...

Page 21: ...mage impairment The lens is shipped separately Take care to preserve the original lens packaging and protective caps for future use The projector will not power on without the lens fitted Inserting a...

Page 22: ...ser 13000 WU Series Changingthelens Removing the lens 1 Push the lens release button all the way in 2 Turn the lens anti clockwise until it disengages 3 Slowly remove the lens Rev A June2019 page22 In...

Page 23: ...OWER indicator goes steady red to indicate that the projector has entered STANDBY mode 2 If you need to switch the projector off completely switch off at the mains power switch next to the power conne...

Page 24: ...he remote control to adjust zoom focus and shift directly without opening a menu l OK enters lens control then switches between Zoom Focus Adjustment and Shift Adjustment l EXIT exits lens control and...

Page 25: ...Rev A June2019 E Vision Laser13000 WU Series High Brightness Digital Video Projector CONNECTION GUIDE 119 946A...

Page 26: ...6 DisplayPort DisplayPort 1 1a input Connect a DisplayPort cable to the connector Supports sources up to 1920 x 1200 resolution at 24 60 Hz Supports HDCP 7 HDMI II HDMI 1 4b input supporting Frame Seq...

Page 27: ...again Using DisplayPort HDMI HDBaseT switchers with the projector When using a DisplayPort HDMI HDBaseT source switcher with the projector it is important to set the switcher so that it passes the pr...

Page 28: ...me Sequential up to 30Hz per eye Also supports the domestic Blu Ray formats See supported signal input modes on page 107 4 DisplayPort DisplayPort 1 1a input supporting Frame Sequential 3D source up t...

Page 29: ...detected by the projector Frame sequential 3D sources up to 120Hz See 3D formats on page 109 for a complete list of supported formats and frame rates While the projector can receive 100 120Hz and dis...

Page 30: ...Digital Projection Ltd E Vision Laser 13000 WU Series 3D connections 3D Sync 1 2 3 4 1 3D Input 2 3D Sync In 3 3D Sync Out 4 IR emitter or Zscreen Rev A June2019 page30 Connection Guide Notes...

Page 31: ...Screen trigger A trigger output can be used to control an electrically operated screen The screen will be automatically deployed when the projector starts up and retracted when the projector shuts dow...

Page 32: ...the Digital Projection website For simultaneous HDBaseT and LAN connectivity a third party distribution product can be utilised to combine HDBaseT video stream with LAN connection for delivery to the...

Page 33: ...232 connection example The Protocol Guide is available separately All of the projector s features can be controlled via a serial connection using commands described in the Protocol Guide Straight thro...

Page 34: ...Digital Projection Ltd E Vision Laser 13000 WU Series Rev A June2019 This page is intentionally left blank...

Page 35: ...Rev A June2019 E Vision Laser13000 WU Series High Brightness Digital Video Projector OPERATING GUIDE 119 946A...

Page 36: ...O F F O N D E F A U L T F R E E Z E R E S Y N C A B C D U S E R P R E S E T Remote control POWER INPUT AUTO SYNC ASPECT CENTER LENS PIC MUTE Projector control panel Access the various menus using eith...

Page 37: ...ue Unavailable Item Value Slider Value Sub menu Command Inside a menu The highlighted item has green background When you open a menu the page consists of the following elements l Title bar at the top...

Page 38: ...rning All Menu values will be lost Press OK to confirm Press Exit to cancel Confirmation Dialog Menu Name Menu Item Value Highlighted Command Highlighted Command If the item contains a command highlig...

Page 39: ...the list of values that opens use the UP and DOWN arrow buttons to highlight a value then press ENTER OK again to select the highlighted value Using a slider to set a value Parameter Value Slider Som...

Page 40: ...and DOWN arrow buttons to highlight the row containing the numeric field you wish to edit 2 Press ENTER OK to enter edit mode A numeric field in edit mode is white text on blue background 3 In edit mo...

Page 41: ...s Use the UP and DOWN arrow buttons to select an input from the list then press ENTER OK to confirm your choice Press EXIT to return to the main menu l Test Pattern Choose from White Black Red Green B...

Page 42: ...r a non UST lens l Lens Memory Opens a sub menu see next page Lens control Lens Control Zoom Focus OK Shift Adjustment Lens Control Shift OK Zoom Focus Adjustment Lens Control settings operate in Zoom...

Page 43: ...reen size and aspect ratio in a dedicated preset Use Clear Memory to delete a memory preset if you need to save a new combination of lens settings in its place Overwriting a saved memory preset is not...

Page 44: ...Low Middle and High l Gamma Choose a de gamma curve from 1 0 1 8 2 0 2 2 2 35 2 5 S Curve and DICOM Used correctly the Gamma setting can improve contrast while maintaining good details for blacks and...

Page 45: ...he phase of the pixel sampling clock relative to the incoming signal Adjust the phase if noise is visible l Tracking Adjusts the frequency of the pixel sampling clock Flicker or vertical banding indic...

Page 46: ...es the noise on the luminance component l Block This filter helps reduce block noise which appears like small blocks in the image and is caused by MPEG compression l Mosquito This filter helps reduce...

Page 47: ...tive Gains and Lifts Color space Color Color Space Auto Color Mode Auto YPbPr YCbCr RGB PC RGB Video ColorMax Manual Color Matching Color Temperature Gains and Lifts In most cases the Auto setting det...

Page 48: ...in the following color modes ColorMax Manual Color Matching Color Temperature and Gains and Lifts ColorMax Color Color Space Auto Color Mode ColorMax ColorMax Peak Manual Color Matching HDTV Peak User...

Page 49: ...n 100 Gain 100 1 Set Color Mode to Manual Color Matching 2 Open the Manual Color Matching submenu Here you can do the following See Color matching parameters explained on the next page for more detail...

Page 50: ...e the color values in the following ways 1 Hue Specifies the position of each color red yellow green cyan blue and magenta relative to its neighboring colors 2 Saturation Specifies the level of white...

Page 51: ...ature 2 Navigate to the Color Temperature setting Choose a value from 3200K warmer to 9300K cooler or Native no correction Gains and lifts 1 Set Color Mode to Gains and Lifts 2 Open the Gains and Lift...

Page 52: ...y an unusual projection angle or irregular screen surface Aspect ratio Image scaling and aspect ratio are also influenced by Setup Screen Setting See Theaterscope setting on the facing page for furthe...

Page 53: ...at the top and bottom of the 16 9 screen to make up for the difference in aspect ratios Without an anamorphic lens and without the TheaterScope setting applied a 16 9 source containing a 2 35 1 image...

Page 54: ...enlarged section is cropped out to preserve the overall image size l Digital Zoom defines the level of zoom that needs to be applied If Digital Zoom is set to 0 then the other settings in the menu wil...

Page 55: ...Crop Zoom Warping Mode Keystone 4 Corners Rotation Pincushion Barrel Arc Custom Warp Use this setting to compensate for noisy or badly defined image edges Crop removes unwanted artifacts from the edg...

Page 56: ...Use this feature to l fit an odd sized screen l cut off timecode dots in the top line of a picture l cut off subtitles etc Select the edge you wish to blank and use the LEFT and RIGHT arrow buttons to...

Page 57: ...rotation in Keystone is reduced from normal rotation Keystone H Keystone 0 V Keystone 0 Rotation 0 Reset Use this setting to compensate for any distortion caused by the projector being in a different...

Page 58: ...ision Laser 13000 WU Series Usingtheprojector Keystone example The image is corrected when Keystone is applied The resulting image is distorted The projector is positioned at an angle Rev A June2019 p...

Page 59: ...To correct apply a negative Horizontal Keystone value using the LEFT arrow button 3 Projector high The projector is positioned above the screen at a downward angle To correct apply a negative Vertical...

Page 60: ...ovide a simple setup for awkward installations and irregular shaped screens that may distort the image To apply a similar but less flexible correction while preserving the original aspect ratio of the...

Page 61: ...Laser 13000 WU Series Top right corner example Top Right Corner Adjustment Top Right Corner x 0 Top Right Corner y 0 In this illustration the top right corner requires both horizontal and vertical cor...

Page 62: ...ion Laser 13000 WU Series Usingtheprojector Rotation Rotation Rotation 0 Reset Use this feature for example to correct a mounting error causing the image not to be level with the screen Rev A June2019...

Page 63: ...area that would be occupied by the image without correction 2 Rotated image The image is smaller than the surrounding DMD area It is scaled in order to remain within the DMD area 3 Angle of rotation...

Page 64: ...he screen or using a surface that is not flat Use the Pincushion Barrel control to compensate electronically for such distortions You can also use this menu to make simple panoramic screen corrections...

Page 65: ...any edge will reduce the image size as the projector needs to maintain the aspect ratio A negative Arc value will not affect the overall image size This feature is similar to Pincushion Barrel but all...

Page 66: ...ature permits selection of predefined User warp maps Use the Projector Controller PC application to create the custom warp maps Custom warp maps provide non linear curvature correction for curved or s...

Page 67: ...overlap with other projectors in the array as a result the overlapping edges are evenly lit and easily blend in with the rest of the image l Edge Blend Enable and disable Edge Blend l Align Pattern A...

Page 68: ...tom 0 Left 0 Right 0 Use the blend start options to deactivate pixels at the edge of the image and set the start point for the blended region Use the LEFT and RIGHT arrow buttons to set the start poin...

Page 69: ...Vision Laser 13000 WU Series Blend width Blend Width Top 0 Bottom 0 Left 0 Right 0 Use the LEFT and RIGHT arrow buttons to set the width of the blended regions 1 2 3 4 1 Top 2 Bottom 3 Left 4 Right O...

Page 70: ...s at the edges where the blended region of one projector overlaps the pond of mirrors of its neighbor In the example below the blended image comes from two projectors 1 and 2 Both images have black le...

Page 71: ...Frame Sequential Frame Sequential is for sources where Left and Right eye images are delivered as alternate frames from a single input Dual Pipe is for sources where Left and Right eye are delivered...

Page 72: ...vered on two separate HDMI links which the projector will interleave for 3D display l Frame Sequential For sequential 3D an external sync is required to identify left and right frames If no sync is av...

Page 73: ...until the best result is obtained Dark time Fully On Fully Off Left Right Dark Time Dark Time Dark Time Banding can be caused if the image is displayed before each eye of the 3D switching glasses or Z...

Page 74: ...fter delay adjustments The sync signal from the 3D server will be in phase with the frames generated by its graphics card However to compensate for switching delays in the glasses or ZScreen Sync Offs...

Page 75: ...h to adjust the power manually l Power Level This setting is only available if Power Mode is set to Custom Choose a value between 20 and 100 ranging from 20 to 100 laser power l Constant Brightness On...

Page 76: ...up user defined color gamut values l Power On Off Access the submenu to set up automatic projector power on and power off l Clock Adjust Access the submenu to set current date and local time l Standb...

Page 77: ...r starts flashing Release the ADDR button and while the indicator is still flashing enter a two digit address using the numeric input buttons The indicator will flash three times quickly to confirm th...

Page 78: ...dual x and y coordinates for each color enables you to match not only the whites but each individual color as well Highlight the submenu you wish to open and press ENTER OK to confirm your choice Meas...

Page 79: ...R button is pressed on the control panel or the ON button is pressed on the remote control Scheduled on off Schedule Off S M T W T F S Time On 12 34 Off 12 34 On 12 34 Off 12 34 l Scheduled on off Acc...

Page 80: ...gs Language English Menu Position Center Menu Transparency 0 Time Out 30 Seconds Message Box On l Language sets the OSD language l Menu Position determines where the OSD should appear on the screen wh...

Page 81: ...red for each input The following settings are saved in a preset l From the Image menu Dynamic Black Gamma Brightness Contrast Saturation Hue Sharpness and Noise Reduction l From the Color menu Color S...

Page 82: ...l Network Mode Choose between Projector Control and Service l DHCP IP Subnet Mask Gateway DNS Set DHCP to On if the IP address is to be assigned by a DHCP server or Off if it is to be set here If DHC...

Page 83: ...off l Source Select an input source for the PIP image Any combinations are possible between main and PIP input source as long as one of the inputs is either DisplayPort or 3G SDI l Position Set the l...

Page 84: ...r Hours 2 System Status Thermal Status Factory Reset This menu gives information about software and hardware configuration input source and laser operating times It also allows you to restore the fact...

Page 85: ...ltitude Mode Auto Laser Power 100 Constant Brightness Off Thermal status Thermal Status Inlet Temp Ti1 24 C DMD Temp 38 C LD Temp B2 51 B3 48 C RLD Temp U 40 1 D 39 C Outside Temp 22 C Fan 1 3 Speed 1...

Page 86: ...00WU Serial Number X000XXXXX0000 Software Version 1 MD03 SE10 FE09 Factory Reset Warning All user settings will be lost Press OK to confirm Press Exit to cancel Thermal Status Factory Reset To restore...

Page 87: ...al Projection Ltd E Vision Laser 13000 WU Series Served web pages The served web pages allow you to control the projector remotely via LAN The default IP address is 192 168 0 100 OperatingGuide Rev A...

Page 88: ...Digital Projection Ltd E Vision Laser 13000 WU Series Served web pages Rev A June2019 page88 OperatingGuide Notes...

Page 89: ...Served web pages Digital Projection Ltd E Vision Laser 13000 WU Series OperatingGuide Rev A June2019 page89 Notes...

Page 90: ...Digital Projection Ltd E Vision Laser 13000 WU Series Served web pages Rev A June2019 page90 OperatingGuide Notes...

Page 91: ...Served web pages Digital Projection Ltd E Vision Laser 13000 WU Series OperatingGuide Rev A June2019 page91 Notes...

Page 92: ...Digital Projection Ltd E Vision Laser 13000 WU Series Rev A June2019 This page is intentionally left blank...

Page 93: ...Rev A June2019 E Vision Laser13000 WU Series High Brightness Digital Video Projector REFERENCE GUIDE 119 946A...

Page 94: ...and corner A number of lenses are available Which lens you choose depends on the screen size image aspect ratio throw distance and light output The following table shows all available lenses in order...

Page 95: ...ers 1 2 Identify the required lens by calculating the throw ratio A throw ratio is the ratio of the throw distance 2 to the screen width 1 1 Use the formula above to obtain the required throw ratio 2...

Page 96: ...77 1 fixed UST 0 82 m 2 71 m 0 75 0 93 1 zoom 1 02 m 12 7 m 0 76 1 fixed 0 81 m 5 08 m 1 25 1 79 1 zoom 1 33 m 11 73 m 1 73 2 27 1 zoom 1 83 m 14 9 m 2 22 3 67 1 zoom 2 36 m 24 2 m 3 58 5 38 1 zoom 3...

Page 97: ...TRC Example Fig 1 illustrates a 4 3 image within a 16 9 display When a 16 9 projector is used for a 4 3 image the image does not fill the width of the DMD creating a pillarboxing effect blank spaces t...

Page 98: ...x 1200 pixels TRC 1 2 1 25 1 5 4 1500 x 1200 pixels TRC 1 28 Calculating the throw ratio with TRC TRC can only be applied if greater than 1 If TRC is 1 or less disregard it and calculate the throw ra...

Page 99: ...d 0 81 m 5 08 m 1 25 1 79 1 zoom 1 33 m 11 73 m 1 73 2 27 1 zoom 1 83 m 14 9 m 2 22 3 67 1 zoom 2 36 m 24 2 m 3 58 5 38 1 zoom 3 8 m 35 35 m 5 31 8 26 1 zoom 5 59 m 54 8 m Your screen is 4 5m wide you...

Page 100: ...splay The following examples show how a number of common formats may be displayed depending on your DMD resolution WUXGA images displayed full width full width 1920 pixels 2 35 1 Scope 817 pixels 16 1...

Page 101: ...onal size D When dealing with large screens and projection distances at different aspect ratios it is more convenient to measure screen width W and height H The example calculations below show how to...

Page 102: ...red for the highest quality image Shifting the lens up rising front Centred Lens Shifting the lens down falling front The normal position for the projector is at the centre of the screen However you c...

Page 103: ...adjustment outside the ranges specified on the following page may result in an unacceptable level of distortion particularly at the corners of the image due to the image passing through the periphery...

Page 104: ...aspect ratio 16 9 leaves black bars at the top and bottom of the screen letterboxing effect 4 3 and 5 4 leave black bars at the sides of the screen pillarboxing l TheaterScope is a special setting use...

Page 105: ...explained Digital Projection Ltd E Vision Laser 13000 WU Series Source 16 9 Aspect Ratio 16 10 1 1 Aspect Ratio Source 16 9 Source 16 10 native Aspect Ratio Source 16 10 ReferenceGuide Rev A June2019...

Page 106: ...make up for the difference in aspect ratios Black margin part of the source Black margin part of the source Without an anamorphic lens and without the TheaterScope setting applied a 16 9 source conta...

Page 107: ...0 85 60 800 x 600 60 32 60 800 x 600 75 60 800 x 600 85 06 60 848 x 480 47 95 48 848 x 480 59 94 60 1024 x 768 60 60 1024 x 768 75 60 1024 x 768 85 60 1280 x 720 47 95 48 1280 x 1024 60 02 60 1280 x 1...

Page 108: ...Hz Remarks RGB YUV 8 bit YUV 10 bit YUV 12 bit SDTV 480i 59 94 60 1440x480i 60 60 1440x576i 50 50 576i 50 50 EDTV 480p 59 94 60 576p 50 50 HDTV 1035i 60 60 1080i 50 50 1080i 59 94 60 1080i 60 60 720p...

Page 109: ...0x720 59 94 750 44 96 120 3 720p60 Top and Bottom 1280x720 60 00 750 45 00 120 3 1080p23 Frame Packing 1920x1080 23 98 2205 26 97 96 4 1080p24 Frame Packing 1920x1080 24 00 2205 27 00 96 4 1080i50 Sid...

Page 110: ...Frame Sequential 1920x1200 100 00 1258 125 72 100 3 WUXGA_120_RB Frame Sequential 1920x1200 120 00 1271 152 40 120 2 3 1080p23 Dual Pipe 1920x1080 23 98 1125 26 97 96 4 1080p24 Dual Pipe 1920x1080 24...

Page 111: ...HD SMPTE 292M 1 5Gbps HD YCbCr 4 2 2 10 1080i50 HD SMPTE 292M 1 5Gbps HD YCbCr 4 2 2 10 1080P24 HD SMPTE 292M 1 5Gbps HD YCbCr 4 2 2 10 720P60 HD SMPTE 292M 1 5Gbps HD YCbCr 4 2 2 10 720P50 HD SMPTE 2...

Page 112: ...or 19 way type A connector 1 TMDS Data 2 2 TMDS Data 2 Shield 3 TMDS Data 2 4 TMDS Data 1 5 TMDS Data 1 Shield 6 TMDS Data 1 7 TMDS Data 0 8 TMDS Data 0 Shield 9 TMDS Data 0 10 TMDS Clock 11 TMDS Cloc...

Page 113: ...in 6 ML_Lane 1 n Lane 1 negative Pin 7 ML_Lane 2 p Lane 2 positive Pin 8 GND Ground Pin 9 ML_Lane 2 n Lane 2 negative Pin 10 ML_Lane 3 p Lane 3 positive Pin 11 GND Ground Pin 12 ML_Lane 3 n Lane 3 neg...

Page 114: ...al Projection Ltd E Vision Laser 13000 WU Series Appendix B wiringdetails 3G SDI in 3G SDI out 3G SDI connector 75 ohm BNC HDBaseT input HDBaseT LAN RJ45 socket Rev A June2019 page114 ReferenceGuide N...

Page 115: ...one time LAN HDBaseT LAN RJ45 socket Shared with HDBaseT RS232 RS232 pin view of female connector 9 way D type connector 1 unused 2 Transmitted Data TX 3 Received Data RX 4 unused 5 Signal Ground 6 un...

Page 116: ...ight with left hand polarisation can pass through the left lens and light with right hand polarisation can pass through the right hand lens These glasses are used in conjunction with another device wh...

Page 117: ...In Component Video signals brightness is the same as luminance Brightness optical Describes how bright an image that is projected onto a screen appears to an observer C C Also known as C this is the...

Page 118: ...g time between left and right eye DDC Display Data Channel A communications link between the source and projector DDC is used on the HDMI DVI and VGA inputs The link is used by the source to read the...

Page 119: ...ed in a sequence to create a moving picture A frame is made of horizontal lines of pixels For example a 1920x1080 frame consists of 1080 lines each containing 1920 pixels In analog video frames are sc...

Page 120: ...pplicable to NTSC I Interlacing A method of updating the image The screen is divided in two fields one containing every odd horizontal line the other one containing the even lines The fields are then...

Page 121: ...r countries 625 lines transmitted at 50 interlaced fields per second Pillarboxing Black margins at the left and right of the image Pillarboxing appears when a narrower image is packed into a wider fra...

Page 122: ...of lines for example 1920 x 1200 RGB Red Green and Blue An uncompressed Component Video standard S Saturation The amount of color in an image Scope An aspect ratio of 2 35 1 SDTV Standard Definition T...

Page 123: ...ratio of the DMD aspect ratio to the image source aspect ratio TRC DMD aspect ratio Source aspect ratio TRC is only used in calculations if it is greater than 1 U UXGA A display resolution of 1600 x...

Page 124: ...out the signal color Not to be confused with Cr Cb Z ZScreen A special kind of light modulator which polarizes the projected image for 3D viewing It normally requires that images are projected onto a...

Page 125: ...1 770 420 1350 Fax 1 770 420 1360 powerinfo digitalprojection com www digitalprojection com Digital Projection Limited Greenside Way Middleton Manchester M24 1XX UK Registered in England No 2207264 Re...

Reviews: