background image


7. Connect the Network Hardware

Note: If you are not connecting your system to a      
network, go to panel 8.

See your system manager or network administrator to:
1. Determine whether network registration is required.
2. Obtain a unique node name and address.
3. Configure the network software.
Next, determine which of the following network con-
nections you have:

10BASE-T (UTP or twisted-pair)

10BASE2 (ThinWire)

AUI

Connecting Your Workstation to  10BASE-T:
For a 10BASE-T (UTP) network you can connect      
directly 
to your office 10BASE-T Ethernet using the
10BASE-T network cable provided with your system.
Connect this network cable from the 10BASE-T      
connector on the back of the system unit to your   
10BASE-T office network connection.

Connecting Your Workstation to 10BASE2:
For a 10BASE2 (ThinWire) network, you need to    
purchase the optional DETTR-AA/AB adapter from
Digital and then:

Connect your 10BASE-T network cable from the
10BASE-T connector on the back of the system 
unit to the 10BASE-T connector      at Port 2 on the
adapter.  

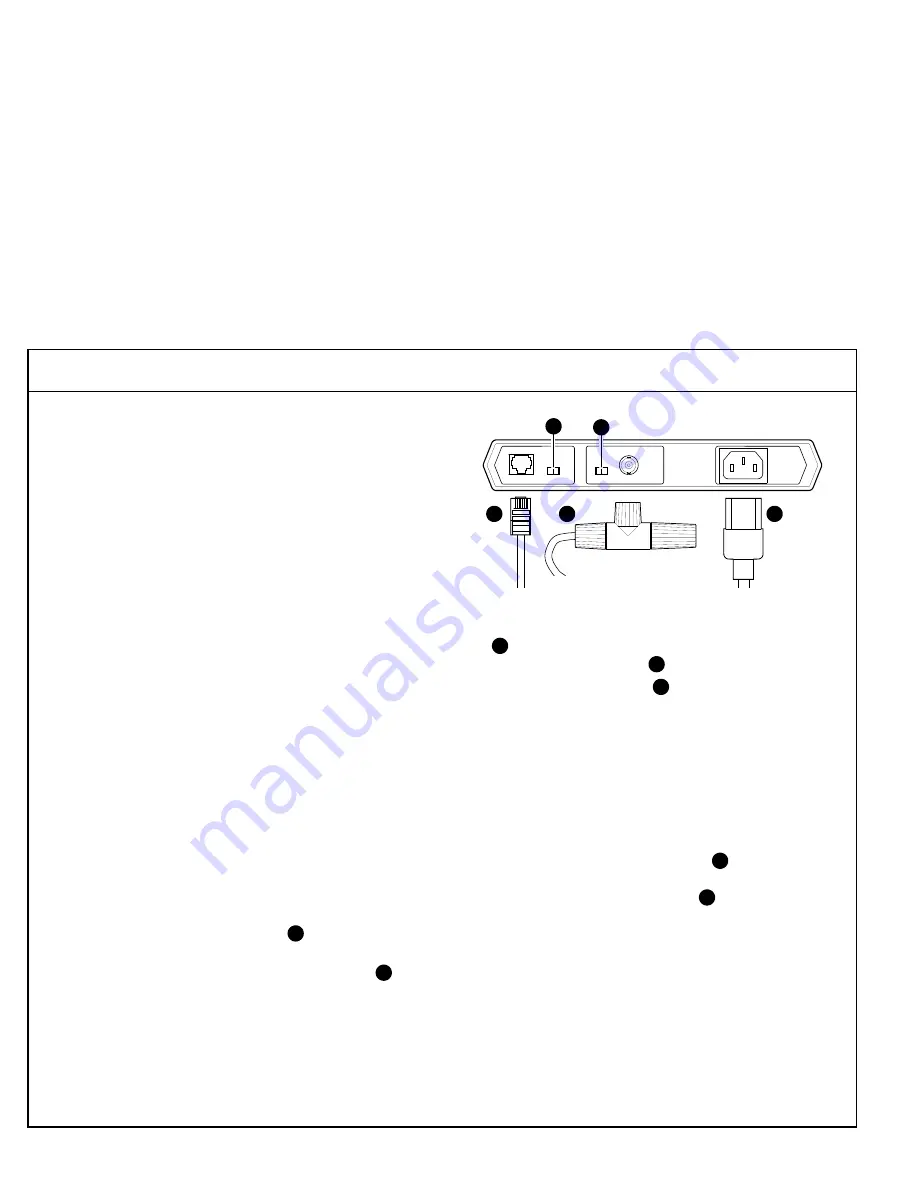
Connect your 10BASE2 office network cable       to
Port 1 on the adapter using a T-connector, as shown
in the next figure. If this is the end of the ThinWire
segment, attach a terminator to the T-connector,    
opposite the network cable.


Set the internal termination switch on the adapter     
       to the off position.

Set the switch at Port 2       to the MDI  X position.

Connect the power cord       from the adapter to a
wall outlet.

Connecting Your Workstation to an AUI Drop: 
For  connection to an AUI drop, you need to purchase
the optional DETTR-BA/BB adapter from Digital and
then:

Connect your 10BASE-T network cable from the
10BASE-T connector on the back of the system
unit to the 10-BASE-T connector     at Port 2 on the
adapter.

Connect your office AUI drop       to Port 1 on the
adapter, as shown in the next figure.

Check with your system manager to ensure that the
SQE/Heartbeat function is disabled on any device
that is connected to the AUI side of the adapter.
The DETTR-BA/BB will not function correctly in
the presence of a Heartbeat.

          (continued on next panel)


POWER

10 BASE-T

PORT 2

1

3

ThinWire

PORT 1

MLO-010692

On

Off

MDI X

MDI

2

4

6

1

3

4

2

6

1

5

Summary of Contents for DEC 3000 300 AXP Series

Page 1: ...DEC 3000 Model 300 Series AXP Setting Up Your System READ THIS FIRST Part Number EK PELHW IC C01...

Page 2: ...or SCSI terminator Modem loopback connector 10BASE T loopback Documentation some items may be country specific Blank panel and metal shield included only if you ordered a preinstalled RX26 drive Mouse...

Page 3: ...ers inches of clearance on all sides of your monitor and system unit for proper air circulation Digital also recommends that you Maintain as dust free an environment as possible Not place your system...

Page 4: ...ard mouse extension cable Used in asynchronous mode to connect communications devices such as a printer plotter modem or console terminal Supports X 25 and is operating system depend ent If running di...

Page 5: ...keyboard mouse port labeled in panel 3 3 Connect the video cable for your monitor to the monitor video port labeled in panel 3 4 Connect the power cord for your monitor to the monitor power socket lab...

Page 6: ...s For a color monitor If your monitor has two rows of three connec tors attach the video connectors to the RGB Video In ports If you have five connectors attach the video connectors to the first three...

Page 7: ...e that the arrow on the mouse cable con nector should be facing up when inserted into the connector block 2 To secure the keyboard mouse extension cable place the plastic flap of the cable connector b...

Page 8: ...10BASE T connector at Port 2 on the adapter Connect your 10BASE2 office network cable to Port 1 on the adapter using a T connector as shown in the next figure If this is the end of the ThinWire segmen...

Page 9: ...u can use the 10BASE T network cable sup plied with your system to connect each worksta tion to a 10BASE T port on the repeater Follow the instructions provided with the specific re peater when connec...

Page 10: ...elbows are close to your sides with your upper arms perpendicular to the floor You maintain a neutral neck posture with the top of the video screen no higher than eye level Adjust monitor and lighting...

Page 11: ...The green power indicator light should come on as shown in in the next figure 7 If your workstation had a yellow sticker over the power connector you have factory installed software FIS that automati...

Page 12: ...software from a fixed disk on an OpenVMS AXP system boot dka 300 help Displays a list of commands advanced parameters and qualifiers set Defines the keyboard language language The default language is...

Page 13: ...terminal Running utilities and diagnostic tests Identifying and solving system problems includ ing a check of error codes and field replaceable unit FRU codes System and option specifications Port pin...

Reviews: