-6-
3
Hardware Setup
Use the following steps to setup the hardware.
Certain BIOS screen items may differ from those shown here
due to new versions.
1) Connect a keyboard to the PL.
2) Turn the PL’s power ON.
3) After the message, “Press <DEL> to Enter SETUP” appears at the left bottom
of the screen, hold down the [DEL] key.
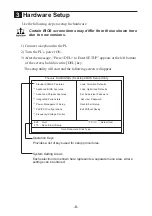
The setup utility will start and the following screen will appear.
Operation Keys
Provides a list of keys used for setup procedures.
System Setting Areas
Each selection item shown here represents a separate menu area, where
settings can be entered.
4
Standard CMOS Features
4
Advanced BIOS Features
4
Advanced Chipset Features
4
Integrated Peripherals
4
Power Management Setup
4
PnP/PCI Configurations
4
Frequency/Voltage Control
ESC : Quit
: Select Item
F10 : Save & Exit Setup
Time,Date,Hard Disk Type . . .
Load Fail-Safe Defaults
Load Optimized Defaults
Set Supervisor Password
Set User Password
Save & Exit Setup
Exit Without Saving
Phoenix FirstBIOS(tm) Desktop CMOS Setup Utility


