Digital Alert Systems MultiPlayer DASMP Quick Start Manual Download Page 6


Digital Alert Systems 

MultiPlayer Quick Start Guide 


Revision 4.0 


Page 6 of 13 

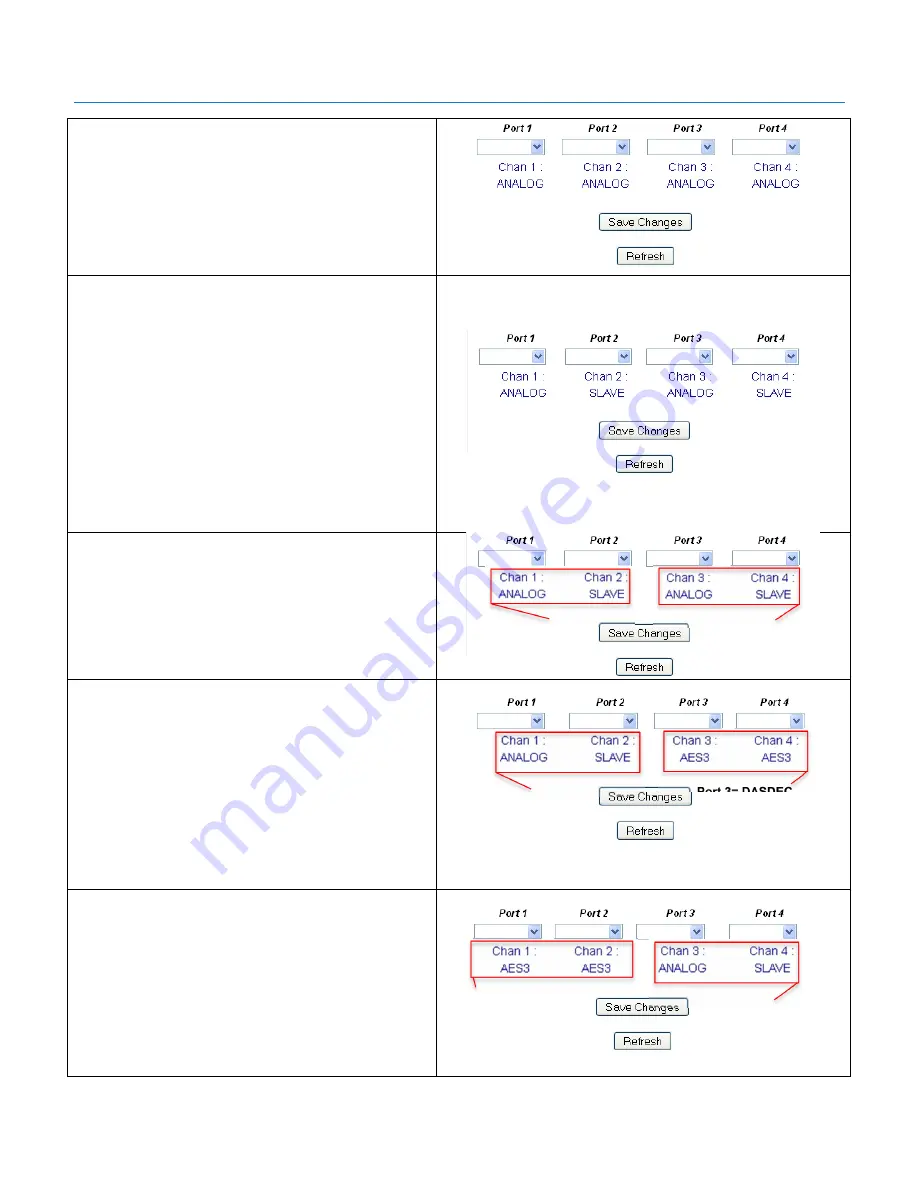
Analog audio can be used as a mono source for any port, 

as shown to the right. 


Analog audio can also be used as a stereo left and right 

source.  To use Analog audio as a stereo source, Port 1 

would need to be set to “ANALOG” and Port 2 would need 

to be set to “SLAVE”. This forms a bonded pair.  

An analog stereo source can also be configured for ports 3 

and 4.  Port 3 would need to be set to “ANALOG” and Port 

4 would need to be set to “SLAVE”. This forms a bonded 

pair. 

 The screenshot on the right shows 2 Analog stereo 

sources being used. 

*The Slave option can only be selected for Ports 2 and 4 


With 2 Analog stereo sources set for the Multiplayer, Ports 

1 and 2 are now Station 1 in the DASDEC Multistation 

Interface.  Ports 3 and 4 would be Station 3 in the 

DASDEC Multistation Interface. 


If only one Analog Stereo source is to be used, then the 

Ports can be arranged in one of 2 ways.  

If Ports 1 and 2 are configured as an Analog Stereo 

source, Ports 1 and 2 are now Station 1 in the DASDEC 

Multistation Interface.  Port 3 is Station 3 in the DASDEC 

Multistation Interface and Port 4 is Station 4 in the 

DASDEC Multistation Interface.  

Ports 3 and 4 can be set to AES, Analog, or ORIG 

depending on the sources being used. 


If Ports 3 and 4 are configured as an Analog Stereo 

source, Ports 3 and 4 are now Station 3 in the DASDEC 

Multistation Interface.  Port 1 is Station 1 in the DASDEC 

Multistation Interface and Port 2 is Station 2 in the 

DASDEC Multistation Interface.  

Ports 1 and 2 can be set to AES, Analog, or ORIG 

depending on the sources being used. 


You must make your selections for each Port when you would like to make a change

.  Once a selection has been made 

for all of the ports, click on 

Save Changes

. To ensure that your settings have saved, click the refresh button. If your 

configuration remains the same below the pull down menus, then your settings have been saved.


DASDEC Multistation 
Interface: Station 1 

DASDEC Multistation 
Interface: Station 3 


DASDEC Multistation 
Interface: Station 1 

DASDEC Multistation 
Interface: Station 3 


Port 1= DASDEC 
Multistation Interface: 
Station 1 
Port 2= DASDEC 
Multistation Interface: 
Station 2 

Port 3= DASDEC 
Multistation Interface: 
Station 3 
Port 4= DASDEC 
Multistation Interface: 
Station 4 


Summary of Contents for MultiPlayer DASMP

Page 1: ...and program switching either simultaneously sequentially or with staggered start times the DASDEC handles EAS playout and switching for the 5th channel This means a DASDEC and DASMP combination can ai...

Page 2: ...EC the MultiPlayer should be configured with a static IP address Consult your IT department to determine the following information Static IP Address _ _ _ _ _ _ _ _ _ _ _ _ Gateway _ _ _ _ _ _ _ _ _ _...

Page 3: ...wn in Figure 4 11 Enter the previously obtained information for IP Address Gateway Address and Subnet Mask in the associated fields 12 Click Save Changes to store the values 13 Click Restart System wi...

Page 4: ...AES3 2 AES digital without input stereo pair ORIG 3 Analog mono ANALOG 4 Analog stereo ANALOG SLAVE combination The different channels created by the MultiPlayer are linked to the different MultiStati...

Page 5: ...nel 2 would be seen as station 2 channel 3 would be seen as station 3 and channel 4 would be seen as station 4 Therefore 4 stations can be configured in the MultiStation interface of the DASDEC The sc...

Page 6: ...in the DASDEC Multistation Interface Port 3 is Station 3 in the DASDEC Multistation Interface and Port 4 is Station 4 in the DASDEC Multistation Interface Ports 3 and 4 can be set to AES Analog or ORI...

Page 7: ...rogram wiring configuration The MultiPlayer features automatic program bypass in the event of power fail In this way the program input will automatically be routed to the program output should power b...

Page 8: ...4 MP Port 1 Input 4 Port 2 Connection DASDEC Label Setup GPIO MultiPlayer GPIO Pin 1 GPO 1 MP Port 2 Relay 1 Pin 1 Pin 2 GPO 2 MP Port 2 Relay 2 Pin 1 Pin 3 GPI 1 MP Port 2 Input 1 Pin 4 GPI 2 MP Port...

Page 9: ...ne of the expansion Ethernet ports you need to be sure it is enabled and configured properly Configuring a Network Interface 1 Log In to the DASDEC 2 Go to Setup Network Configuration 3 Enable the pro...

Page 10: ...ns in BOTH the MultiPlayer FTP User Name and MultiPlayer FTP Password fields 6 Once the network information is entered the DASDEC will attempt to verify connection to the MultiPlayer If there is a con...

Page 11: ...ext for more information 10 Once selected the change is immediately applied 11 If you are using Analog Audio for the MultiPlayer you must set the EAS Header Tone EOM Amplitude percent to 40 Once you h...

Page 12: ...ltiPlayer is not connected to the DASDEC you will see the warning message as shown in Figure 13 If necessary follow the steps in STEP 2 6 above to verify connectivity Figure 13 Warning message if Mult...

Page 13: ...Repeat Steps 3 4 thru 3 9 for each station Step 4 Configuring the MultiPlayer GPI s and GPO s 1 Log in to the DASDEC 2 Go to Setup GPIO MultiPlayer GPIO 3 Using the pull down selections to define the...

Reviews: