background image

37

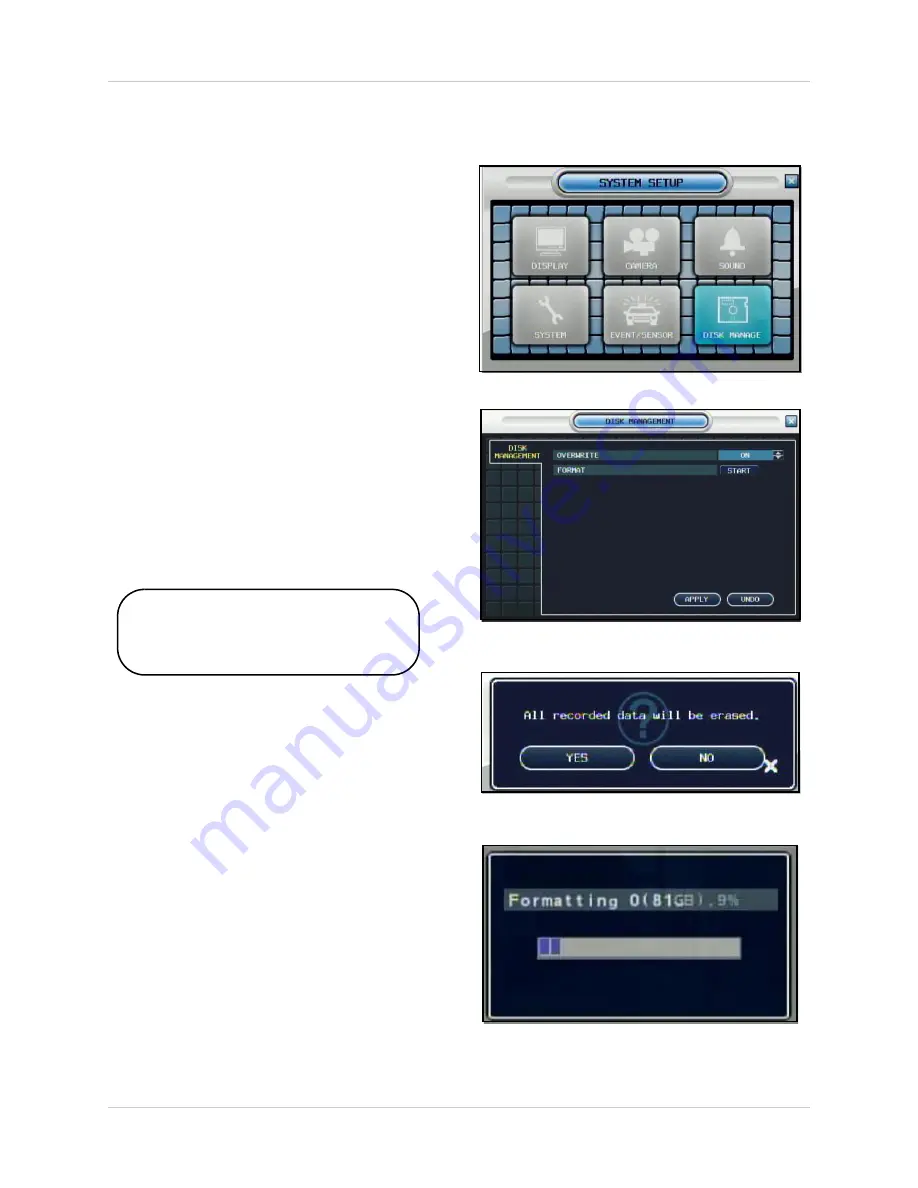
Disk Management

Disk Management

• 

Overwrite

 - Determines how data is 

maintained when the Hard Drive is full.

• 

ON

 - When Overwrite is set to ON, data 

will be overwritten when the Hard Drive 
is full, starting with the Oldest recording.                  

• 

OFF

 - 

When Overwrite is set to OFF, the 

data will not be overwritten when the Hard 
Disk is Full. Recording will Stop, and the 
Buzzer will be Activated.

• 

Format

 - Erases all Hard Drive data:

• Press start button. A warning message will 

be displayed with the prompt ‘All 
Recorded Data will be erased.’

• Select OK to erase the data, or CANCEL 

to return without erasing the Hard Drive.

• Once OK is selected, the user will be 

prompted to enter the 

ADMIN 

PASSWORD. 

Once the password is 

accepted, all Hard Drive data will be 
erased.

Formatting Status Indicator Window: 
Once the format is complete, the 
system will return to the Disk Manage 
Menu.

Summary of Contents for DHU104 Series

Page 1: ...yright 2008 Digimerge Technology Inc www digimerge com INSTRUCTION MANUAL English Version 1 0 DIGITAL VIDEO SURVEILLANCE RECORDER WITH PENTAPLEX OPERATION AND MPEG4 VIDEO COMPRESSION MODELS DHU104 SER...

Page 2: ...IC SHOCK MATCH WIDE BLADE OF PLUG TO WIDE SLOT FULLY INSERT Thank you for purchasing this Digital Video Surveillance Recorder Digimerge is committed to providing our customers with a high quality reli...

Page 3: ...cord and if its appearance indicates damage or deteriorated insulation have it replaced by your service technician 7 Power Cord Protection Power supply cords should be routed so that they are not like...

Page 4: ...can prevent fire electric shock or other hazards 16 Safety Check Upon completion of any service or repairs to this video product ask the service technician to perform safety checks recommended by the...

Page 5: ...r is connected Consult the dealer or an experienced radio or television technician for assistance NOTE This equipment has been certified and found to comply with the limits regulated by FCC EMC and LV...

Page 6: ...o simultaneously Local Remote Advanced MPEG4 video compression 120 fps recording Graphical User Interface USB ports for data back up firmware upgrades VGA and composite video outputs for connection to...

Page 7: ...10 Virtual Keyboard Control 10 Active Option Indicator 10 Playback and Navigation Controls 11 Recording Menu Controls 12 PANIC RECORDING 12 Record Setup Menu 12 Recording Operations 12 SIMPLE RECORDIN...

Page 8: ...46 Appendix 1 System Specifications 47 Appendix 1 System Specification cont d 48 Appendix 1 System Specification cont d 49 Appendix 2 Digimerge Client Software Requirements 50 Appendix 3 Monitor Out...

Page 9: ...SURVEILLANCE RECORDER HARDWARE SOFTWARE MANUALS QUICK START GUIDE SOFTWARE CD HARD DRIVE SIZE NUMBER OF CHANNELS AND CAMERA CONFIGURATION MAY VARY BY MODEL PLEASE REFER TO YOUR PACKAGE FOR SPECIFIC CO...

Page 10: ...YBACK NAVIGATION CONTROLS Controls the playback of video and navigates in the main screen in Menu and Search Modes Decreases the playback speed in both Forward and Reverse play 2x 4x 8x 16x 32x 64x In...

Page 11: ...Output port to connect the unit to a Computer Monitor Directly reflects the current onscreen images 7 ALARM BLOCK INPUT OUTPUT RS 485 PTZ TERMINALS These terminals are used to connect External alarm d...

Page 12: ...ive audio 10 AUDIO CHANNEL SELECT Switches between liveaudiochannels CH1 4only PressAudioand select Channel 1 4 11 PIP Displays the Component Input in the PIP Screen in the lower right corner 12 DVR S...

Page 13: ...Left and Right Buttons to open menus and change options RIGHT BUTTON Opens a submenu to access a list of options LEFT BUTTON Double click on a Channel in QUAD or other views to view the single camera...

Page 14: ...channel displays the Camera Name and Recording Status Record Pre Record C Continuous M Motion A Alarm NOTE If a new HARD DRIVE is detected the system will prompt you to FORMAT the drive If you do not...

Page 15: ...experiencing difficulties Red Indicates that the network is unstable Display Modes Cameras can be displayed in several different modes by pressing the Display Button on the front panel of the system o...

Page 16: ...cess the Focus Control Screen The onscreen icons represent buttons on the front panel and remote control up down left right The Camera can be adjusted using these buttons F Indicates FOCUS I Indicates...

Page 17: ...Button on the front panel or press the power button on the remote control to open the Shutdown window Only the ADMIN can turn the unit ON OFF The System will NOT continue to record while the unit is...

Page 18: ...rol Click to View Uppercase and Symbols The Virtual Keyboard control becomes available when keyboard input is needed for entering information such as Names Network Information etc Includesa z A Z 0 9a...

Page 19: ...Playback Move menu cursor up Move menu cursor down Forward playback move menu cursor right Reverse playback move cursor left Pause playback Fast Forward and Reverse playback buttons can be used while...

Page 20: ...tinuous and Motion recording types Can be set to Advanced MANUAL RECORDING Manually adjust image size frame rate picture quality and set recordable audio channels Recording Operations RECORDING MODE S...

Page 21: ...cording for each channel Each channel can be set to 1 2 3 7 15 or 30 Frames per second real time video capture fromasharedpoolof240FPS Select the time grid and press the ENTER button Check the boxes f...

Page 22: ...Select an Hour highlighted in Green and press ENTER again to open the Camera Settings for the selected hour SIZE Sets the video capture size for each camera to 352x240 704x240 or 704x480 FPS Sets the...

Page 23: ...p menu Check the boxes for the following Continuous Dark Blue The system constantly records the camera based on the hourly setting Motion Light Blue Only starts the recording if motion is detected in...

Page 24: ...to 352x240 704x240 or 704x480 FPS Sets the Frames Per Second for recording for each channel Each channel can be set to 1 2 3 7 15 or 30 Frames per second real time video capture from a shared pool of...

Page 25: ...screens Search By Time Searches the system based on date and time Press the Enter button to access the Calendar on the left side of the screen Press ENTER to select and confirm the year month and cale...

Page 26: ...er and Cameras Navigate within the options using the Arrow Keys on the front panel or remote control Press the Enter button to select or deselect options Note Multiple event types can be selected Navi...

Page 27: ...also contains a Shutdown button on the ENTERING SETUP Menu To exit the MENU press the RETURN button NOTE Options may differ between the 4 Channel and the 8 16 Channel Models Carefully review the foll...

Page 28: ...ent indicators and general screen settings MONITOR Display settings for Alarm and Events OSD Onscreen Display Status Bar Turns the status bar ON OFF The status bar displays Recording State Recording R...

Page 29: ...ares i e Blue Squares Language Select the system language MONITOR SequenceDwell Setsthecycletime when the system is in Sequence Mode between 1 60 seconds Alarm Pop Up Mode Set to ON OFF Switches the s...

Page 30: ...m Covert Turns the onscreen display of the Camera ON OFF Covert Cameras continue to record however the camera is not displayed onscreen This feature iscommonlyusedinsituations wherethe Monitor is loca...

Page 31: ...www digimerge com ADDRESS Selectthephysicaladdress location of the PTZ Camera as connected to the rear PTZ Control Block Refer to the appendices for details PROTOCOL SelecttheProtocolforthe PTZ Camer...

Page 32: ...Motion Sensitivity for the individual camera between 1 low 10 high Area Setup Opens the Area Setup for the camera CONFIRMATION SCREEN Select All Selects all areas Deselect All Clears all areas Cancel...

Page 33: ...on the terminal to ON OFF Audio Monitoring Channel Select the channel for Listen in Audio 1 4 NOTE Listen In Audio only works with Channels 1 4 4CH Network Audio TX Sets Network Audio Transmission to...

Page 34: ...em Date and Time Date Format Sets the Date Display format MM DD YYYY YYYY MM DD etc Time Format Sets the Time Display format to either 12 or 24 hour display Network Time Server Setup Synchronizes the...

Page 35: ...ering the IP address Digimerge offers a free DDNS Service at http ddns digimerge net If you use the DDNS there is no need to enter the IP Address with every connection Navigate to the DDNS website to...

Page 36: ...m Data Transfer speed for the remote connection default of 8192 KB sec MAIL SETUP The Mail Setup uses your existing Email settings to send notifications and alerts Default Server Click to use the syst...

Page 37: ...usly ADD User Screen User ID Enter an ID Name for the new user Password Enter a password for the New User Group Enter the permissions level Manager Mid Level Access The Manager can use the Search Func...

Page 38: ...us System Information Screen Displays the System Information The IP address and MAC address are necessary for setting up the DDNS Server IP Address Displays the IP address assigned to the System MAC A...

Page 39: ...r user ID and password The USB device will be recognized by the system Press the START button to display the available firmware Select the Firmware and press ENTER A prompt will appear confirming the...

Page 40: ...USB flash drive Insert the USB flash drive into the System and select the Save option to save settings A Success message indicates that the backup was completed If the device is not detected a messag...

Page 41: ...Door Window Sensors ALARM OUTPUT Sends a signal to an external device when an alarm is detected BUZZER OUTPUT Turns the audible Buzzer ON OFF for selected event types E MAIL NOTIFICATION Sends and E M...

Page 42: ...Alarm that has a Normally Closed circuit such as a Window Sensor An Alarm will occur when this is changed to a Opened status ALARM OUTPUT Sends an Alarm Out signal to a device such as a Manual Door o...

Page 43: ...BUZZER OUTPUT Generates a Buzzer when an alarm is detected Operation Enables Disables the buzzer for selected Event Alarm types Mode Set the Reacted Relay to either Latched or Transparent Mode HDD Ev...

Page 44: ...A notification is sent if a HardDriveeventisdetected settoON OFF Setup Event A notification is sent when changes are made to the system configurations Booting Event A notification is sent when system...

Page 45: ...rding will Stop and the Buzzer will be Activated Format Erases all Hard Drive data Press startbutton Awarningmessage will be displayed with the prompt All Recorded Data will be erased Select OK to era...

Page 46: ...Start Time and Date for Backup To Select the End Time and Date for Backup A V channel Select the Video and Audio Channel s for backup Device Displays all detected backup mediadevices USBFlashDiskorUS...

Page 47: ...Size of the Log File Select OK to begin the backup The Writing status window displays the completion state of the Backup in The Extracting status window displays the completion state of the Extraction...

Page 48: ...prior to powering on the system This allows the system to communicate on your network 2 Find the IP address of your DVR through the Menu System on the unit 3 Set up a web account at http ddns digimer...

Page 49: ...t System Setup and press the Enter button 2 Select SYSTEM and press the ENTER button 3 Select the SYSTEM MANAGEMENT tab on the left hand side 4 Under System Information select PRESS and press the Ente...

Page 50: ...digimerge net 2 Select the Create Account option from the list on the left side of the screen 3 Complete the Account Information fields with your personal information 4 Complete the System Information...

Page 51: ...r remote access to your System Record YOUR information below User Name ________________________________________________________ Domain Name __________________________________________________________ P...

Page 52: ...d data to your internal network it sends this data to the external IP address of the Router The Router then needs to decide where this data is to be sent to This is where setting up Port Forwarding be...

Page 53: ...e Client Software or through Internet Explorer 1 Open the MENU and select SYSTEM SETUP 2 Select SYSTEM and press the ENTER button 3 Select the NETWORK tab Press the Enter button to access the Network...

Page 54: ...st the outlet with another plugged device such as an electric calculator or phone charger If the unit is connected through a power bar or surge protector try bypassing the bar and connecting the power...

Page 55: ...ng System Linux Recording Speed 352x240 NTSC 352x288 PAL 704x240 NTSC 704x288 PAL 704x480 NTSC 704x576 PAL Audio Inputs 4 x Line In RCA Sockets Audio Outputs 1 x Line Out RCA Socket Audio 2 Way Audio...

Page 56: ...d 352x240 240 200 NTSC PAL 704x240 120 100 NTSC PAL 704x480 60 50 NTSC PAL Record Scheduling Daily Weekly and Hour Specific Pre Post Alarm Pre Alarm 5 Seconds Post Alarm 3 Minutes programmable per cam...

Page 57: ...C Housing Steel Metal DHU500R Series Plastic Metal Plastic DHU104 Series Color Silver DHU500R Series Black Burgundy DHU104 Series Dimensions WxDxH 11 4 x 12 5 x 2 3 290 mm x 318mm x 58mm Weight 9 3 l...

Page 58: ...indows Vista compatibility Operating System Windows 2000 Windows XP Home Edition Windows XP Professional Processor Pentium 4 1 5 GHz Processor or equivalent Memory 256 MB RAM Hard Drive 50 MB Installa...

Page 59: ...em to an external monitor or to another DVR or observation system the MONITOR OUT port on the back of the DVR MONITOR OUT Displays exactly what is shown from the DVR Camera View Menus etc to a TV or V...

Page 60: ...le A Window sensor unit has been installed on Alarm Block port 4 When this sensor is activated the camera on DIN or BNC VIDEO port 4 will become active if enabled in the MENU on the DVR Installing a S...

Page 61: ...ailable at www digimerge com Installing a PTZ RS 445 Type PTZ Camera 1 Connect the Transmit Cable to the D port on the PTZ Control Block on the DVR 2 Connect the Receive Cable to the D port on the PTZ...

Page 62: ...wing diagram outlines a general set of connections available with the DVR DVR PC not included ROUTER not included MONITOR OUT not included 4 x BNC CAMERAS not included VGA OUT not included LINE IN AUD...

Page 63: ...panel Carefully remove the metal housing 2 Disconnect the power and data cables from the hard drive Press the metal clip on each cable and gently pull 3 Remove the four screws holding the hard drive...

Page 64: ...y the system To format the new hard drive 1 From the system prompt press the Right Arrow key on the front panel to select YES 2 Press the Enter key on the front panel Note If you choose to FORMAT a dr...

Page 65: ...to change the options to reflect your System settings Example of Recording Time Calculations 1 Select the settings to reflect the options you have chosen on your System CH1 CH4 Select the channels to...

Page 66: ...options by pressing the UP DOWN buttons on the Front Panel or Remote Control To enter a sub menu select the option and press the ENTER button To exit a SUBMENU press the RETURN button To exit the MEN...

Page 67: ...Sets the Time Display format to either 12 or 24 hour display Network Time Server Setup Synchronizes the system to the specified remote time server Select the SYNC button to connect to the remote serv...

Page 68: ...NOTE Formatting the Hard Drive will erase any previously recorded data This will NOT affect your system configurations 1 From the system MENU select SYSTEM SETUP and press the ENTER button 2 Select D...

Page 69: ...ttings by navigating with the UP DOWN LEFT and RIGHT arrow keys CAM Indicates the Camera Number corresponds to the BNC connection port on the back of the system Covert Turns the onscreen display of th...

Page 70: ...avigate using the up and down arrows on the front panel or remote control Highlight the selection in Green and press the ENTER button to enter the SYSTEM MANAGEMENT Menu 3 Navigate to the System Data...

Page 71: ...TER button 3 Under AUDIO configure the following options Live Audio Turns Live System Audio from the Audio on the terminal to ON OFF Audio Monitoring Channel Select the channel for Listen in Audio Net...

Page 72: ...te Control to switch between the Search By Time and Search By Event screens Search By Time Searches the system based on date and time Press the Enter button to access the Calendar on the left side of...

Page 73: ...nuous Motion and Other and Cameras Navigate within the options using the ArrowKeysonthefrontpanelorremote control PresstheEnterbuttontoselect or deselect options Note Multiple event types can be selec...

Page 74: ...ORD MENU Option 2 Select the SIMPLE RECORDING MODE menu Navigate using the up and down arrows on the front panel or remote control Navigate using the arrow keys 3 Use the navigation arrows on the remo...

Page 75: ...e remote control to select the Time Grid and press the ENTER button Once selected the Time Grid is highlighted in light blue 4 Use the navigation arrows to select an individual time block Selected arr...

Page 76: ...twork Network Setup Remote Access Overview To setup remote viewing 1 With the system powered off connect the system to the router using the included Ethernet cable 2 Power the system on You must conne...

Page 77: ...elect System Setup and press the Enter button 2 Select SYSTEM and press the ENTER button 3 Select the SYSTEM MANAGEMENT tab on the left hand side 4 Under System Information select PRESS and press the...

Page 78: ...dns digimerge net 2 Select the Create Account option from the list on the left side of the screen 3 Complete the Account Information fields with your personal information 4 Complete the System Informa...

Page 79: ...n for remote access to your System Record YOUR information below User Name ________________________________________________________ Domain Name ________________________________________________________...

Page 80: ...is sent to the Router When a computer on the Internet needs to send data to your internal network it sends this data to the external IP address of the Router The Router then needs to decide where this...

Page 81: ...merge Client Software or through Internet Explorer 1 Open the MENU and select SYSTEM SETUP 2 Select SYSTEM and press the ENTER button 3 Select the NETWORK tab Press the Enter button to access the Netw...

Page 82: ...on to allow the user to remotely connect to the DVR Adding a Group Group Right click on Site to add a New Group A group can represent one or more DVRs For Example you may have more than one system in...

Page 83: ...nternet Port Setto6100bydefault User ID Enter the USER ID to connect to the system the USER ID is configured on the System i e ADMIN case sensitive Password The password used to access the System i e...

Page 84: ...1 Select the Site profile from the Dropdown List 2 Press the CONNECT button The Connection Status window displays the state of the connection Once a successful connection to the System has been made t...

Page 85: ...rchase defective products will at the sole discretion of Digimerge be repaired or replaced with equal or better product in terms of hardware features without charge if all the conditions set forth in...

Page 86: ...ion of incidental or consequential damages for certain products supplied to consumers or the limitation of liability for personal injury To the extent that such restrictions on limitations apply to th...

Page 87: ......

Page 88: ...IT S ALL ON THE WEB Digimerge Technology Inc VISIT www digimerge com www digimerge co Product Information User Manuals Quick Start Guides Specification Sheets Software Upgrades Firmware Upgrades...

Reviews: