background image


Accessing the Main Menu 

 
The Menu allows you to configure your DVR settings and program various recording options. 
Follow these steps in order to access the Menu: 


Press the 

MENU

 button. The password screen will appear: 


The default Password is 0000. 


To change the number of the Password, use the 

 / 

 buttons to scroll left and right between numbers, and use the 

 / 


buttons to change the value of the number that is flashing. 
 
Press the 

ENTER

 button once the correct Password is entered. The menu options screen will appear. 


NOTE

: If you get a message “Password Error”, you have entered an incorrect password. 


Main Menu 

 
When the correct password is entered, the Main Menu options will be displayed.  
 
There are 7 options available in the Main Menu: 
 

Search:

     Finds recorded list 

Timer: 

Scheduling recording 

Record: 

Record mode setup 

Camera: 

Camera channel setup 

System: 

System setup (sets the date, chooses an HDD overwrite setting, changes                  
password, resets system settings, or clears the HDD) 

Event:

       Event List - Allows you to view video from a list of recorded events 

Network:

   Network setup 


Navigating the Menu: 


 / 

:  

Scroll up and down through menu options; change values when an option is selected and is blinking 

 / 

:  

Scroll sideways within a menu option that has been selected 


ENTER: 

Selects a submenu / an option in a submenu for browsing / modification 

MENU: 

Completes modification of a menu option; exits a menu 

 
NOTE:   The Menu setup will timeout after 1 minute of no key presses.  


Search 

 
The DGN209 allows you to easily find sections of recorded video using the 

SEARCH

 feature. 

 
To access the Search option, press 

MENU 

followed by the 4 digit password. Use the 

 / 

 to scroll to the 

Search 

option


and 

press 

ENTER. 


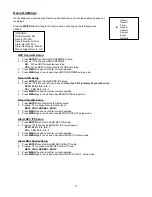
Password: 0000 


       (Menu) 
 Search 


Timer 

 Record 
 Camera 
 System 
 Event 
        Network 

 (Menu) 
 

 Search 

 Timer 
 Record 
 Camera 
 System 
 Event 

          Network 


Summary of Contents for DGN209

Page 1: ...9 Channel Multiplex Digital Video Recorder Model DGN209 Installation User Manual Digimerge Technologies Inc...

Page 2: ...quipment has been tested and found to comply with the limits for a Class B digital device pursuant to part 15 of the FCC Rules These limits are designed to provide reasonable protection against harmfu...

Page 3: ...View Select 22 Picture in Picture PIP 22 Zoom 22 Video Search 23 Playing Back Video 23 Hardware Connection from DVR 24 Static IP Setting 24 Dynamic IP Setting 27 Software Operation at the Remote Site...

Page 4: ...ning the power off correctly This equipment should be operated using only the power source from standard package Unauthorized repair or parts substitutions may result in fire electric shock or other h...

Page 5: ...ts and 2 outputs Resolution 704X564 full screen 352X282 4 channels 224X188 9 channels Independent main and call monitor outputs allow for sequencing of camera views or full screen viewing Multi screen...

Page 6: ...uration example shown in Appendix 2 2 Connect the AC Power Cord to the Power Adapter and plug into an electrical outlet A Red LED indicator light will be ON to indicate that the DVR is in Standby mode...

Page 7: ...lect an item for change while in the setup menu 5 SELECT Press the SELECT button to change the camera shown in the individual panes of the multi screen modes 6 ZOOM Press ZOOM to enlarge the picture d...

Page 8: ...eo 16 REW Left REW Under DVR play mode it can play video backward at different speeds Press REW again to adjust speed as 1 2 4 8 16 32 times Left When in the setup mode it works as Left directional bu...

Page 9: ...PUT 1 9 Connects to a video source i e camera 5 CALL Connects to the CALL monitor for real time sequencing 6 LAN Connects DVR by LAN cable 7 AUDIO OUTPUT R L Connects to monitor or speaker 2 mono audi...

Page 10: ...ord mode setup Camera Camera channel setup System System setup sets the date chooses an HDD overwrite setting changes password resets system settings or clears the HDD Event Event List Allows you to v...

Page 11: ...The DGN209 will play the video in chronological order until it hits the End of the list Playback can be stopped at any time by pressing the STOP button D Motion Recording M Manual Record Time A Alarm...

Page 12: ...MO FR Monday to Friday SA SU Saturday Sunday JAN 01 Special Date OFF Not activated 2 Use the scroll keys to move to START record time 00 00 HH MM Press to set the start time 3 Press move to END record...

Page 13: ...PS record speed Note that 25A indicates 25 ips with audio NTSC 25A 15 8 4 2 1 PAL 18A 12 6 3 2 1 3 Press MENU to exit and confirm current operation 4 Press MENU again to exit and close RECORD IPS setu...

Page 14: ...character title to each camera input 1 Press to select the desired time camera channel 1 9 and then press ENTER 2 Press to select the desired character and to move to the next character 3 Press MENU t...

Page 15: ...the recording time to that channel i e the normal record sequence for cameras is Camera 1 Camera 2 Camera 3 etc In Event mode when an alarm in triggered from channel 1 the DVR will record using the fo...

Page 16: ...e 4 moves the target cursor down one row at a time 5 moves the target cursor left one column at a time 6 moves the target cursor right one column at a time 7 Press ENTER to turn the target cursor ON P...

Page 17: ...ETECTION SETUP 1 9 1 2 3 4 5 6 7 8 9 10 11 12 13 14 15 032 Figure 1 2 MOTION DETECTION SETUP LINE 1 2 3 4 5 6 7 8 9 10 11 12 13 14 15 032 Figure 1 3 MOTION DETECTION SETUP ALL 1 2 3 4 5 6 7 8 9 10 11...

Page 18: ...other field on the System screen or press MENU to exit Setting the Internal Audible Alarm Buzzer o enable or disable the Internal Audible Alarm Buzzer If e T a nabled the buzzer will sound when the ex...

Page 19: ...the call monitor before sequencing to the ne 1 to another field on the System screen or press MENU to exit timer is used to select the amount of time between 1 10s a channel appears xt channel To Set...

Page 20: ...l erase all data from the hard drive nsure that there are no important recordings on the disk before using this option 1 On the System screen press to select Clear HDD and then press ENTER on this opt...

Page 21: ...20 NOTE This will not affect the time and date settings...

Page 22: ...DD ERROR Slave HDD may contain error HDD FULL HDD is full SYSTEM ERROR System may have failed 02 VLOSS Channel 2 Video Loss N Menu Record Event Search Timer Camera System Network Network SERVER IP 192...

Page 23: ...esolution is also b th a W In 1 Alarm Record The display will indicate a recording triggered by an Alarm using the letter A 2 Timer Record The display will indicate a scheduled recording using the let...

Page 24: ...rom the Search mode st Forward Press PLAY on the front panel then press FF to open the fast forward search screen Press FF once to increase the speed to 2X twice to increase the speed to 4X and so on...

Page 25: ...ogram will install on your PC The CD contains a self running installation that automatically starts when the CD is inserted Follow the instructions for installation as indicated in the next few pages...

Page 26: ...25 3 Choose the destination location and press Next ram shortcut setting and press Next 4 Set the prog 5 Press Next to begin copying the files...

Page 27: ...tup assword 1 2 Key in the User Name Password and Server IP The default setting for the User Name is admin and the default P address that you set in Step 2 Click on OK to connect is admin Server IP is...

Page 28: ...RE INSTALLATION DYNAMIC IP SETTING Dynamic IP Address is a A o give compa STEP 1 SOFTW on Page 19 for the Static IP Setting TEP 2 DDNS REGISTRATION FOR A DYNAMIC IP ADDRESS Follow the same procedure a...

Page 29: ...me DDNS HOSTs E 4 After registering your account you will receive an e mail which contains instructions to activate your account If yo follow these directions within 48 hours you w 5 Logi 6 Click on A...

Page 30: ...3 the setup similar to that of Win XP O S operties for TCP IP setup TERNET PROTOCOL TCP IP and then select Properties to setup 2 procedure is Click twice Local Area Connection Enabled Realtek RTL8139...

Page 31: ...outer s gateway e g 192 168 1 1 Close the window above Enter the IP address router s gateway 192 168 1 1 to log in to the router from the Internet Explorer Enter the login web page and key in the rout...

Page 32: ...CP setting Virtual server setting DDNS setting Click on INTERNET PORT and choose your WAN type e g PPPoE Enter your User Name and Password to dial up the dynamic IP address Press save after you set up...

Page 33: ...S key in the DNS Account User Name and Password that you applied in step 3 Press save after you set up STEP 5 IP SETTING In the DVR MENU NETWORK set the IP ADDRESS GATEWAY NET MASK DNS and WEB PORT ST...

Page 34: ...e any login IP address to access the Video Server This function is designed to store a list of IP addresses which you can control and manage Backup Progra You can press button and backup all related f...

Page 35: ...h one static ADSL you can remotely watch the video anywhere with a networkable computer Step 1 Click twice to enter the Login setup please refer to software installation Step 2 Key in User Name and Pa...

Page 36: ...ddle Low usting Brightness Contrast Saturation ot press this button to automatically save the image on your PC ss this button to record the files and automatically save them on your PC ystem Configura...

Page 37: ...here will be a recorded file on your PC Each recording file can save up to 6000 frames The recording file will be assigned to the second file if it is more than 6000 frames If the HDD space is less th...

Page 38: ...AL controls basic functions only GUEST LEVEL watch the image only 2 Life time During this period of time users are allowed to control the Video Web Server Set up the ALARM function You can use it to o...

Page 39: ...st which you want to send to when the alarm is triggered 3 If it is not necessary for you to verify the password and user s name please choose Verify as No When the alarm is triggered the video server...

Page 40: ...o button when you would like to shift the selection by jumping 6 selections at a time Get online users information 1 Info refresh Refresh the online users information Connecting the Video Web Server V...

Page 41: ...ver Note If you would like to download the Video Web Server Application you can do this by clickin ton and saving the file to your remote computer and installing it g this but Step 3 Click on YES to c...

Page 42: ...p Down Exit 11 Lock Enter Zoom Search Select 12 Stop Play Record Rew Fast Pause Slow 13 Camera 14 4cut 7cut 9cut PIP 15 Position of view Key Lock For added security you can Lock the buttons on your DG...

Page 43: ...een ins No recorded video Check camera s video cables and co Check monitor s video cables and co Make sure that the camera No video Check that T Timer Alarm recording is Check if the system is in Key...

Page 44: ...75 BNC Audio input output 4 audio inputs RCA and 2 audio outputs RCA Motion detect area 15 X 12 Targets per camera NTSC 15 14 targets per camera PAL Motion detect sensitivity 256 Levels Video loss det...

Page 45: ...or 3 Handle Step 1 Remove the Cartridge Casing from the DGN209 Lift the handle and pull towards you The Cartridge Casing will slide out of the DGN209 NOTE The Cartridge must be unlocked to remove it p...

Page 46: ...the locked position 1 The HDD should be selected as Master 2 This product does not support hot swap Please power off the unit before removing HDD 3 Approved models and manufactures of HDD are listed i...

Page 47: ...K OF ELECTRIC SHOCK DO NOT OPEN WARNING TO REDUCE THE RISK OF ELECTRIC SHOCK DO NOT REMOVE COVER OR BACK NO USER SERVICEABLE PARTS INSIDE REFER SERVICING TO QUALIFIED SERVICE PERSONNEL HI 1 MAIN ACT L...

Page 48: ...isconnects with NO When the Alarm is triggered COM connects with NO EXTERNAL ALARM NO PIN 25 Under normal operations COM disconnects with NO When the Alarm is triggered COM connects with NO EXTERNAL A...

Page 49: ...s for rack mounting applications can be purchased as an optional accessory Front Angle with Rack Mount Optional Side View with Rack Mount Optional For more information about the rack mount other acces...

Page 50: ...105hr 200hr 400hr 800hr 1600hr HDD Type 80GB IPS 25A 15 8 4 2 1 Best 24hr 48hr 90hr 180hr 360hr 720hr High 30hr 60hr 1136hr 225hr 450hr 900hr Normal 48hr 96hr 1600hr 360hr 720hr 1440hr Record Quality...

Page 51: ...us 9 Model 6Y160L0 160GB 7200rpm Seagate Barracuda ATA IV ST380021A 80GB 7200rpm Seagate Barracuda ATA V ST3120023A 120GB 7200 rpm Seagate Barracuda 7200 7 Plus ST3160023A 160GB 7200 rpm Western Digit...

Page 52: ...HIS LIMITED WARRANTY IS THE EXCLUSIVE REMEDY OF THE URCHASER DIGIMERGE SHALL IN NO EVENT BE LIABLE FOR ANY SPECIAL INDIRECT INCIDENTAL PUNITIVE OR CONSEQUENTIAL DAMAGES OF ANY KIND OR CHARACTER INCLUD...

Page 53: ...52 Digimerge Technologies Inc 300 Alden Road Markham Ontario L3R 4C1 TUwww digimerge comUT...

Reviews: