English
- 9 -
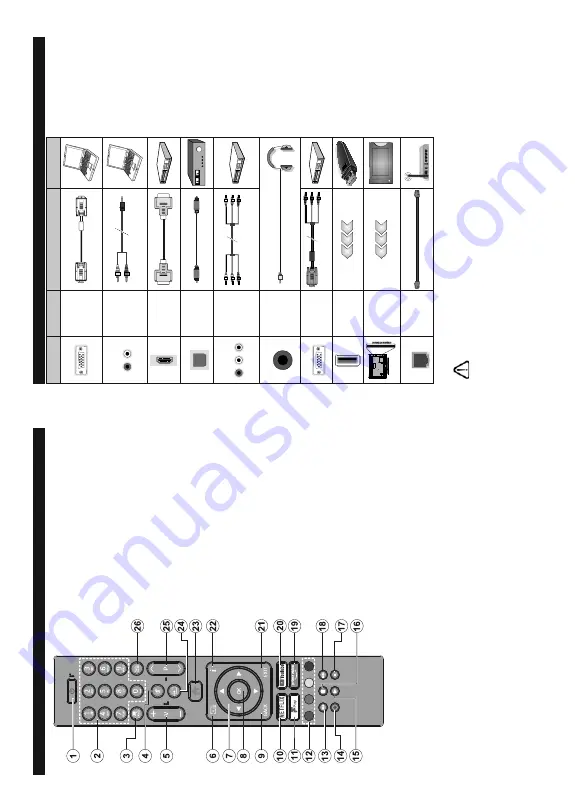
Remote Control
1.
Standby:
6ZLWFKHV2Q2ႇWKH
79
2.
N
umeric
buttons:
S
witches
the
channel,
enters
a number or a letter in the text box on the screen.
3.
L
anguage:
S
witches
a
mong
sound
modes
(an
-
alogue
T
V),
displays
and
changes
audio/subtitle
language
and
WXUQV
VXEWLWOHV
RQ
RU
Rႇ
(
digital
TV
,
where available)
4.
M
ute:
&RPSOHWHO\WXUQVRႇWKHYROXPHRIWKH
79
V
olume +/-
6.
Guide:
Displays the electronic programme guide
7.
D
irectional
b
uttons:
Helps
n
avigate
menus,
content
e
tc.
and
displays
the
subpages
in
TXT
mode when pressed Right or Left
8.
O
K:
&RQ¿UPV
XVHU
VHOHFWLRQV
KROGV
WKH
SDJH
LQ
TXT
mode), views
Channels
menu (DTV mode)
9.
Back/Return:
Returns
to
previous
screen,
previous
menu,
opens
index
page
(in
T
XT
m
ode).
Quickly
cycles
b
etween
previous
a
nd
current
channels
or sources
10.
1HWÀL[
/DXQFKHVWKH1HWÀL[DSSOLFDWLRQ
11
.
Freeview
P
lay:
Connects
to
the
Freeview
P
lay
platform
where
you
can
access
available
catch-up
TV services
12.
Coloured Buttons:
Follow the on-screen instruc-
tions for coloured button functions
13.
Rewind:
M
oves
frames
backwards
in
media
such
as movies
14.
No function
Play:
Starts to play selected media
16.
Pause:
Pauses the media being played
17.
Stop:
Stops the media being played
18
.
Fast
F
orward:
M
oves
frames
forward
in
media
such as movies
19.
Prime
V
ideo:
L
aunches
the
Amazon
Prime
V
ideo
application
20.
Y
ouT
ube:
Launches the
Y
ouT
ube application
21.
Exit:
Closes
and
exits
from
displayed
menus
or
returns to previous screen
22.
In
fo
:
Displays
information
about
on-screen
content,
shows hidden information (reveal - in
TXT
mode)
23.
Home:
Displays
TV menu
24.
Source:
S
hows
available
broadcast
and
content
sources
Pro/-
26.
Te
x
t:
Displays
teletext
(where
a
vailable),
press
again
to
superimpose
the
teletext
over
a
normal
broadcast picture (mix)
English
- 10 -
Connections
Connector
Ty
pe
Cables
Device
VGA
Connection
(back)
AUDIO IN
PC/YPbPr
Audio
Connection
(back)
YPbPr/PC
A
udio Cable
HDMI
Connection
(side&back)
SPDIF
SPDIF
(Optical Out)
Connection
(back)
BACK
A
V
Back
A
V
(Audio/V
ideo)
Connection
(back)
Audio V
ideo Cable
HEADPHONE
Headphone
Connection
(side)
YPBPR
YPbPr V
ideo
Connection
(back)
PC to
YPbPr Connection Cable
USB
Connection
(side)
CI
Connection
(side)
CAM
module
LAN
Ethernet
Connection
(back)
LAN / Ethernet Cable
See the illustrations o
n
th
e
le
ft
s
id
e
.
Y
o
u can use
YPbPr to VGA
cable to enable
YPbPr signal via
VGA
input.
Y
o
u cannot use VGA
and
YPbPr at the same time. T
o
enable PC/YPbPr audio, you will
n
e
e
d
t
o
u
s
e
the
back
audio
inputs
with a
YPbPr/PC audio cable for
a
u
d
io
c
o
n
n
e
c
ti
o
n
. When using
the wall mounting kit (a
v
a
il
a
b
le
from a third party in the market,
if
not
supplied)
, w
e
r
e
commend
that you plug all your cables into
the back of the TV before mounting
on the wall. Insert or remove the
CI module only when the TV is
SWITCHED OFF
.
Y
o
u should refer
to the module instruction manual
for details of the settings.
The USB
input
of your TV supports devices
up to 500mA. Connecting devices
that have current value above
500mA
may damage your TV
. When
connecting equipment using a HDMI
cable to your TV
, to guarantee
VXFLHQW
LPPXQLW\
DJDLQVW
SDUDVLWLF
frequency radiation, you have to use
a high speed shielded (high grade)
HDMI cable with ferrites.
,I
\RX
ZDQW
WR
FRQQHFW
D
GHYLFH
WR
WKH
79
PDNH
VXUH
WKDW
ERWK
WKH
79
DQG
WKH
GHYLFH
DUH
WXUQHG
Rႇ
EHIRUH
PDNLQJ
any connection.
A
fter the connection is done, you can turn on t
he units and use them.
Summary of Contents for 43551FHDSM
Page 1: ...43551FHDSM OPERATING INSTRUCTIONS COLOUR TELEVISION WITH REMOTE CONTROL ...
Page 2: ......
Page 19: ......
Page 20: ...50619288 ...


