background image

SM500MK4 Service Manual 


25 

5.1.8     Span Switch Status 


KEY TO PRESS 

OPERATION 

In the Weighing Mode, press 


.

-- Go to Z mode. 
-- Then turn on the Span Switch. 


KEY TO PRESS 

OPERATION 


  +  

[2][8][4]


-- Indicates SPAN Switch status. 
-- Back to Z mode, after 1 second. 


5.2     Adjustment  


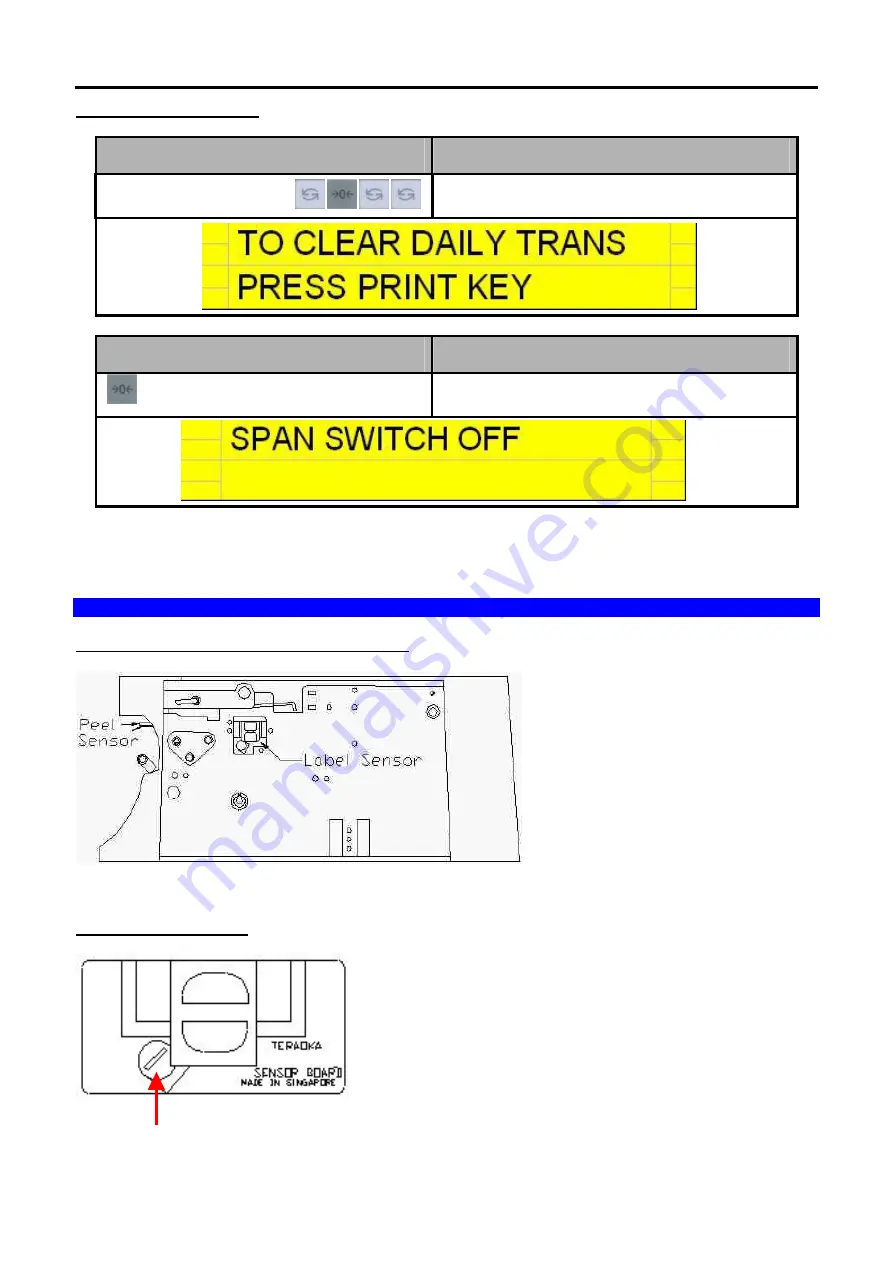
5.2.1     Location of Gap Sensor And Peel Sensor. 


5.2.2     Label Gap Sensor 


The label sensor is to detect the gap between the 
labels so as to identify the starting position of the label. 
If the gap is not detected properly, the scale will issue 
two or more labels. Also different material of label and 
back paper will have different sensitivity level; the 
variable resistor beside the label sensor is to adjust the 
sensitivity to suitable level. 

Adjust this variable resistor for 
sensor level sensitivity. 

All manuals and user guides at all-guides.com

Summary of Contents for SM-500MK4

Page 1: ...COPYRIGHT 2006 TERAOKA WEIGH SYSTEM PTE LTD SERVICE MANUAL DIGITAL COMPUTING PRINTING SCALE SM 500MK4 Edition 1 All manuals and user guides at all guides com a l l g u i d e s c o m ...

Page 2: ... INITIAL SETUP 12 4 1 Scale Assembly 12 4 1 1 Display Pole Kit Mounting 12 4 1 2 Level Adjustment 12 4 2 Software Setting 12 4 2 1 Memory Initialization 12 4 3 Calibration 16 4 4 User Spec Setup Procedure 17 4 5 Weigh Measurement Spec Setup Procedure 19 5 HARDWARE TESTING MAINTENANCE 21 5 1 Hardware Testing 21 5 1 1 RAM Read and Write Test 21 5 1 2 SIO Loop Back Test 22 5 1 3 RS485 Loop Back Test ...

Page 3: ...TTING 46 8 1 Main Board Jumper Setting 46 9 MISCELLANEOUS 46 9 1 Error Messages 46 9 2 Corresponding Key of IBM Keyboard 48 9 3 ASCII Characters 48 9 4 TERAOKA Code 49 9 5 Wire And Connector 49 9 5 1 Straight Crossover Ethernet Cable 49 9 5 2 Cash Drawer Option RJ11 50 9 5 3 PS2 Keyboard Option 51 9 5 4 RS232C and Multi Drop 4 Line RS485 Wire 51 10 APPENDIX 55 10 1 Block Diagram 55 10 1 1 Bench Ty...

Page 4: ...rising from misinterpretation of any procedure Screen displays operating procedures and supporting features might vary with different software version releases This document shall not be reproduced whether in part or whole without the written consent from Teraoka Weigh System Pte Ltd Teraoka Weigh System Pte Ltd 4 Leng Kee Road 06 01 SIS Building Singapore 159088 All manuals and user guides at all...

Page 5: ... paper cutter o Changing of labels and receipt paper to prevent injuries from cutting from paper cutter and movable printer mechanism Trained and qualified personnel shall only carry out repair and servicing of product Disclaimer Specifications are subject to change without notice All dimensions shown are approximate Please be aware that Teraoka has indicated that its hardware and software used in...

Page 6: ...ervice machine used Display Resolution 1 3000 Multiple Interval 1 6000 or 1 7500 Single Range Internal Resolution 1 60000 Printer Type Cassette Type A Paper Label Receipt Label Standard 40mm to 72mm B Paper Width Label Option 40mm to 80 mm Receipt 72mm 80mm C Resolution 8 dots mm Label 150mm sec D Speed Receipt 150mm sec Note For Best Speed and Printing Resolution use Ricoh paper 150LAB Memory 2 M...

Page 7: ...bi directional control two DC motor 3 RS232 Drv AX3232 M B U18 It s a device consists of two line driver two receiver and a dual change pump circuit with 15kv ESD protection pin to pin 4 Controller H8 3024F CPU BD U1 It s a high performance single chip microcomputer that integrates peripheral functions necessary y for system configuration with an H8 300H CPU feature a 32 bits internal architecture...

Page 8: ...SM500MK4 Service Manual 5 2 OVERVIEW 2 1Dimension Dimensions are in mm 2 1 1 Pole 570 480 335 408 2 1 2 Touch Screen Pole 335 408 570 480 All manuals and user guides at all guides com ...

Page 9: ...SM500MK4 Service Manual 6 2 1 3 Bench 462 154 All manuals and user guides at all guides com ...

Page 10: ...SM500MK4 Service Manual 7 2 2Key sheet Layout 32 Preset Keys 56 Preset Keys 100 Preset Keys All manuals and user guides at all guides com ...

Page 11: ...Pre pack mode alternatively The mode status will be indicated in the P and M indicator P PRE PACK MODE M MANUAL MODE CHANGE KEY Calculate the Changed Amount Escape the Programming screen without saving data in S mode MULTIPLE KEY Register the number of Non Weight products Select programming item such as PLU data Shop Name in S mode Select Report Type in X mode Select Data Transaction Type in Z mod...

Page 12: ... Programming preset data such as products data shop name etc Indicator Z TOTAL MODE Clear sales data stored Indicator X Blink PASWORD SETTING MODE Setting ENTRY PASSWORD for S X and Z modes PRESET KEYS to Call up Preset data such as PLU Data or Function Data in Reg Mode Enter Alphabetic data in Program Mode Note The following Preset Keys are used in entering Alphabetic Pole Type Move the cursor Ch...

Page 13: ...ount is displayed 6 CH Lights when the amount of change is being displayed 7 PE Lights when label or receipt paper ends 8 R Lights when REGISTRATION Mode is selected 9 X Lights when CHECK Mode is selected 10 S Light when PROGRAM Mode is selected 11 Z Lights when TOTAL Mode is selected 12 A Lights when Sales Data is in Memory for CLERK 9995 13 B Lights when Sales Data is in Memory for CLERK 9996 14...

Page 14: ...n the Bottom Cover 3 Loosen the 2pcs Truss Head screw M4X6 and disconnect the Interface Board cable 4 Loosen the 2pcs SEMS B screw M3X6 then open the Insulator 5 Change SW2 jumper to Enable Disable Span Switch 3 2 Span Switch located in Main Board Interface Board Cable Span Switch SW2 Mainboard Insulator Insulator All manuals and user guides at all guides com ...

Page 15: ...e turn on the span switch before proceed this process KEY TO PRESS OPERATION Switch On the Power Show current country SPEC then default Customer Specification setting Follow the instruction a Press the Clear then b Press the Print process to next step 1 Place the display Pole inside the pole bottom base AB 2 Align the four holes of the display pole and tighten screw Flat Head M4x16 Place the scale...

Page 16: ...s Operation Reading Country Specification Key to press Operation After Reading Country Spec the display will prompt MEMORY CLEAR message Scale Type 0 Pole 6 Kg 1 Pole 15 Kg 2 Pole 30 Kg 3 Pole 30 Lb 4 Bench 6 Kg 5 Bench 15 Kg 6 Bench 30 Kg 7 Bench 30 Lb 8 Printer BP 80 90 Label Length 0 Short ÆLabel length up to maximum 120mm 1 Long ÆLabel length up to maximum 240mm All manuals and user guides at ...

Page 17: ...ion 9 3 Switch On the Power Show current country SPEC then default Customer Specification setting Follow the instruction a Press the Clear then b Press the Print process to next step KEY TO PRESS OPERATION 0 To 1 Select label length OR Select label length Then To set the label length Label Length 0 Short ÆLabel length up to maximum 120mm 1 Long ÆLabel length up to maximum 240mm All manuals and use...

Page 18: ...ecification Key to press Operation After Reading Country Spec the display will prompt MEMORY CLEAR message Key to press Operation If Yes press Process of initialize Then go to segment check OR If No press Go to segment check All manuals and user guides at all guides com ...

Page 19: ... To calibrate zero point Ensure no weight in platter Wait until the SET WEIGHT PRT shows KEY TO PRESS OPERATION Place the capacity weight on the scale after the following screen appears Place the capacity weight according to the scale on the platter E g for a 6 Kg scale put a 6 Kg capacity weight on the platter KEY TO PRESS OPERATION Press Mode key exit Calibration finish All manuals and user guid...

Page 20: ...hange the selection for the Spec press the Number of the selection Press the key to Save go to next Spec Press key to go back to previous Spec Press PLU to save and exit Press Tare to exit without saving KEY TO PRESS OPERATION 0 To 2 0 Select data Refers to Customer Spec setting OR To choose scale type Then To set Save data and increase SPEC No KEY TO PRESS OPERATION Increase the SPEC number witho...

Page 21: ...thout saving data of the previous SPEC number KEY TO PRESS OPERATION 1 0 To jump to desire SPEC number KEY TO PRESS OPERATION OR Save SPEC setting and Exit to R mode Do not save SPEC setting and Exit to R mode All manuals and user guides at all guides com a l l g u i d e s c o m ...

Page 22: ...ication Mode To change the selection for the Spec press the Number of the selection Press PRINT key to Save go to next Spec Pres key to go back to previous Spec Press PLU to save and exit Press Tare to exit without saving KEY TO PRESS OPERATION 0 To 1 OR Then Select data Refer to Weight Measurement Spec setting To choose scale type To set Save data and increase SPEC No KEY TO PRESS OPERATION Incre...

Page 23: ...e previous SPEC number KEY TO PRESS OPERATION 6 1 0 To jump to desire SPEC number KEY TO PRESS OPERATION OR Save SPEC setting and Exit to R mode Do not save SPEC setting and Exit to R mode Remarks Please restart the scale every time after changing the SPEC All manuals and user guides at all guides com ...

Page 24: ...e press Go to Z mode 5 1 1 RAM Read and Write Test KEY TO PRESS OPERATION 0 0 1 Go to Hardware Testing Mode and first it will show the RAM TEST Result KEY TO PRESS OPERATION If the RAM is Ok It will show the message below OR If the RAM is Fail It will show the message below All manuals and user guides at all guides com ...

Page 25: ... is show at below OR 5 1 3 RS485 Loop Back Test KEY TO PRESS OPERATION Testing the 4 Line port Please plug in the test connector on the 4 Line port before proceed The test result is show at below OR 5 1 4 Ethernet Loop Back Test KEY TO PRESS OPERATION Testing the Ethernet port If the port okay it will display the message below OR All manuals and user guides at all guides com ...

Page 26: ...r Test KEY TO PRESS OPERATION Testing the PLU Generator Press the PRINT key to start PLU Generator Then it will display how many PLU generated at the right top corner Then KEY TO PRESS OPERATION Go to Hardware Testing Mode again After that KEY TO PRESS OPERATION It will show the message below FF5A5B All manuals and user guides at all guides com a l l g u i d e s c o m ...

Page 27: ...ghing Mode press Go to Z mode Then turn on the Span Switch KEY TO PRESS OPERATION 0 0 9 Internal Count Mode Press Tare key to exit 5 4 1 6 TEST JIG CONNECTOR for SIO Port Connect pin 4 and pin 5 TEST JIG CONNECTOR for 4 LINE RS485 Port Connect pin 1 and pin 3 Connect pin 2 and pin 4 All manuals and user guides at all guides com ...

Page 28: ... 5 2 2 Label Gap Sensor The label sensor is to detect the gap between the labels so as to identify the starting position of the label If the gap is not detected properly the scale will issue two or more labels Also different material of label and back paper will have different sensitivity level the variable resistor beside the label sensor is to adjust the sensitivity to suitable level Adjust this...

Page 29: ...the key KEY TO PRESS OPERATION At R mode KEY TO PRESS OPERATION 5 1 5 Go to the Peel sensor adjustment KEY TO PRESS OPERATION OR Enter a value for sensor voltage then press OR Once the key is press it will auto set the voltage value and Exit to R mode You can enter the value of the peel sensor voltage then press the PLU key to save and Exit to R mode Exit to R mode without doing anything All manua...

Page 30: ... alignment The process only allows adjusting vertical position only KEY TO PRESS OPERATION At R mode KEY TO PRESS OPERATION 5 1 4 Go to Thermal Head calibration KEY TO PRESS OPERATION 2 0 OR 2 0 OR Adjust upward Adjust downward Store new value and Exit to R mode All manuals and user guides at all guides com ...

Page 31: ...leaning kit supplied with the product Instruction 1 Turn OFF Scale by Main Power Switch 2 Open the Printer Side Door first after that press on the top of Printer Front Door and pull out the cover toward in front 3 Push the Printer Head Handle to up for Printer Head in upper position Printer Front Door Printer Side Door Printer Head Handle Printer Head All manuals and user guides at all guides com ...

Page 32: ...ead with sharp objects this will DAMAGE the thermal print head 5 After Finish cleaning press down the Printer Head Handle first then close the Printer Front Door and Printer Side Door 6 Turn ON the scale and depress FEED key to feed the label 5 3 2 Basic Maintenance Clean scale surfaces and platter periodically with a soft damp cloth Do not use alcohol or detergent Cleaning Tool Thermal Head All m...

Page 33: ...up for Printer Head in upper position 4 Need to take out the Thermal Head wire 5 Use the Hand push the Thermal Head to up first then pull out the thermal head Because the thermal head bracket catch by printer head bracket 6 Unscrew the 2pcs Sems B M3X6 screw to take out Thermal Head or adjustment the alignments Printer Side Door Printer Head Handle Printer Front Door All manuals and user guides at...

Page 34: ...SM500MK4 Service Manual 31 5 4 Method of Assembly Sealing Screw Sticker 5 4 1 All Machine except Console Type SM500MK4 SEALING METHOD ALL VARIANT MODELS All manuals and user guides at all guides com ...

Page 35: ...e Manual 32 5 4 2 For only Console Type SM500MK4 WITH EXTERNAL LOADCELL SEALING METHOD ALL VARIANT MODELS SM500MK4 WITH EXTERNAL LOADCELL SEALING METHOD ALL VARIANT MODELS All manuals and user guides at all guides com ...

Page 36: ...le Type Disassembly 101 101 101 101 102 102 102 102 104 104 103 103 103 Screw Type 101 Flat Head M4X16 4pcs 102 Sems B M4X10 4pcs 103 Flat Head M3X5 3pcs 104 Truss Head M4X6 2pcs All manuals and user guides at all guides com a l l g u i d e s c o m ...

Page 37: ...10 110 110 111 111 112 112 112 112 Screw Type 105 Sems B M4X8 2pcs 106 Sems B M3X8 2pcs 107 Flat Head M4X16 1pcs 108 Truss Head M4X16 4pcs 109 Sems B M4X6 2pcs 110 Sems B M3X6 4pcs 111 Binding Head M3X8 2pcs 112 Allen Cap M6X20 4pcs All manuals and user guides at all guides com ...

Page 38: ...SM500MK4 Service Manual 35 Screw Type 113 Sems B M4X8 2pcs 114 Sems B M4X6 4pcs 115 Sems B M4X12 3pcs 114 114 114 114 115 115 115 113 113 113 Ground Wire All manuals and user guides at all guides com ...

Page 39: ...embly 1 To remove the AD Board solder out the Loadcell wire and then unscrew the 2pcs Sems B M3X6 screw Screw Type 101 Sems B M3X6 2pcs 101 101 Loadcell wire color indication Green Blue White Red Black All manuals and user guides at all guides com ...

Page 40: ...rt AA from Loadcell unscrew the 2pcs Allen Cap screw M4X20 from Top 2 To remove the Loadcell from Base Diecast unscrew the 2pcs Allen Cap screw M4X20 from Bottom Screw Type 101 Allen Cap M4X20 101 101 101 101 Support AA Loadcell All manuals and user guides at all guides com ...

Page 41: ...ly the Bracket EE 30KG Base Top tighten 1pcs Sems B screw M4x12 from Top 2 To assembly the Bracket EF 30KG Base Bottom tighten 3pcs Sems B screw M4x12 from Bottom 101 101 101 101 Screw Type 101 M4 X 12 Sems B All manuals and user guides at all guides com a l l g u i d e s c o m ...

Page 42: ...wnloading to scale is Flash Development Toolkit 3 1 1 PC to scale via RS232C interface 1 Double click open the Flash Development Toolkit 3 1 software 2 When Option icon appears click the Cancel 3 From the Option Menu select the File Æ Open An S Record RS232 Cable All manuals and user guides at all guides com ...

Page 43: ...e Device Æ Configure Flash Project 6 Click the to select the device H8 3024F 7 Click the to select the port COM1 then click the 8 In the CPU crystal frequency for selected device change the default number 25 to 23 then click the 2 time Note Enter the number 23 it will automatically change to number 23 0000 All manuals and user guides at all guides com ...

Page 44: ...Æ Download Active File 11 After boot loader downloading finish on the screen will shown Main kernel download complete Connection Complete Note Ensure that after downloading completed must change back the Mainboard SW 1 jumper setting All manuals and user guides at all guides com ...

Page 45: ...Æ Communications Æ Hyper Terminal 2 Once screen appear Connection Description setting Enter any name Example Hyper Terminal in the blank box and then click the OK button to next step Port setting 3 In the Com 1 Port Settings Use the button to change the setting follows by below highlight as shown Bits per second 57600 Data bits 8 Parity None Stop bits 1 Flow control None After that click Apply and...

Page 46: ...the keyboard Enter key button 2 times 7 a On the SM300 500 Basic Boot loader Main Menu will show Enter erase start address as a 32 bit hex value e g AABBCC b Type in the number 100800000 Note When type in the first number 1 it will automatically convert to H symbol Remarks I After next step on the screen shown Enter erase end address as a 32 bit hex value e g AABBCC Around 3 seconds lead time to c...

Page 47: ...he number 200800000 Note When type in the first number 2 it will automatically convert to H symbol Remarks I After next step on the screen shown Enter erase end address as a 32 bit hex value e g AABBCC Around 3 seconds lead time to continue if not it will display the Timed out waiting for address II You can type in the number 200800000 from last step 9 c again and then to continue 10 a When the sc...

Page 48: ...K Xmodem 14 The downloading and upgrade the software needs to take time waiting around 15 minutes for process 15 When the screen shown Upload Ok and automatically goes back to Main Menu that meaning the downloading upgrade the software is completed 16 Click the button the screen will show the information of disconnected And then click the Yes button to close the Hyper Terminal program All manuals ...

Page 49: ...e data or number exists 14 PRINTER HEAD NO CLOSE Thermal head no closed Please close thermal head 15 WRITE FILE Write file errors Memory problem Please clear the memory 16 NO MEMORY Not enough memory Expand memory or delete unnecessary data 17 FILE DELETE ERROR Delete file errors Memory problem 18 PLEASE REMOVE WEIGHT Fixed price item please remove weigh 19 PLU NOT EXIST No such PLU data or number...

Page 50: ...mit when discount is use 63 INGREDIENT NOT EXIST No such ingredient data or number exists 64 SPECIAL MSG NOT EXIST No such special message data or number exists 65 TEXT NOT EXIST No such text data or number exists 66 CLERK ASSIGN Clerk already assigned Please choose another clerk 67 NO PRINT AREA No print area on label for some function like text ingredient etc 68 USER INGRE NOT EXIST No such user...

Page 51: ...ET KEY 48 Letter size 9 3 ASCII Characters The table shown below is the common use of characters of ASCII code in HEX value Please enter the hex value when entering commodity name advertisement shop name clerk name special name ingredient and text etc when using the SM500MK4 BENCH TYPE A B C D E F G H I J K L M 41 42 43 44 45 46 47 48 49 4A 4B 4C 4D N O P Q R S T U V W X Y Z 4E 4F 50 51 52 53 54 5...

Page 52: ... Y Z 20 21 22 23 24 25 26 27 28 29 0 1 2 3 4 5 6 7 8 9 30 31 32 33 34 35 36 37 38 39 40 41 42 43 44 45 46 47 48 49 50 9 5 Wire And Connector 9 5 1 Straight Crossover Ethernet Cable Straight cable is for Client Server connection Crossover cable is for Hub to Hub connection Some models of the Hub do not need crossover cable for Hub to Hub connection Please refer to the Hub operation manual if in dou...

Page 53: ... Drawer Option RJ11 SM 500MK4 SCLAE SIDE Interface Board Pin Signal Function 1 FG Frame Ground 2 DRAWER 1 Drawer 1 drive signal 3 DRSW Drawer Switch Input 4 VDR Drawer Drive Power Supply 5 DRAWER 2 Drawer 2 Drive Signal 6 GND Common Ground On Circuit Straight Cable Connection Cross Cable Connection 1 2 3 4 5 6 Note This connector is used for Interface Board TWB 01750 1 RJ11 Connector All manuals a...

Page 54: ...Drop 4 Line RS485 Wire Connector Type 9 Pin D Sub Connector Female Back View 25 Pin D Sub Connector Female Back View 9 Pin D Sub Connector Male Back View 25 Pin D Sub Connector Male Back View 8 Pin DIN Plug Male Front View 1 6 5 4 3 2 PS2 IBM Keyboard Connector Main Board Side All manuals and user guides at all guides com ...

Page 55: ...RXD 3 3 TXD TXD 2 4 DTR DTR 20 5 GND GND 7 6 DSR DSR 6 7 RTS RTS 4 8 CTS CTS 5 9 CI CI 22 PC 25 PIN TO LCU 401 For PC to LCU 401 communication 25 Pin D Sub Female 25 Pin D Sub Male Pin Signal Signal Pin 2 TXD TXD 2 3 RXD RXD 3 4 RTS RTS 4 5 CTS CTS 5 6 DSR DSR 6 7 GND GND 7 8 CD CD 8 20 DTR DTR 20 22 CI CI 22 All manuals and user guides at all guides com ...

Page 56: ...f the cable to the metal casing of the connector for more isolation to noise PC 25 PIN TO SCALE RS232C PORT For PC and PC FL 1 communication 25 Pin D Sub Female 8 Pin DIN plug Male Pin Signal Signal Pin 2 TXD RXD 4 3 RXD TXD 5 7 GND GND 2 4 RTS RTS 6 5 CTS CTS 7 8 CD DSR 3 6 DSR 20 DTR SM300 SM80SX SM90 SM500 SM500MK4 SM300 SM80SX SM90 SM500 SM500MK4 SM300 SM80SX SM90 SM500 SM500V2 SM500MK4 RS232 ...

Page 57: ...nd PC FL 1 communication 9 Pin D Sub Female 8 Pin DIN plug Male Pin Signal Signal Pin 3 TXD RXD 4 2 RXD TXD 5 5 GND GND 2 7 RTS RTS 6 8 CTS CTS 7 1 CD DSR 3 6 DSR 4 DTR SM300 SM80SX SM90 SM500 SM500V2 SM500MK4 RS232 Port All manuals and user guides at all guides com ...

Page 58: ...55 10 APPENDIX 10 1 Block Diagram 10 1 1 Bench Type All manuals and user guides at all guides com ...

Page 59: ...56 10 1 2 Touch Screen Pole Type All manuals and user guides at all guides com ...

Page 60: ...57 10 1 3 Elevated Type All manuals and user guides at all guides com ...

Page 61: ... CCCCC PCD XXXX CD 13 DIGIT NON PLU 21 F1F2 RRRRR XXXXX CD 13 DIGIT NON PLU 22 F2 CCCCCXXXXXX CD 13 DIGIT NON PLU 23 FFF CCCC PPPPP CD 13 DIGIT NON PLU 24 FF CCCCC WWWWW CD 13 DIGIT NON PLU ver 14 61 25 F CCCCC WWWWW0 CD 13 DIGIT NON PLU ver 14 66 26 F1F2 CCCCCC WWWWW CD 13 DIGIT NON PLU 27 CCCCCCC XXXXXXX WWWWWW CD Non Barcode 28 F1F2 CCC XXXXXXX CD 13 DIGIT NON PLU 29 F2 CCCCCCC WWWW CD 13 DIGIT...

Page 62: ...XXX 13 DIGIT NON PLU 21 F1F2RRRRRXXXXXCD 22 F2CCCCCXXXXXXCD 23 FFFCCCCPPPPPCD 24 FF CCCCC WWWWW CD 13 DIGIT NON PLU ver 14 61 25 F CCCCC WWWWW0 CD 13 DIGIT NON PLU ver 14 66 26 F1F2 CCCCCC WWWWW CD 13 DIGIT NON PLU 27 CCCCCCC XXXXXXX WWWWWW CD Non Barcode 28 F1F2 CCC XXXXXXX CD 13 DIGIT NON PLU 29 F2 CCCCCCC WWWW CD 13 DIGIT NON PLU 30 F1F2 CC NNN CD 13 DIGIT NON PLU 31 F1F2 C NNNN CD 13 DIGIT NON...

Page 63: ... PRINT WITHOUT ACCUMULATION SPEC 20 SELECTION OF TOTAL LABEL PRINTING 0 NO PRINT 1 PRINT SPEC 21 SELECTION OF PRINTING OPERATOR NAME ON RECEIPT AND LABEL 0 CODE ONLY 1 NAME SPEC 22 SELECTION OF RECEIPT PAPER WIDTH 0 60 mm 1 40 mm 2 50 mm SPEC 23 MANUAL PRICE ENTRY FOR PRINTING OR ACCUMULATION 0 ALLOW 1 INHIBIT SPEC 24 SELECTION OF DEFAULT LABEL FORMAT FOR ITEM PRINTING STANDARD U1 CA STANDARD U1 C...

Page 64: ...C 28 SELECTION OF PEEL SENSOR FUNCTION IN PREPACK MODE 0 DISABLE 1 ENABLE SPEC 29 SELECTION OF CONTINUOUS PRINT FOR LABEL IN PREPACK 0 INHIBIT 1 ALLOW SPEC 30 SELECTION OF CDV 0 INHIBIT 1 ALLOW SPEC 31 SELECTION OF CDV TYPE 0 CDV 1 TEAR OFF SPEC 32 SELECTION OF CDV MODULUS 0 MODULUS 10 1 MODULUS 11 SPEC 33 THE SPOT CORRECTION 0 ALLOW 1 INHIBIT SPEC 34 SELECTION OF SEARCH CORRECTION 0 ALLOW 1 INHIB...

Page 65: ...ITY NAME SHOP NAME AND SPECIAL MESSAGE LABEL RECEIPT 0 RECEIPT 1 LABEL SPEC 44 TARE OVERRIDE 0 ALLOW 1 INHIBIT SPEC 45 ITEM PRINTING 0 ALLOW 1 INHIBIT SPEC 46 DEFAULT DATA OF PRINTING SHOP NAME NUMBER FOR LABEL 0 32 SPEC 47 DEFAULT DATA OF PRINTING SHOP NAME NUMBER FOR RECEIPT 0 32 SPEC 48 SETTING OF SCALE NUMBERS 1 999999 SPEC 49 SELECTION OF CLIENT SERVER INTERFACE 0 NO INTERFACE 1 ETHERNET COAX...

Page 66: ...EN SPEC 58 SELECTION OF STOP BIT FOR MULTI DROP SIO 0 1 BIT 1 2 BIT SPEC 59 MULTI DROP S I O SELECT JOB 0 NO OPERATION 1 FIS3000 2 PICK N PAY SF SPEC 60 S I O SELECT JOB 0 NO OPERATION 1 FIS3000 2 FL 1 3 POINT AND SHOP 4 RS232 BARCODE SCANNING 5 VIDEO CTRL SM300 ONLY RESERVED SM500 90 ONLY 6 PICK N PAY SF SPEC 61 FLOATING CLERK SELECTION 0 INHIBIT 1 ALLOW SPEC 62 RECEIPT FREE FORMAT NOT FOR AA 0 D...

Page 67: ...IBIT SPEC 71 FIXED UNIT PRICE PERCENTAGE FUNCTION KEY ENABLE 0 ALLOW 1 INHIBIT SPEC 72 PACK DATE FUNCTION KEY ENABLE 0 ALLOW 1 INHIBIT SPEC 73 PACK DATE FUNCTION KEY ENABLE 0 ALLOW 1 INHIBIT SPEC 74 SELL BY DATE FUNCTION KEY ENABLE 0 ALLOW 1 INHIBIT SPEC 75 UNIT SYMBOL FUNCTION KEY ENABLE 0 ALLOW 1 INHIBIT SPEC 76 QUANTITY SET FUNCTION KEY ENABLE 0 ALLOW 1 INHIBIT SPEC 77 PRICE CHANGE FUNCTION KEY...

Page 68: ...EL TYPE 0 GAP 1 NO GAP SPEC 88 SELECTION OF SELL BY DATE TITLE PRINTOUT FOR AA ONLY 0 INHIBIT 1 ALLOW SPEC 89 SELECTION OF ASCII CODE ENTRY IN S MODE FOR AA ONLY 0 INHIBIT 1 ALLOW SPEC 90 SELECTION OF SUB TOTAL MARKDOWN 0 NO MARKDOWN 1 MARKDOWN SPEC 91 SELECTION OF PRINTER SPEED FOR RECEIPT 0 SLOW 1 NORMAL 2 HIGH SPEC 92 SELECTION OF PRINTER SPEED FOR LABEL 0 SLOW 1 NORMAL 2 HIGH SPEC 93 SECOND RE...

Page 69: ...OUNT UNIT PRICE NO PROFIT 3 ORIGINAL UNIT PRICE NO PROFIT 4 DISC UNIT PRICE NO PROFIT NO DISC TEXT SPEC 103 SELECTION OF UNIT PRICE ASSIGNMENT FUNCTION KEY FOR PLU 0 ENABLE 1 DISABLE SPEC 104 SELECTION OF DISCOUNT PRICE ROUNDING METHOD 0 ROUNDING 1 CUT DOWN 2 CUT UP SPEC 105 SELECTION OF FIXED TOTAL PRICE MARKDOWN FUNCTION KEY ENABLE 0 ALLOW 1 INHIBIT SPEC 106 SELECTION OF TOTAL PRICE PERCENTAGE M...

Page 70: ...ION OF ZERO MINUTES PRINTING FOR NICHII ONLY 0 NO PRINT 1 PRINT SPEC 118 SELECTION OF BOTH PRICE BEFORE AND AFTER DISCOUNT FOR NICHII ONLY 0 PRICE BEFORE AND AFTER DISCOUNT 1 PRICE BEFORE DISCOUNT ONLY SPEC 119 SELECTION OF UNIT SYMBOL PRINTOUT IN RECEIPT FOR AA 0 DEPEND ON PLU PROGRAMMING 1 JAPANESE PCS 2 NO PRINT SPEC 120 SELECTION OF PLU NUMBER PRINT 0 NO ZERO SUPPRESS 1 ZERO SUPPRESS SPEC 121 ...

Page 71: ...S ON MANUAL TOTAL LABEL SPEC 131 PRINT PLU SETTING QUANTITY IN MANUAL MODE 0 NO 1 YES SPEC 132 RECEIPT TOTAL REPORT DM 0 NO 1 YES SPEC 133 CHANGE ALL PLU DEFAULT FORMAT WHEN DEFAULT SPEC CHANGE 0 YES 1 NO SPEC 134 HOST COMMUNICATION 0 NO OPERATION 1 ENABLE SPEC 135 PORT NUMBER 1 255 SPEC 136 SELECTION OF ONE TOUCHES SELF SERVICE OPERATION 0 ONE TOUCH 1 TWO TOUCH SPEC 137 SELECTION OF CENTERING OF ...

Page 72: ...E 0 SM80 FIS3D 1 SM25 FIS3D SPEC 149 SELECTION OF MAIN GROUP FUNCTION KEY ENABLE NOT FOR AA 0 DISABLE 1 ENABLE SPEC 150 PRESET KEY ASSIGNMENT FOR CLIENT 0 LOCAL ASSIGN 1 CENTRAL ASSIGN SPEC 151 CHANGE SELL BY DATE AND USED BY DATE WHEN PACK DATED IS CHANGED 0 NO 1 YES SPEC 152 SELECTION HAVE SELL BY DATE OR SELL BY TIME FOR INDIVIDUAL PLU 0 DISABLE 1 ENABLE SPEC 153 USER PROGRAMMABLE RIGHT SIDE DA...

Page 73: ... OF TRANSACTION DATA STORE IN CLIENT MEMORY 0 DISABLE 1 ENABLE SPEC 164 MAXIMUM LABEL LENGTH 0 120 MM 1 240 MM SPEC 165 UPDATE REPORT 0 YES 1 NO SPEC 166 AVERAGE PRICE AND WEIGHT LABEL FUNCTION 0 DISABLE 1 ENABLE SPEC 167 LABEL DATE TITLE PRINT NOT FOR AA 0 NO PRINT 1 PRINT SPEC 168 GB CODE 0 GB CODE 1 SHIFT GB CODE SPEC 169 PRINT PLU SETTING UNIT IN MANUAL MODE 0 NO 1 YES SPEC 170 USER SPECIFICAT...

Page 74: ...L 0 NORMAL 1 BLACK BAR SENSING SPEC 180 SCROLL MESSAGE GROUP 0 DISABLE 1 ENABLE SPEC 181 CONTINUOUS LABEL 0 DISABLE 1 ENABLE SPEC 182 CHARACTER SIZE FOR BARCODE DATA 0 LARGE 1 SMALL SPEC 183 PLU CLEAR AFTER 3 MINUTES TIME OUT 0 NO 1 YES SPEC 184 DUPLICATE UNIT TOTAL PRICE ON LABEL 0 NO PRINT 1 PRINT SPEC 185 WEIGH NON WEIGH FUNCTION KEY ENABLES 0 DISABLE 1 ENABLE SPEC 186 PRINT AND WEIGHT UNIT ON ...

Page 75: ...4 SPEC 195 WEIGHT PRINT FOR NON WEIGH ITEM 0 NO 1 YES SPEC 196 SCALE FILE 0 DISABLE 1 ENABLE SPEC 197 PRINTING FORMAT OF MONTH 0 NUMBER 1 2 ALPHABETIC 2 3 ALPHABETIC SPEC 198 FSD SAVING CALCULATION 0 NET VALUE 1 CENT OFF SPEC 199 FIS3000 TIME OUT 0 2 SECONDS 1 8 SECONDS 2 32 SECONDS SPEC 200 PLU CALL UP RANGE 0 DISABLE 1 ENABLE SPEC 201 SELL BY DATE FOR MANUAL MODE 0 PROGRAMMED SELL BY DATE 1 ZERO...

Page 76: ... FSD CALCULATION 0 UNIT PRICE DISCOUNT 1 PRICE OFF SPEC 210 PLU REPEAT FUNCTION KEY ENABLE 0 DISABLE 1 ENABLE SPEC 211 PICK N PAY PROTOCOL SOUTH AFRICA 0 OLD 1 NEW SPEC 212 DEPARTMENT NUMBER FOR PICK N PAY SOUTH AFRICA 1 99 SPEC 213 FLAG CODE FUNCTION KEY ENABLE 0 DISABLE 1 ENABLE SPEC 214 DHCP 0 DISABLE 1 ENABLE SPEC 215 SELECTION OF CENTERING OF SPECIAL MESSAGE 0 CENTERING 1 NO CENTERING SPEC 21...

Page 77: ...ATE UNIT PRICE FUNCTION 0 DISABLE 1 ENABLE SPEC 224 FIS3000 CABLE 0 4 WIRE 1 2 WIRE SPEC 225 PREPACK GRAND TOTAL FOR INDIVIDUAL PLU 0 YES 1 NO SPEC 226 REVERSE CALCULATION OF ITF CHECK DIGIT 0 NO 1 YES SPEC 227 UNIT PRICE OVERRIDE PASSWORD FUNCTION 0 DISABLE 1 ENABLE SPEC 228 INDIVIDUAL PLU TOTAL TRANSACTION 0 NO 1 YES SPEC 229 PRESET KEY GROUP 0 DISABLE 1 ENABLE SPEC 230 AUTO PRINT AFTER PLU CALL...

Page 78: ...FUNCTION KEY 0 DISABLE 1 ENABLE SPEC 241 PLU CODE FOR IR POS TMR 0 6 DIGITS 1 7 DIGITS SPEC 242 DISCOUNT WITHOUT LIMIT FUNCTION KEY 0 DISABLE 1 ENABLE SPEC 243 CONCATENATE COMMODITY NAME DISPLAY 0 NO 1 YES SPEC 244 ENABLE PLU PRICE CHANGE FLAG 0 NO 1 YES SPEC 245 PRINT SELL BY DATE OR USED BY DATE WHEN DATE PACKED DATE 0 YES 1 NO SPEC 246 PRINT 1 ST AND CHECK DIGITS OUTSIDE BARCODE 0 NO 1 YES SPEC...

Page 79: ...PLUs 2 UPDATE EXISTING PLUs NO DELETE 3 UPDATE ALL SERVER PLUs NO DELETE 4 DISABLE SPEC 254 AUTO UPDATE OF CLIENT OFF LINE REPORT 0 DISABLE 1 ENABLE SPEC 255 ETHERNET COMMUNICATION RETRY 0 2 TIMES 1 5 TIMES SPEC 256 DISPLAY PRICE WITH TAX AFTER CLERK KEY PRESS AA 0 YES 1 NO SPEC 257 CHANGE PLACE NAME TO PLU VIA FUNCTION KEY AA 0 NO 1 YES SPEC 258 BEEF LABELLING 0 NO 1 YES SPEC 259 AUTO PRINT SUB T...

Page 80: ...LERK ACCUMULATION 0 NO 1 9995 A KEY 2 9996 B KEY 3 9997 C KEY 4 9998 D KEY SPEC 270 INDIVIDUAL REPORT PRINT AND CLEAR IN Z MODE 0 DISABLE 1 MANUAL CLEAR 3 AUTO CLEAR SPEC 271 STORE TOTAL REPORT CLEAR WHEN SPEC270 ENABLE 0 CLEAR STORE TOTAL REPORT ONLY 1 CLEAR ALL REPORT SPEC 272 BEEF REFERENCE NO 0 CODE 1 DATE SPEC 273 ITEM CODE PLU NUMBER 0 YES 1 NO SPEC 274 BENCH KEY PAD SM300 ONLY 0 NEW 1 OLD S...

Page 81: ...UNCTION 0 WITHOUT CR 1 WITH CR SPEC 283 NOT USED SPEC 284 OPEN CASH DRAWER ON CREDIT PAYMENT 0 ALLOW 1 INHIBIT SPEC 285 AUSTRALIA ECR FUNCTION 0 NO 1 YES SPEC 286 ENFORCE AMOUNT TENDERED 0 NO 1 YES SPEC 287 ENFORCE CHANGE KEY 0 NO 1 YES SPEC 288 PLANNED PRICE PRINTED IN REPORT 0 ENABLE 1 DISABLE SPEC 289 REPEAT PLU CALL 0 NO 1 YES SPEC 290 PAYMENT KEY EURO COUNTRIES ONLY 0 DISABLE 1 ENABLE SPEC 29...

Page 82: ...ARD SELECTION 0 NORMAL KEYBOARD 1 100 PRESET KEYS KEYBOARD 2 80 PRESET KEYS KEYBOARD SPEC 300 SM500 SELF SERVICE 0 NO 1 YES SPEC 301 PRINT RECIEPT AFTER ACCUMULATION 0 YES 1 NO SPEC 302 FIXED PORT NUMBER FOR ETHERNET 1 255 SPEC 303 DHCP IP ADDRESS LEASE TIME 0 DISABLE 1 ENABLE SPEC 305 CHAR SPREADING SPEED UP S3 S4 M3 M4 FOR U1 ONLY 0 DISABLE 1 ENABLE SPEC 306 UNIT PRINT ON RECEIPT 0 PCS 1 ITEMS S...

Page 83: ... RCT 0 YES 1 NO SPEC 316 INCLUDE PPK TTL IN MANUAL TTL RPT 0 NO 1 YES SPEC 317 WIRELESS COMMUNICATION 0 NO 1 YES SPEC 318 WIRELESS FTP PORT NO 1 9999 SPEC 319 DELETE TRACEABILITY REOCRD 0 YES 1 NO SPEC 320 PLU LINK TO TEXT FIELD 0 DISABLE 1 ENABLE SPEC 321 JULIAN DATE FOR PACKED SELL DATE 0 NO 1 YES SPEC 322 PRICE PRINTING SIZE LARGE FONT VER 14 63 ONWARDS 0 NO 1 YES SPEC 323 AUTO PLU BROADCASTING...

Page 84: ...EC 332 ITEM TEXT 5 16 PRINT ON TOTAL LABEL 0 DISABLE 1 ENABLE SPEC 333 IMAGE AT TOP RECEIPT 0 99 SPEC 334 IMAGE AT BOTTOM RECEIPT 0 99 SPEC 335 TRACEABILITY EATS BY DATE 0 DISABLE 1 ENABLE SPEC 336 TRACEABILITY MAX WEIGHT 0 DISABLE 1 ENABLE SPEC 336 TRACEABILITY NO ASSIGNMENT PER PLU 0 NO 1 YES SPEC 337 TRACEABILITY DEFAULT LABEL FORMAT 1 F1 2 F2 3 F3 4 F4 5 F5 6 F6 7 F7 8 F8 SPEC 337 TRACEABILITY...

Page 85: ...C 346 UPDATE LABEL TURNOVER IN RT BUFFER 0 NO 1 ONLY IN REGISTRATION MODE 2 ONLY IN PRE PACK MODE 3 REGISTRATION PRE PACK MODE SPEC 347 INTERNET BROADCAST 0 NO 1 YES SPEC 348 TAIWAN POP LABEL 0 DISABLE 1 ENABLE SPEC 349 DIRECT ACCESS TO CLERK MODE 0 DISABLE 1 ENABLE SPEC 350 ADDITIONAL ROUNDING IN RECEIPT 0 PRINT 1 NO PRINT SPEC 351 GRATUITOUS ARP 0 DISABLE 1 ENABLE SPEC 352 MAGALI TRACEABILITY 0 ...

Page 86: ...D ON GROSS WT 0 DISABLE 1 ENABLE SPEC 363 BARCODE READABLE CHARACTER 0 PRINT 1 NO PRINT 10 2 2 Weigh Measure Specification REZERO 1 4 2 SPEC 600 SELECTION OF PRICE BASE FOR PRICE CALCULATION FOR WEIGHED ITEMS 0 100g BASE 1 1kg BASE SPEC 601 SELECTION OF AUTO ZERO FUNCTION 0 NO AUTO ZERO 1 AUTO ZERO SPEC 602 SELECTION OF DISPLAY TYPE 0 SINGLE DISPLAY ROW 1 THREE DISPLAY SPEC 603 SELECTION OF TAX 0 ...

Page 87: ... 0 2 0 00 3 0 000 SPEC 610 SELECTION OF UNIT PRICE DECIMAL POINT RIGHT SHIFT 0 NO RIGHT SHIFT 1 RIGHT SHIFT SPEC 611 SELECTION OF UNIT PRICE DECIMAL POINT LEFT SHIFT 0 NO LEFT SHIFT 1 LEFT SHIFT SPEC 612 SELECTION OF SWITCHING OF PRICE BASE 0 INHIBIT 1 100g 1 KG 2 500g 1 KG SPEC 613 SELECTION OF EXIT FROM ACCUMULATION MODE AFTER TIME OUT 0 INHIBIT 1 15 SECS 2 5 SECS 3 10 SECS SPEC 614 SELECTION OF...

Page 88: ...1 INHIBIT SPEC 624 ZERO TRACKING DURING TARE 0 ALLOW 1 INHIBIT SPEC 625 SELECTION OF ACCUMULATION WHEN TARE 0 ALLOW 1 INHIBIT SPEC 626 SELECTION OF DIGITAL TARE 0 ALLOW 1 INHIBIT SPEC 627 SELECTION OF DECIMAL POINT FIGURE 0 PERIOD 1 COMMA SPEC 628 SELECTION OF PRICE ROUNDING METHODS FOR THE DECIMAL DIGITS FOR WEIGHED ITEMS 0 ROUNDING 1 TRUNCATING 2 CUT UP SPEC 629 SELECTION OF ADDITIONAL PRICE ROU...

Page 89: ... 3 MAX 200G 2 NOT USED SPEC 639 SELECTION OF EXIT FROM ACCUMULATION MODE WHEN WEIGHT CHANGE 0 INHIBIT 1 ALLOW SPEC 640 SELECTION OF PRICE ACCUMULATION WITH WEIGHT CHANGE 10d 0 INHIBIT 1 ALLOW SPEC 641 ACCUMULATION AVAILABLE ONLY AFTER SCALE SHOWS WEIGHT 0 0 INHIBIT 1 ALLOW SPEC 642 SELECTION OF TARE DISPLAY FOR ONE TOUCH TARE 0 ALLOW 1 INHIBIT SPEC 643 SELECTION OF WEIGHT RANGE OF NON WEIGH ITEMS ...

Page 90: ...DER 0 FUNCTION KEY PRECEDE NUMERIC KEY 1 NUMERIC KEY PRECEDE FUNCTION KEY SPEC 652 SELECTION OF ANGLE ROTATION FOR CERTAIN ITEMS PRINTING 0 ANTI CLOCKWISE 1 CLOCKWISE SPEC 653 SELECTION OF TOTAL DISCOUNT 0 ALLOW 1 INHIBIT SPEC 654 SELECTION OF PACKED DATE FUNCTIONS IN MANUAL MODE 0 INHIBIT 1 ALLOW SPEC 655 SELECTION OF PREPACK MODE 0 ALLOW 1 INHIBIT SPEC 656 SELECTION OF SCALE TYPE 0 POLE TYPE 1 B...

Page 91: ...DE 0 NO SWAP 1 SWAP SPEC 666 MULTIPLICATION OPERATION IN PREPACKS MODE 0 INHIBIT 1 ALLOW SPEC 667 SM 90 DOT MATRIX DISPLAY SCANNING RATE 0 NORMAL 1 SLOW 2 HIGH SPEED 3 VERY HIGH SPEED SPEC 668 DISPLAY INTERVAL 0 FAST DISABLE 1 NORMAL SPEC 668 16x16 COM NAME 0 1 0 SEC DISPLAY 1 1 5 SEC DISPLAY 2 2 0 SEC DISPLAY 3 0 5 SEC DISPLAY SPEC 669 MASK WEIGHT DISPLAY 0 NO 1 YES SPEC 670 SCROLL MESSAGE DISPLA...

Page 92: ...TAIWAN 0 DISABLE 1 ENABLE SPEC 680 TARE CLEAR WHEN EXIT FROM Z PASSWORD MODE AND CHANGING OF SPECIFICATIONS REZERO 141 REZERO 142 0 NO 1 YES SPEC 681 EURO SECOND PRICE ROUNDING METHOD 0 ROUNDING 1 TRUNCATING 2 CUT UP SPEC 682 ADDITIONAL EURO SECOND PRICE ROUNDING METHOD 0 NO ADDITIONAL ROUNDING 1 1 4 ROUNDING 2 SPECIAL ROUNDING 3 ROUNDING FOR 1 ST DIGIT 4 CUT OFF 5 CUT UP 6 Υ5 CUT OFF AND Υ10 CUT ...

Page 93: ...E 1 ENABLE SPEC 691 ONE TOUCH TARE 0 ENABLE 1 DISABLE SPEC 692 SCROLLING MSG SM300 ONLY 0 NO 1 YES SPEC 693 FLEXI SELF SERVICE KEY GROUPING 0 NO 1 YES SPEC 694 WEIGHT HOLD FUNCTION SM300 0 DISABLE 1 ENABLE SPEC 695 CLERK PASSWORD SETTING CA ONLY 0 DISABLE 1 ENABLE SPEC 696 QUANTITY SYMBOL RECALCULATION 0 NO 1 YES SPEC 697 RESERVE 0 NO 1 YES SPEC 698 DEC PLU TARE 0 NO 1 YES All manuals and user gui...

Page 94: ... 0 3 PAGES 1 4 PAGES 2 5 PAGES 3 6 PAGES SPEC 258 SLT PRESET NAME PROGRAMMING 0 PLU PROGRAMMING 1 KEY ASSIGNMENT SPEC 264 DIRECT ACCESS TO CLERK ADD MODE 0 NO 1 YES SPEC 265 SELECT NO OF FUNCTION KEY PAGES 0 3 PAGES 1 4 PAGES 2 5 PAGES 3 6 PAGES SPEC 269 FUNCTION KEY NAME SETTING 0 ALLOW 1 INHIBIT All manuals and user guides at all guides com ...

Page 95: ...K4 Service Manual 92 11 REVISIONRECORDS REVISION RECORDS Serial no Date Rev Statu Description of Changes Software Version Remarks 001 Aug 06 00 V29 246 Edition 1 All manuals and user guides at all guides com ...

Reviews: