


Troubleshooting
D3655-US Rev E
EZ400 User’s Manual
25
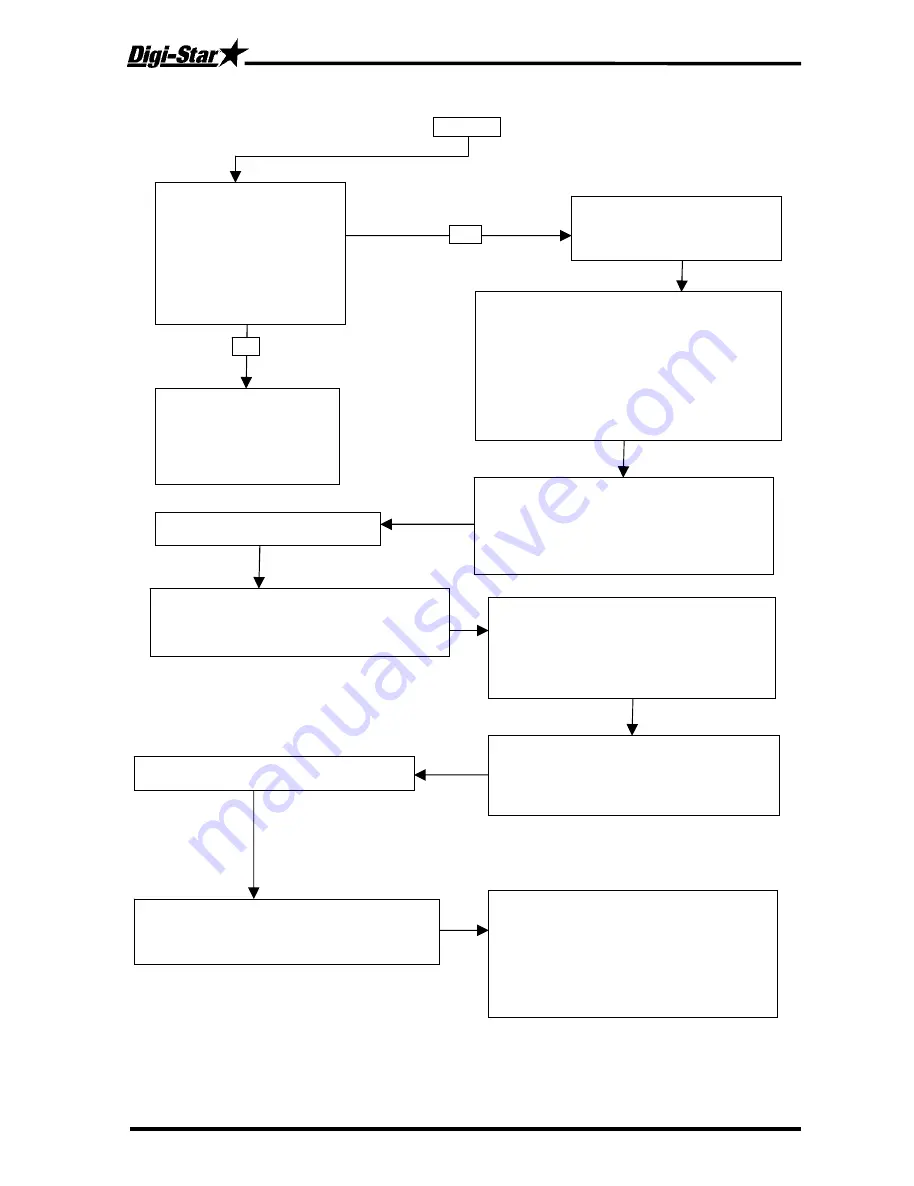
FLOW CHART
Continued
1. Disconnect all the Load Cell
wires from the terminal blocks
inside the J-Box (leave the
Indicator on while connecting
and disconnecting the wires, it
will not damage Load Cells or
Indicator if wires are shorted
during this step). Is reading on
Indicator stable?
2. Zero balance the Indicator.
(Press “NET/GROSS” then
“ZERO”). Indicator should display
“0”.
YES
Replace J-Box
(be aware of electrical
interference that might affect
your scale such as: mobile
phones, CB radios, radio
towers, electric motors, etc.).
NO
Note:
Hook up the Load Cells to the J-Box one at
a time (only one Load Cell connected at a time).
This will get a reading for each Load Cell. While
performing this test, watch for any other
symptoms such as erratic/unstable display.
Indicator flashing “±RANGE”, negative reading,
etc. If the Indicator reading should ever appear
abnormal with any Load Cell connected then it is
probably bad.
4. Record the Indicator reading with
the Load Cell connected.
3. Connect one Load Cell back into one of the
terminals in the J-Box. (The reading you get for
each Load Cell is dependent on the size and type
of each Load Cell and how much weight is over
each Load Cell. In general, the number should be
positive and stable.)
5. Stand or hang your weight over the connected
Load Cell. Record how much the weight
increased with your weight over the Load Cell. (A
scale with only one Load Cell will weigh heavy.)
Note:
If the scale responded to your weight,
that’s verification on the J-Box is OK. If the
scale did not respond, either that Load Cell is
bad or the J-Box is bad. Try the other Load
Cells. If the Indicator still shows no response,
the J-Box is bad. (Replace J-Box)
6. Disconnect the first Load Cell and reconnect
a second one. Record the Indicator reading.
Stand or hang your weight over the connected
Load Cell. Record how much the weight
increased.
7. Repeat step 6 for the remaining Load Cells.
Remember to record your readings.
Do not expect the Load Cells to give the same
reading. It is common for Load Cells to have
readings that vary by hundreds, even thousands.
Especially when one is carrying more weight.
8. Bad Load Cells will have a reading that is
either unstable, makes the indicator flash
“±RANGE” or is more than three times greater
or less than the average of the others. Also the
readings of your weight over each Load Cell
should be similar. (Probably 4 times your actual
weight). Any differences could be an indication
of a bad Load Cell or a structural problem.
All manuals and user guides at all-guides.com


