background image

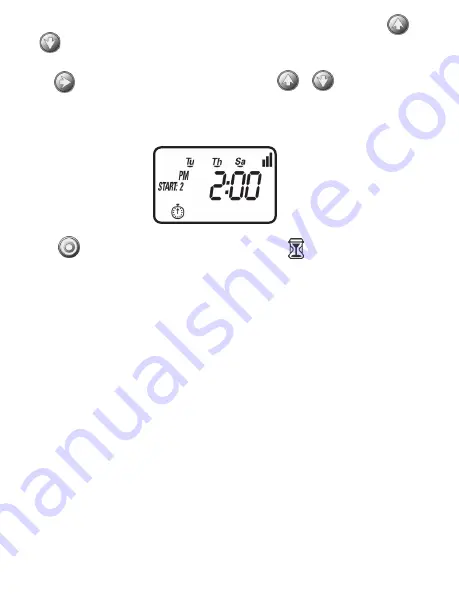
7.  To set the desired second start time hour (note AM and PM designations), press 


or 


8. Press 

 again and the minutes begin blinking, press 

 or 

 to select the 

watering start time in minutes. Repeat the steps to set the third, and if needed, the 
fourth and fifth start times. During programming, the screen also shows which days 
the controller will operate.

Press the 

 button to proceed to the next step RUN TIME   or to review  

the program.

13

Summary of Contents for LEIT-1

Page 1: ...Ambient Light Powered Smart Irrigation Controller LEIT1 000 LEIT1 ILV 075 LEIT1 ILV 100 LEIT1 ILV 150 LEIT1 ILV 200 I N S T R U C T I O N M A N U A L...

Page 2: ...g a rain sensor 24 17 Maintenance troubleshooting and repairs 25 18 Warranty technical service 27 1 ABOUT THE CONTROLLERS Thank you for purchasing DIG s LEIT1 ambient light powered irrigation controll...

Page 3: ...button keypad 4 Rain sensor connection 5 Quick reference label Inline valve included with model LEIT1 075 or 3 4 LEIT1 100 or 1 LEIT1 150 or 1 LEIT1 200 or 2 Controller Assembly 30 920 adapter 1 2 3 4...

Page 4: ...et Monthly Budget Seasonal adjustment setting 0 200 in 5 increments or to fine tune SimpleSmart programming q w r y i o a e t u d s 8 Rain Delay Delay irrigation setting from 1 99 days with automatic...

Page 5: ...ram To turn on the valve manually using the solenoid lift the controller from the solenoid and turn the solenoid counterclockwise 1 2 to 3 4 of a turn or until you hear or see water flowing through th...

Page 6: ...lve Consult local codes for specific details 1 Flush the main line until water runs clear before installation 2 Shut off the main water supply 3 Install the controller with inline valve directly to th...

Page 7: ...o 2 hours This section explains the programming features and the steps necessary to assign irrigation schedules To program the controller press the to select the desired programming mode the to make t...

Page 8: ...ND DATE To enable the controller to operate properly the current time and date must be set 1 Press the button until the icon appears along with the time and the day of the week 2 If the current time h...

Page 9: ...ing month day and year When the date is selected and updated the day of the week will be updated at the same time to correspond with the date MONTH DAY YEAR 6 Press to proceed to the next step SET DAY...

Page 10: ...the icon and the days of the week appear on the screen 2 Press once and M for Monday starts blinking 3 Press and underscore under M Monday disappears Monday is de selected 4 Press twice and W for Wed...

Page 11: ...o skip all the days of the week underscore must be removed beneath all days 3 Press and EVEN appears blinking To select ODD days press 4 Press again and 1 DAY appears blinking To select the number of...

Page 12: ...ys OFF or the last start time programmed in START 1 appears 2 Press and OFF or the first start time programmed begins blinking 3 To set the desired first start time hour note AM and PM designations pr...

Page 13: ...begin blinking press or to select the watering start time in minutes Repeat the steps to set the third and if needed the fourth and fifth start times During programming the screen also shows which day...

Page 14: ...For example setting watering run time to 10 minutes on certain days of the week will program the controller to turn the water on for 10 minutes on each of the days chosen and at every start time sele...

Page 15: ...inutes When programming the watering duration the screen will also show the days the controller will operate NOTE If the last data entered stops blinking after 10 seconds press again to resume or to m...

Page 16: ...ART A on page 16 and choose from the region description Selecting SP01 through SP20 sets the LEIT1 controller to water a predetermined number of minutes per month The amount to water is pre programmed...

Page 17: ...Drip Systems SP08 Humid Sub Tropical Sprinkler Systems SP09 Highlands Drip Systems SP10 Highlands Sprinkler Systems SP11 Dry Inland Valleys Drip Systems SP12 Dry Inland Valleys Sprinkler Systems SP13...

Page 18: ...onth of January To activate the SimpleSmart ET feature 1 Press the button until the icon appears and OFF appears 2 Press and OFF or the last SP program appears 3 To select a desired SimpleSmart preset...

Page 19: ...me setting of the SimpleSmart programming per month by percentage To set seasonal adjustment in 1 Press the button until 100 and the current month appears 2 Press the button and the 100 appears blinki...

Page 20: ...a temporary suspension of the program 1 Press the button until the icon appears and OFF appear 2 Press the button and OFF starts blinking 3 To set the desired temporary suspension of the program 1 99...

Page 21: ...ary 12 December 2 Push the button until the desired day of the week flashes 3 Push the to remove the underline under the day of the week During the selected month watering will not occur on the days o...

Page 22: ...ton to review the program or to return to the home screen Here is an example of the home screen showing all the icons of the programs that are currently set and active which is the SimpleSmart SET ET...

Page 23: ...s assigned The sensor condition is disregarded in this mode To start a manual run 1 Press the button and the icon and icon appears ON appears momentarily and then the last watering duration is display...

Page 24: ...oop 2 Strip approximately 1 2 in of insulation from the end of each wire 3 Splice one yellow wire to each of the wires coming from the sensor Use waterproof wire connectors to secure the connections 4...

Page 25: ...solenoid CAUSE Flow control handle is turned down SOLUTION Open flow control handle on valve PROBLEM Valve functions in manual mode but not automatically CAUSE Controller is set to OFF mode SOLUTION V...

Page 26: ...SE Rain sensor is normally open malfunctioning or not wired correctly SOLUTION Verify that sensor icon appears on display when pin is pushed down check all wire splices PROBLEM Controller waters more...

Page 27: ...the purchase of the product for personal family or household purposes DIG CORPORATION disclaims any such warranties to the extent permitted by law To the extent that any such disclaimer or implied war...

Page 28: ...www digcorp com email dig digcorp com 26 209 REVC 080420 Printed in the USA DIG is a Registered Service Mark of DIG Corporation 1210 Activity Drive Vista CA 92081 8510 USA...

Reviews: