background image

BEETLE /iSCAN EASY  


Service Manual 


37 

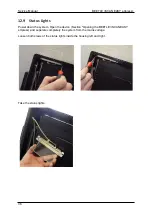
You can change the total status lights, or you can only change the board. To change the 

board, you drag the board out of the status lights and insert a new one. 


Install the new or old status lights in the reverse order according to the previous steps. 


Summary of Contents for BEETLE /iSCAN EASY eXpress+

Page 1: ...BEETLE iSCAN EASY eXpress Service manual May 2019...

Page 2: ......

Page 3: ...rved Any violations give rise to a claim for damages All rights reserved particularly in relation to the grant of a patent or the registration of a utility model Subject to availability and technical...

Page 4: ...5 Disconnecting the device from the power supply 14 12 Changing components 15 12 1 PC 15 12 2 Printer TH230 16 12 3 Display 18 12 3 1 Control Panel 20 12 3 2 OSD Function 20 12 4 Magnetic card reader...

Page 5: ...mensions mm 51 15 1 Rear view 51 15 2 15 Version 52 15 3 19 Version 53 15 4 Permissible tilt angle 53 15 5 From below 54 15 6 Device with open door 54 16 Block diagram 55 17 Certificates 56 18 Recycli...

Page 6: ......

Page 7: ...ng the device lies with the customer The BEETLE iSCAN EASY eXpress may only be installed and connected by employees with the appropriate technical training The safety instructions given in this docume...

Page 8: ...jury WARNING This warning note describes a hazard with a medium degree of risk which if not avoided will result in death or grave bodily injury CAUTION This warning note describes a hazard with a low...

Page 9: ...Xpress Service Manual 3 3 Other documentation Product Dokumentationsart DN Intranet BEEETLE Kiosk User Manual Yes Printer TH230 User Manual Service Guide Programmer Reference Guide Yes Yes Yes TSF 15...

Page 10: ...cts due to improper or inadequate maintenance improper use or unauthorized modification of the product or an unsuitable installation location or inadequate environment are not covered by the warranty...

Page 11: ...m a cold environment into a heated operating room condensa tion may occur The device must be completely dry before being operated An acclimati zation period of at least two hours must therefore be obs...

Page 12: ...ional Electrical Code ANSI NFPA 70 NEC Canadian Electrical Code part I CSA C22 1 CE Code The device should only be transported in its original packaging to protect it against shock and impact Always k...

Page 13: ...TLE iSCAN EASY eXpress Service Manual 7 6 Tools You Need Keep the following tools at hand for working on the system Torx screw driver Size T6 T8 T10 T20 T25 Socket wrench Wrench size 5 5mm M3 und 7mm...

Page 14: ...es between the contents of the package and the packing list or defects inform your suppliers immediately or the Diebold Nixdorf sales office Make sure to also keep the packing list to hand to indicate...

Page 15: ...SD Always use the antistatic equipment Unplug the power before inserting or removing components containing ESDs While working with ESDs you must discharge yourself by using an ESD wrist strap or groun...

Page 16: ...Light 6 Printer 2 Display 19 optional 15 7 EFT 3 Swipe Card Reader or Waiter lock modular only with 15 Display 8 Waiter Lock integrated 4 Lock 9 Article Surveillance System 5 Scanner It may be connec...

Page 17: ...d Reader or Waiter Lock only with 15 Display 9 Power Supply 3 Display 10 Lock 4 EFT 11 Fan 5 Scanner 12 Printer 6 Article Surveillance System 13 NFC 7 Waiter Lock 14 Loud Speaker It may be connected E...

Page 18: ...Service Manual BEETLE iSCAN EASY eXpress 12 10 Opening the device Unlock the system with the key siehe arrow Open the door to the left...

Page 19: ...er system is referred to as a TN S network Do not use PEN conductors NOTICE The system operates automatically when the power plug is plugged into the building installation If this does not work please...

Page 20: ...device by closing the application 11 4 Restart the system after it has been shut down Press the ON OFF button on the PC to start the system 11 5 Disconnecting the device from the power supply To compl...

Page 21: ...wn the system Open the device Section Opening the BEETLE iSCAN EASY eXpress and seperate completely the system from the mains voltage Disconnect all cables from the PC Pull the green button down see a...

Page 22: ...evice Section Opening the BEETLE iSCAN EASY eXpress and unplug the mains cable from the PC Section Disconnecting the kiosk from the power supply Remove the 2 screws see arrows Slide the printer tot he...

Page 23: ...the printer left from the drillings for the screws into the housing and slide it over the latches see arrows Fix the printer at the housing with the two screws removed befores NOTICE Check the printe...

Page 24: ...play Power down the system Open the device Section Opening the BEETLE iSCAN EASY eXpress and unplug the mains cable from the PC Section Disconnecting the kiosk from the power supply Unplug all cables...

Page 25: ...lay holder to the case and lift it out of the case Remove the screws see arrows at the metal holder Remove the holder and mount it on the new display Mount the display in reverse order You may need to...

Page 26: ...ally close if you have left it idle for a pre set time To Lock the OSD I Power menu buttons please follow the instructions below Please note the monitor has to be turned ON with a valid signal pre set...

Page 27: ...Use the Enter key to select OSD or Power setting then set at Unlock by pushing the UP or Down button c When the UP or Down button is released the previous setting will be saved and exit the Lock Unloc...

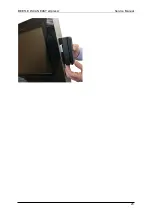
Page 28: ...the system from the mains voltage Remove the two screws see photo Pull the unit sideways out of the housing and slide the cover to the side Disconnect the ca ble and replace the module with a new one...

Page 29: ...BEETLE iSCAN EASY eXpress Service Manual 23...

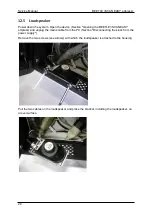
Page 30: ...the BEETLE iSCAN EASY eXpress and unplug the mains cable from the PC Section Disconnecting the kiosk from the power supply Remove the two screws see arrows with which the loudspeaker is attached to th...

Page 31: ...press Service Manual 25 Loosen the two screws securing the loudspeaker to the bracket and replace it with a new one Install the new loudspeaker including the bracket in reverse order in the same way a...

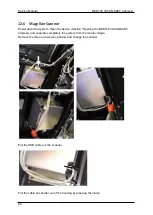
Page 32: ...tem Open the device Section Opening the BEETLE iSCAN EASY eXpress and seperate completely the system from the mains voltage Remove the three screws see photos and change the scanner Pull the USB cable...

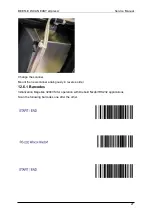
Page 33: ...e Manual 27 Change the scanner Mount the new scanner analogously in reverse order 12 6 1 Barcodes Initialization Magellan 3200VSi for operation with Diebold Nixdorf RS232 applications Scan the followi...

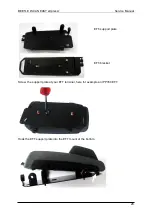
Page 34: ...em Open the device Section Opening the BEETLE iSCAN EASY eXpress and seperate completely the system from the mains voltage NOTICE Various customer specific EFTs are used Here in the example it is the...

Page 35: ...E iSCAN EASY eXpress Service Manual 29 EFT support plate EFT bracket Screw the support plate at your EFT terminal here for example an IPP350 EFT Hook the EFT support plate into the EFT mount at the bo...

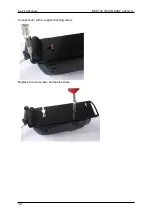
Page 36: ...Service Manual BEETLE iSCAN EASY eXpress 30 Connect both with a supplied locking screw Replace the two screws and tighten them...

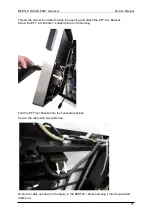
Page 37: ...pening and attach the EFT incl Bracket Screw the EFT incl Bracket support plate to the housing Fold the EFT incl Bracket into the horizontal position Secure the cable with two cable ties Route the cab...

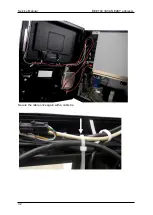
Page 38: ...Service Manual BEETLE iSCAN EASY eXpress 32 Secure the cable once again with a cable tie...

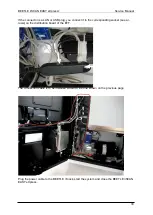
Page 39: ...ug you connect it to the corresponding socket see ar rows on the distribution board of the EFT The connection cable is to be installed similar to the one shown on the previous page Plug the power cabl...

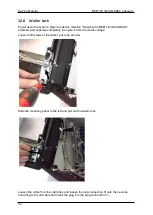
Page 40: ...Xpress and seperate completely the system from the mains voltage Loosen both srews of the waiter lock see arrows Slide the mounting panel to the left and pull out the waiter lock Loosen the cable from...

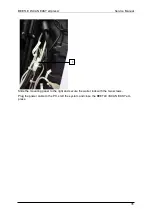
Page 41: ...AN EASY eXpress Service Manual 35 Slide the mounting panel to the right and secure the waiter lock with the two screws Plug the power cable to the PC start the system and close the BEETLE iSCAN EASY e...

Page 42: ...tatus Lights Power down the system Open the device Section Opening the BEETLE iSCAN EASY eXpress and seperate completely the system from the mains voltage Loosen both srews of the status lights inside...

Page 43: ...ou can change the total status lights or you can only change the board To change the board you drag the board out of the status lights and insert a new one Install the new or old status lights in the...

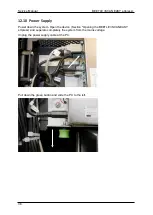
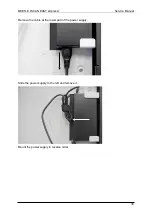
Page 44: ...Power Supply Power down the system Open the device Section Opening the BEETLE iSCAN EASY eXpress and seperate completely the system from the mains voltage Unplug the power supply cable at the PC Pull...

Page 45: ...BEETLE iSCAN EASY eXpress Service Manual 39 Remove the cable at the lower part oft he power supply Slide the power supply to the left and remove it Mount the power supply in reverse order...

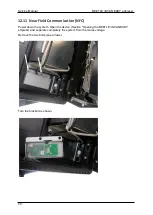
Page 46: ...s 40 12 11 Near Field Communication NFC Power down the system Open the device Section Opening the BEETLE iSCAN EASY eXpress and seperate completely the system from the mains voltage Remove the two bol...

Page 47: ...BEETLE iSCAN EASY eXpress Service Manual 41 Loosen the two screws on the board Place the two screws aside and turn the board Loosen the plug on the board Install the new NFC board in the correct order...

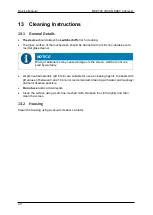
Page 48: ...enance may cause damages to the screen which are not cov ered by warranty All pH neutral materials pH 6 to 8 are suitable for use as cleaning agents Cleaners with pH values of between 9 and 10 are not...

Page 49: ...f Air Duster 400g 01750108425 Non flammable Cleaning cloths with isopro panol 01750104065 100 cloths with isopropyl Cleaning card for hybrid card readers 01750016388 Dampened cleaning card for all chi...

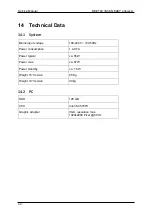
Page 50: ...em Mains input voltage 100 240 V 60 50Hz Power consumption 1 4 0 7A Power typical ca 55W Power max ca 87W Power standby ca 1 5W Weight 15 Version 28 Kg Weight 19 Version 30 kg 14 2 PC SSD 128 GB CPU I...

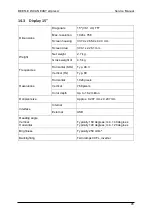
Page 51: ...Gross weight of 4 5 kg Frequencies Horizontal KHz Typ 48 3 Vertical Hz Typ 60 Resolutions Horizontal 1024 pixels Vertical 768 pixels Color depth Up to 16 2 million Dot pixel size Approx 0 297 mm x 0 2...

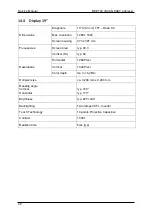
Page 52: ...uencies Screen area typ 48 3 Vertikal Hz typ 60 Resolutions Horizontal 1280 Pixel Vertical 1024 Pixel Color depth Up to 16 2 Mio Dot pixel size ca 0 294 mm x 0 294 mm Reading angle Vertical Horizontal...

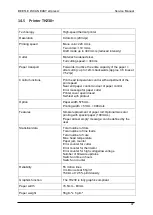
Page 53: ...message for paper cutter Printer cover open closed Self test with printout Option Paper width 57 5mm Printing width 51mm 408 dots Features Simple replacement of paper roll Optional two color printing...

Page 54: ...mal coating Rear side of paper Paper roll Outer diameter 90mm max Width of paper roll 80 3mm max Length of paper 100m Core size Core diameter 10mm 2mm Wall thickness of core max 2mm 0 3mm End of paper...

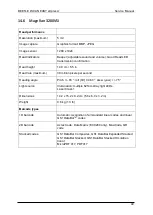
Page 55: ...els per second Reading angle Pitch 65 roll tilt 0 360 skew yaw 75 Light source Illumination multiple 625nm stray light LEDs Laser Class 1 Dimensions 14 2 x 15 2 x 8 2 cm 5 6 x 6 0 x 3 2 in Weight 0 6...

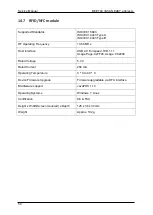
Page 56: ...Host Interface USB 2 0 Full speed HID 1 11 Usage Page 0xFF45 Usage 0X2200 Rated Voltage 5 0 V Rated Current 250 mA Operating Temperature 0 C to 40 C Device Firmware Upgrade Firmware upgradable via DF...

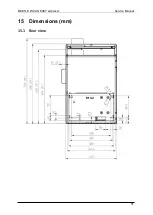
Page 57: ...BEETLE iSCAN EASY eXpress Service Manual 51 15 Dimensions mm 15 1 Rear view...

Page 58: ...Service Manual BEETLE iSCAN EASY eXpress 52 15 2 15 Version...

Page 59: ...BEETLE iSCAN EASY eXpress Service Manual 53 15 3 19 Version 15 4 Permissible tilt angle...

Page 60: ...Service Manual BEETLE iSCAN EASY eXpress 54 15 5 From below 15 6 Device with open door...

Page 61: ...BEETLE iSCAN EASY eXpress Service Manual 55 16 Block diagram The components optional are marked in green color...

Page 62: ...Class A digital de vice pursuant to part 15 of the FCC Rules These limits are designed to provide reasonable protection against harmful interference when the equipment is operated in a commercial en...

Page 63: ...cyclable materials and components Do not affix any additional stickers to the device for recycling reasons Diebold Nixdorf disposes of waste equipment in an environmentally responsible manner in a rec...

Page 64: ......
Page 65: ...Diebold Nixdorf D 33094 Paderborn...

Reviews: