background image

OPERATOR’S MANUAL

GAC® 2500 AGRI

11001-1626B-201405

42

/

SETUP

DATA STORAGE CAPACITY

The unit is capable of storing a maximum of 3,000 test results. The 
database can be cleared at any time by selecting the 

Clear Database


button located under the System Setup screen. When stored data has 
reached approximately 2,500 records, a warning screen automatically 
appears when attempting a grain measurement that indicates memory 
capacity is getting low. Analysis can still occur until the maximum allowed 
records of approximately 3000 is reached. Once maximum storage is 
reached, grain analysis cannot continue until cleared.

NOTE:

Records cannot be exported to 
a USB memory device at this 
screen.  If a backup is required, 
this can be accomplished at the 
View Results screen found 
under the Results button.

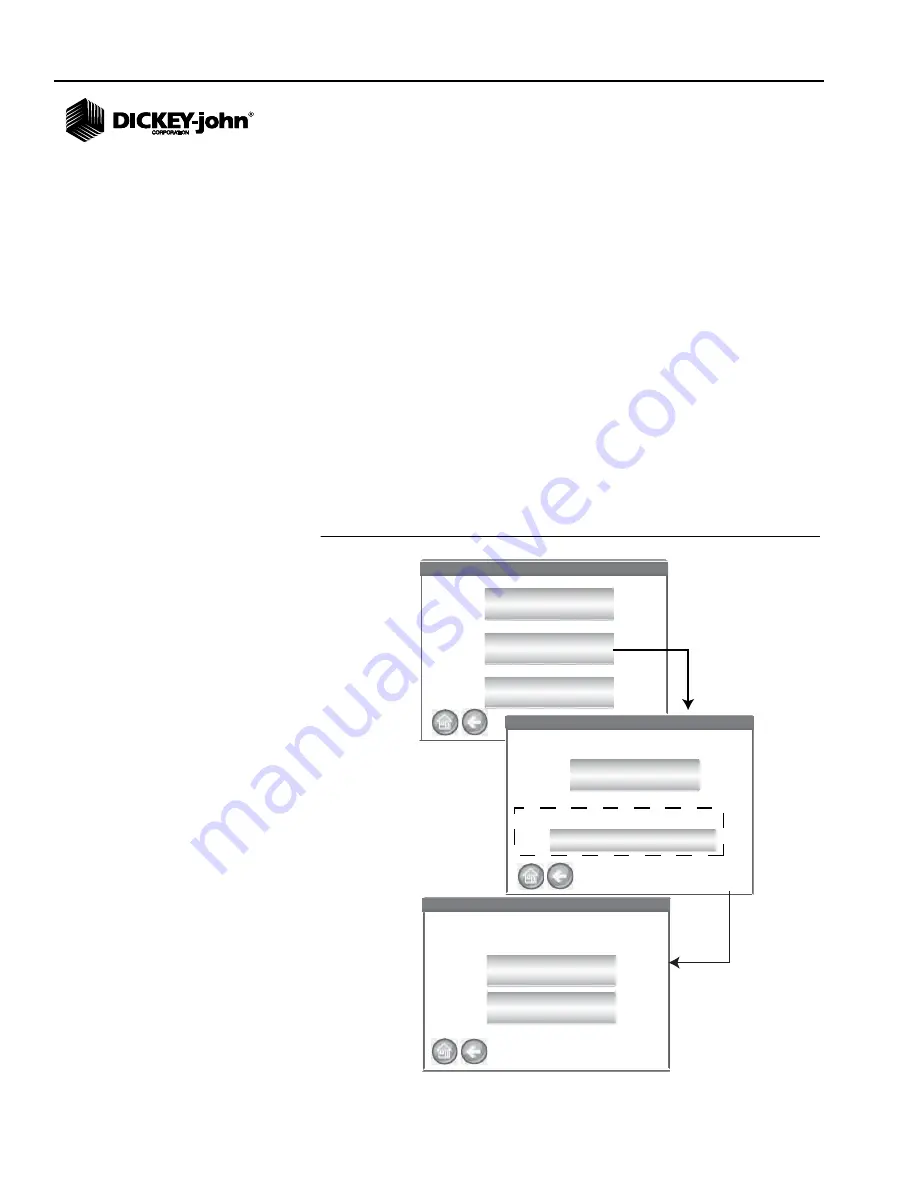
To Delete Records:

1. At the System Setup screen, press the 

More

 button until the 

Clear 

Database

 button displays.

2. Press the 

Clear Database

 button to display the Delete Results screen.

3. At the Delete Results screen, press the 

Delete All Results

 button.

– A Delete Engineering Data button appears if Engineering log files 

are present. This button must be pressed to clear those records.

4. Press 

Yes

 to proceed with clearing records.

– Press 

No

 to abort record deletion.

Figure 37
Memory Capacity Low Screen

Your Response Needed

Your Response Needed

Yes

No

Delete All Results?

System Setup                                                              

System Setup                                                              

Service Data

Clear Database

  Check Scale

GAC2500-AGRI

GAC2500-AGRI

Delete Results?

Delete Results?

Delete All Results?

2515 Results in Database

GAC2500-AGRI

Engineering log files present

Delete Engineering Data

Appears if 

Engineering 

files are present

Summary of Contents for GAC 2500-AGRI

Page 1: ...10 Installation 11 Connecting AC Power 11 Grain Drawer 12 Optional Bottomless Grain Drawer 12 Navigation 13 Using External Devices 13 Touch Screen Button Functions 14 Home 14 Power Off 14 Initiate 14...

Page 2: ...3 Network Setup 46 Update Instrument 46 Startup 47 Power Down 48 Analyzing Grain 49 User Login Optional 49 Selecting Product 51 Performing a Grain Analysis 51 Hopper Level Indicator 52 General Cleanin...

Page 3: ...GAC 2500 AGRI 11001 1626B 201405 III Maintenance 67 External Cleaning 67 Internal Cleaning 68 Daily Clean Method 68 Extensive Cleaning Method 70 Cleaning the Temperature Sensor Probe 73 Troubleshooti...

Page 4: ...OPERATOR S MANUAL GAC 2500 AGRI 11001 1626B 201405 IV...

Page 5: ...WARNING indicates a potentially hazardous situation which if not avoided could result in death or serious injury Use of the word CAUTION with the Safety Alert Symbol indicates a potentially hazardous...

Page 6: ...perational conditions Therefore we expect the operator to take responsibility to assure that the results of the testing is as accurate as possible by following approved maintenance procedures on a reg...

Page 7: ...n analysis and maintenance routines ACCESSORIES The following list of components are included with the unit and can be ordered as replacement parts 110V power cord p n 203150002 220V power cord p n 20...

Page 8: ...rnal communication options SPECIFICATIONS Operating temperature 36 to 113 degrees F 2 to 45 degrees C Power 110 220V 50 60 Hz 30 35 VA Humidity 20 to 90 noncondensing Grain temperature 4 degrees F to...

Page 9: ...ONNECTIONS 4 USB connections 2 in front 2 in back to connect a keyboard mouse printer or flash drive Up to 3 devices can be active on USB 1 USB connection to connect the GAC 2500 AGRI to a computer fo...

Page 10: ...the GAC 2500 AGRI to print test data results to a ticket The ticket can be setup to include the facility name and address product date and time sample ID customer ID grain calibration date percent mo...

Page 11: ...e unlocked and placed in the operating location before proceeding to setup and operation To unlock shipping bracket 1 Remove Allen wrench from upper foam packaging insert Figure 4 Remove Allen Wrench...

Page 12: ...405 8 UNPACKING THE INSTRUMENT 5 Loosen hex bolt from the shipping locked location Figure 6 Loosen Hex Bolt from Bracket 6 Remove hex bolt and set aside Figure 7 Remove Hex Bolt 7 Press down on the br...

Page 13: ...ighten using the Allen wrench Figure 10 Insert Hex Bolt and Tighten 10 Perform the same procedure to the other bracket 11 Once both brackets are securely tightened to the operating location place unit...

Page 14: ...t should be placed on a flat level surface that does NOT exceed more than 1 degree of tilt left to right and front to back CAUTION A surface that exceeds this requirement can effect measurement result...

Page 15: ...damage is found file a claim with the carrier immediately and notify your DICKEY john sales representative Figure 11 Unit Dimensions CONNECTING AC POWER 1 Securely connect power cord into the AC plug...

Page 16: ...Number DRAWEROPGAC2500 A bottomless grain drawer is used with a flow through work counter that allows the tested grain samples to fall through to a larger container below The size of the hole must be...

Page 17: ...age to screen can result The following methods are used to navigate through and interface with the unit 1 Text input boxes 2 Keypad icon enables keyboard 3 Buttons 4 Keyboard Figure 13 LCD Touch Scree...

Page 18: ...begin test Yellow an action is required to proceed Red system cannot process error has occurred PRINT Print button allows printing test results to a local printer Refer to the Setup section for print...

Page 19: ...display when screen responsiveness does not occur effectively to a finger touch or stylus KEYPAD The Keypad icon appears on those screens that require text entry Pressing the Keypad icon opens the vi...

Page 20: ...OPERATOR S MANUAL GAC 2500 AGRI 11001 1626B 201405 16 NAVIGATION...

Page 21: ...dmin Username and Password as GUEST and press the Enter button 3 At the Setup screen press the Admin Settings button 4 At the Enter New Password screen press the Admin Username keypad icon and enter a...

Page 22: ...up Setup Admin Settings Enter New Password FRED Enter Admin Username New Password Re Enter Password FRED PASSWORD FRED PASSWORD Enter Admin Username GAC2500 AGRI Enter Admin Username Enter Admin Usern...

Page 23: ...ge locale preferences time date sample result output unit measurement sample customer ID s delete records and printing formats System button Diagnostics for troubleshooting and unit information Diagno...

Page 24: ...reen an alphabetical product list appears Press the desired product to highlight Press the Up or Down button to display additional products 3 Press the Enter button to select Once the product is selec...

Page 25: ...d 4 A new Issue ID is automatically defined for the new product Press the keypad icon to enter a different Issue ID if desired 5 Press the Enter button to save Figure 18 Creating a Product Screen MODI...

Page 26: ...be used to enter data into the unit Figure 19 Edit Slope and Bias Edit Product Edit Product 0 02 0 99 0 10 0 99 Moisture Bias Moisture Slope Test Weight Bias Test Weight Slope GAC2500 AGRI View Produ...

Page 27: ...the Enter button to confirm deletion Figure 20 Delete Product Screen Delete Product Delete Product Confirm Deletion Of Peas2100 GAC2500 AGRI View Product Setup View Product Setup Product Corn Issue ID...

Page 28: ...nload A progress bar indicates downloading status 5 If a product calibration already exists on the instrument accept the new calibration by pressing the Replace button or the Skip button to revert to...

Page 29: ...turns to the previous level in the directory structure 4 Press the Enter button to begin download 5 If product calibrations already exist on the instrument accept new calibrations by pressing the Repl...

Page 30: ...keypad icon and enter a new Admin Username 6 Enter New Password and re enter password for verification 7 Press the Enter button to accept changes The new user name and password is saved when the Ente...

Page 31: ...an be set to automatically or manually print a ticket at the end of each test NOTE Reference the printer s specifications for correct settings To Set Printer Settings 1 At the System Setup screen pres...

Page 32: ...sults are sent to a computer NTEP A detailed printout that includes engineering data and test results used by the National Conference on Weights and Measures 9 Select the line termination style CR Car...

Page 33: ...d address If the owner data text box is blank owner data information has not been entered at the Owner Data screen and can be entered at the System Setup screen Owner Data button 3 To enter other text...

Page 34: ...lect a keyboard type press the radio button to enable either QWERTY or Standard style 3 Unit will automatically convert to the selected system language and or the selected keyboard Figure 27 Selecting...

Page 35: ...dditional locales will be available on future releases Contact Technical Support at 1 800 637 3302 for release dates and available locales To Change Locale 1 At the System Setup screen press the Local...

Page 36: ...ears during analyzation giving the option to include either of these ID s Enable when a sample or customer ID are required entries before analyzation A sample ID will be associated with each grain tes...

Page 37: ...System Setup System Setup Result Setup More Sample Setup Export Data Format GAC2500 UGMA Sampling Setup Sampling Setup When Running Samples User Login Required Prompt for Sample ID Auto Sequence Samp...

Page 38: ...D screen within a specified period of time 4 to 20 seconds without pressing the Initiate button Manual Return Advances to the Sample ID screen to perform another test by pressing the Enter button afte...

Page 39: ...Setup Upon Sample Result 8 seconds Enter number between 4 20 seconds Bottomless Drawer in Use Automatic Return in Manual Return Require drawer to be emptied after each sample Display Test Weight Displ...

Page 40: ...ess the the More button until the Export Format button appears 2 Press the Export Format button 3 Enable the check box of the desired output 4 Press the Enter button to accept Figure 31 Data Format Sc...

Page 41: ...te press the Date drop down arrow to display calendar 3 Use arrows to change the month 4 Enter time using the up down arrows 5 Select PM check box if applicable 6 Press the Enter button when done Figu...

Page 42: ...Unit defaults Date US MM DD YYYY Test weight lbs bu Temperature degrees F Radix point Period Moisture tenths To Change Units 1 At the System Setup screen press the the More button until the Units butt...

Page 43: ...er to Printer Setup 1 At the System Setup screen press the More button until the Owner Data button appears 2 Press the Owner Data button and enter name address phone number by pressing the keypad icon...

Page 44: ...n until the Service Data button appears 2 Press the Service Data button to display the Service Data screen 3 Enter notes and date by pressing the keypad icon 4 Press Reset button to set counter to 0 i...

Page 45: ...und the screen 4 With a keyboard attached press the Enter button to accept new settings or the Esc button to keep previous settings Without an attached keyboard press anywhere on the screen to accept...

Page 46: ...n be accomplished at the View Results screen found under the Results button To Delete Records 1 At the System Setup screen press the More button until the Clear Database button displays 2 Press the Cl...

Page 47: ...xt screen automatically displays Figure 38 Performing a Check Scale 4 Press the Measure button to start the process This is the last screen that allows returning to the previous screen or returning to...

Page 48: ...cking Scale Checking Scale Weighing Checking Scale Checking Scale Weight 263 90 g Temp 22 72 C Please Empty Drawer Scale Measurement Results Scale Measurement Results Scale Measurement Results Scale M...

Page 49: ...e to reading on the display 10 Press the Retest button to perform another check scale or Exit button to return to the Setup screen Figure 40 Dumping Sample Scale Measurement Results Scale Measurement...

Page 50: ...horized service technician or by contacting DICKEY john Tech Support UPDATE INSTRUMENT Update Instrument allows a software update to the instrument via a USB memory device This feature should be enabl...

Page 51: ...ation screen displays before the Main Menu screen appears IMPORTANT On initial power up of the unit the system defaults with open access to all screens To ensure that the unit s settings are protected...

Page 52: ...ch located on the front panel A virtual Power Down button is also available on some top level screens and powers off the unit in the same manner as the on off switch A Power Down screen must be acknow...

Page 53: ...e that requires a user to login before grain can be analyzed The unit default is no user login required If a user login is required a User button appears on the Main Menu screen The User cannot procee...

Page 54: ...Keypad 3 Press the Enter button to accept The user name will appear as the current user on the Main Menu screen The unit will continue to analyze grain with the active user name until the user logs of...

Page 55: ...More button Press the Up and Down buttons to view grains Select the desired grain in the product table Once selected press the Initiate button to accept 4 Grain is ready for analysis Figure 46 Select...

Page 56: ...ain 1 2 3 etc If auto sequence is not selected the previous tests sample ID is cleared 3 A Customer ID can be entered by pressing the keypad located next to the input box 4 Press the Initiate button t...

Page 57: ...cell fills and the striker arm swings across the top of the test cell to wipe away excess grain 8 During analysis a testing status bar indicates progress Figure 49 Analysis Process 9 An audible alarm...

Page 58: ...ach test can be enabled at the Result Setup screen Drawer capacity holds approximately 3 tests After 3 tests the drawer must be emptied before proceeding IMPORTANT When using a bottomless grain drawer...

Page 59: ...possibly affect measurement results It is recommended the unit be regularly cleaned to ensure continued and consistent results Refer to the Maintenance section for cleaning steps NOTE Refer to the Er...

Page 60: ...utton To clear Database Records 1 At the Memory Low screen press Yes to delete results Select No to return to previous screen and abort deleting records 2 At the Delete Results screen the number of re...

Page 61: ...ate from the Results Database Therefore the Results database can be empty but the Data Drive can exceed capacity causing a memory low error Analysis can continue but the data drive should be cleared s...

Page 62: ...data drive is out of space An analysis cannot be performed until data is cleared Figure 54 Data Drive Out of Memory Warning OUT OF MEMORY FOR RESULTS OUT OF MEMORY FOR RESULTS Yes No The Data Drive is...

Page 63: ...est results with Sample ID Moisture Weight Temperature Product Issue No Customer ID User ID Date and Time 4 Press the Filter button to choose what events display on the test results record Refer to Re...

Page 64: ...ecords entered but there could be more older records in the database that meet the same criteria PRINT ONLY LAST NUMBER OF RECORDS Allows entry of a specified number of records to print starting with...

Page 65: ...a search for similar records within the User field All records that fit the criteria entered in the User Like filter search will display SAMPLE ID LIKE Allows entry of part or all of the Sample ID na...

Page 66: ...can only be viewed and printed at this screen 1 At the Results screen press the View Products button 2 Press the Print button to print all active products and respective Issue ID s Figure 58 View Pro...

Page 67: ...GRAIN CALIBRATIONS Grain calibration files will be available for download at the DICKEY john website www dickey john com for transfer to the GAC 2500 AGRI via a USB memory device These files are also...

Page 68: ...OPERATOR S MANUAL GAC 2500 AGRI 11001 1626B 201405 64 GRAIN CALIBRATIONS...

Page 69: ...g It is recommended that the functions on this screen are only performed by a DICKEY john representative To view Diagnostics screen 1 Press the Setup button to display the Setup screen 2 Press the Dia...

Page 70: ...OPERATOR S MANUAL GAC 2500 AGRI 11001 1626B 201405 66 DIAGNOSTICS...

Page 71: ...d quality operating instrument It should not be interpreted as an exhaustive maintenance program Dust and debris may periodically accumulate in areas not specified in this manual The owner is responsi...

Page 72: ...trap door opens automatically also To start the cleaning process 1 At the Main Menu screen press the Instrument Information button 2 At the Instrument Information screen press the Clean button Pressi...

Page 73: ...the measuring cell 5 Press the OK button to return instrument to normal operation Hands should be clear from inside the instrument before pressing the OK button Figure 63 Cleaning Sequence 6 Insert gr...

Page 74: ...ased on surrounding environment conditions Factors such as dust temperature extremes grain dust and external humidity vary from location to location If there are any questions about the cleanliness or...

Page 75: ...1001 1626B 201405 MAINTENANCE 71 3 Remove other accessory cords USB and printer Figure 66 Remove Accessory Cords 4 Remove grain drawer Figure 67 Remove Grain Drawer 5 Place the unit on its back side F...

Page 76: ...ean surfaces around measurement cell including hinge trap door and edge of cell with the supplied brush Figure 70 Clean Surface Area Around Cell Hinge Trap Door Edge of Cell 8 Close the trap door and...

Page 77: ...d the sensor that could potentially cause temperature error readings during analysis It is important the temperature sensor is visually inspected and cleaned each time a regular maintenance check of t...

Page 78: ...d recommended cotton swab McMaster Carr p n 71035T54 newer instruments include a flush sensor on the circuit board and a brush bracket recommended cotton swab McMaster Carr p n 7074T12 TEMPERATURE SEN...

Page 79: ...For instruments with the flush sensor and brush bracket the following procedure can be utilized to remove particles from the brush Carefully place the head of the screw driver 10 length recommended a...

Page 80: ...the black tube Insert the swab inside the black tube and gently clean the IR temperature sensor with the wet end of the cotton swab as depicted in Figure 80 For flush sensors gently clean the entire...

Page 81: ...ent it should be returned to a dealer or authorized service center 8 If cleaning is acceptable return instrument to upright position and replace the drawer 9 Reconnect power cable and accessory cords...

Page 82: ...OPERATOR S MANUAL GAC 2500 AGRI 11001 1626B 201405 78 MAINTENANCE...

Page 83: ...ctronics If any limit is exceeded or malfunctions occur an error code displays with a recommended resolution ERROR MESSAGES Error messages display when an abnormal event occurs An error can be acknowl...

Page 84: ...OPERATOR S MANUAL GAC 2500 AGRI 11001 1626B 201405 80 TROUBLESHOOTING...

Page 85: ...s higher than the allowed limit of 45 degrees C Check unit ventilation or move to a cooler environment 15 Unit to Grain Differential The difference between grain temperature and machine temperature ha...

Page 86: ...Unexpected Application Crash The application has encountered an unexpected error Press the Initiate green button or cycle power to reboot the instrument If problem persists contact Dickey john Tech Su...

Page 87: ...DICKEY john s written consent damage to any associated equipment or lost profits or special damages Said part will not be considered defective if it substantially fulfills the performance expectations...

Reviews: