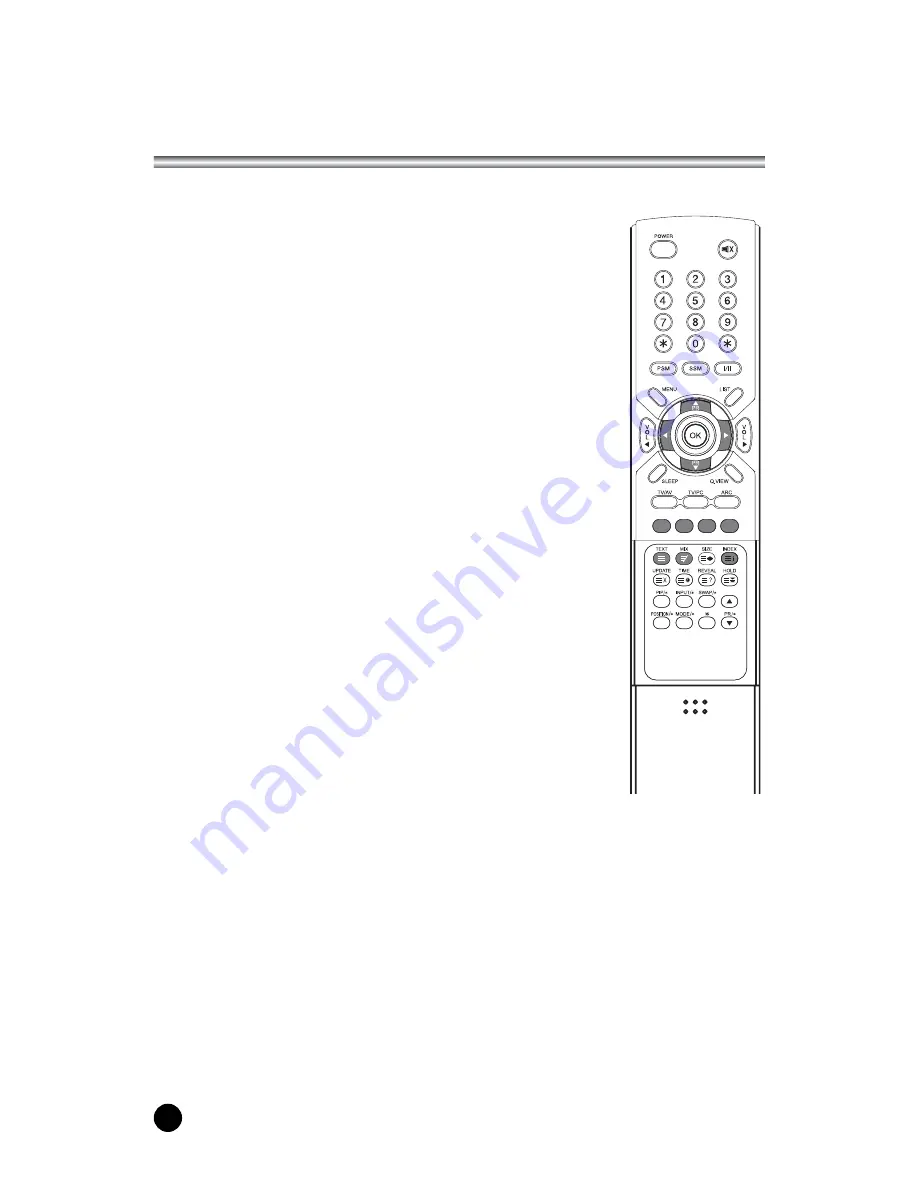
background image

22

TELETEXT

TEXT On/Off

Press the 

TEXT

button to switch to TELETEXT. 

The initial page or last selected page appears on the screen. 
The first page number indicates your selection, 
while the second shows the current page displayed.

1. Press 

TEXT

button once, displays the Teletext pages.

Press 

MIX

button once more, displays the 

Teletext pages superimposed on the TV picture.

2. If you press the 

TEXT

button twice, the teletext 

pages and the TV picture are concurrently displayed 
on both sides of the screen.

3. Press the 

TEXT

button to switch off Teletext 

once more, Text mode is off, and TV mode appears.

TOP text

The user guide displays four fields-red, green, yellow and 
blue at the bottom of the screen. The yellow field denotes 
the next group and the blue field indicates the next block.

Group/block/page selection

1. With the 

BLUE

button you can progress from block to block.

2. Use the 

YELLOW

button to proceed to the next 

group with automatic overflow to the next block.

3. With the 

GREEN

button you can proceed to the 

next existing page with automatic overflow to the next group.
Alternatively the 

PR

x

button can be used.

4. The 

RED

button permits to return to previous selection. 

Alternatively the

PR

y

button can be used. 

FLOF text

The Teletext pages are colour coded along the bottom of the screen and are selected by
pressing the corresponding coloured button.

Page selection

1. Press the 

INDEX

button to select the index page.

2. You can select the pages, which are colour coded along the bottom line with the

same coloured buttons.

3. The 

Ïq

button can be used to select the preceding or following page.

Summary of Contents for lt-23q5lfh

Page 1: ...Owner s Manual Model LT 23Q5LFH 23 WIDE TFT LCD TV MONITOR ENGLISH...

Page 2: ......

Page 3: ...Never touch the power plug with a wet hand This may cause an electric shockhazard Unplug the set from the wall outlet when it is left unattended and unused for long periods of time Accumulated dust ma...

Page 4: ...the TV to vibration moisture dust or heat Also ensure that the TV is placed in a position that allows a free flow of air Do not cover the ventilation openings on the back cover You can install the TV...

Page 5: ...cture Control 15 Manual picture control 15 Auto picture control 15 Sound Control 16 17 Other functions 18 19 Clock 18 Blue Back 18 Auto Sleep 19 Childlock 19 Radio 19 ARC 19 Radio Control 20 Other fun...

Page 6: ...llowing accessories are provided with Product 2 Remote controller 4 Owner s manual 5 PC IN cable 6 PC Audio IN cable 3 Batteries type AAA 1 AC Cord Model LT 23Q5LFH Owner s Manual 23 WIDE TFT LCD TV M...

Page 7: ...ent to these inputs Note There is COMM jack at the bottom of rear of set This is only for service Customer can t use this 1 ON OFF Switches TV set on or off 2 MENU Displays a menu 3 PR Programme Up Do...

Page 8: ...lects TV SCART1 SCART2 VIDEO S VIDEO RADIO Only when the set is Radio On PC Analog PC Digital or COMPONENT mode Clears the menu from the screen 5 MENU Displays a main menu 6 LIST Displays the programm...

Page 9: ...case darken the room or move the TV 14 PSM Picture Status Memory Recalls your preferred picture setting 15 SSM Sound Status Memory Recalls your preferred sound setting 16 ARC You can watch TV in vari...

Page 10: ...he PRxy button or NUMBER buttons Volume adjustment Press the VOL q button to adjust the sound level Quick view Press the Q VIEW button to view the last Programme you were watching Sound mute function...

Page 11: ...ion Adjust Back MENU Exit TV AV Position Back MENU Exit TV AV Main Menu Picture q Sound q Special q Setup q Picture Contrast 90 Brightness 75 Colour 75 Sharpness 60 Equalizer Flat Music Movie Speech U...

Page 12: ...ramme during installation of this set 1 Press the MENU button 2 Select the Setup menu 3 Select the Auto Programme menu 4 Press the PRxy button to select System 5 Select a TV system with the q button B...

Page 13: ...ess the PRxy button to select the Table menu 8 Press the q button to select V UHF or Cable as required 9 Select a TV system with the q button BG Germany Asia M East Africa Australia I UK Hong Kong Sou...

Page 14: ...the YELLOW button again to release this function Skipping a programme number 1 Select a programme number to be skipped with the PRxy or q button 2 Press the CYAN button The skipped programme turns to...

Page 15: ...tandard Standard Picture Appearance Mild Softer Picture Appearance Game External Video Game Picture Setup User Manual Picture Setup Selected Item Contrast Brightness Colour Sharpness Tint Setting Chan...

Page 16: ...ess the MENU button to return to preceding menu 7 Press the PRxy button to the Balance menu 8 Select the Balance menu with the q button and adjust the balance of speaker 9 Select the AVL Automatic Vol...

Page 17: ...ress the SSM button 2 Press the SSM button repeatedly to select Each press of the button changes the screen display as below Flat Music Movie Speech User Choose Flat for the standard factory settings...

Page 18: ...n to select On Time 8 Set the TV on time with the numeric buttons and the PRxy button Then press the q button Select On or Off with PRxy button When the setting is On the set will be switched On autom...

Page 19: ...menu Then press the q button 3 Press the PRxy button to select Radio 4 Press the q button to select Radio On or Off Note When the setting is On you can adjust radio function in radio mode see page 20...

Page 20: ...the q button repeatedly to automatically scans and tunes to the next available station 10 Press the PRxy button to select Off Time Then press the q button repeatedly to select Off 5 10 30 minutes The...

Page 21: ...he PRxy button to select the programme desired in TV mode of sub picture Calling the programme list You can check the programmes stored in the memory by displaying the programme LIST Displaying progra...

Page 22: ...he yellow field denotes the next group and the blue field indicates the next block Group block page selection 1 With the BLUE button you can progress from block to block 2 Use the YELLOW button to pro...

Page 23: ...ress this button again Return to index page TEXT MIX Functions MENU SIZE HOLD INDEX Displays the TV picture on the screen while waiting for the new Teletext page The display will appear at the top lef...

Page 24: ...screen 4 Press the PLAY button on the DVD The COMPONENT playback picture appears on the screen Note The COMPONENT mode is available in the 576i 480P 720P and 1080i signal S VIDEO Input If using an S V...

Page 25: ...acks on the TV 2 Press the TV AV button to select VIDEO mode 3 Press the PLAY button on the VCR The VCR playback picture appears on the screen Note If you have a mono VCR connect the audio cable from...

Page 26: ...rature is a measure of the warmth of the image color Note Press the PSM button to switch temperature directly 6500K 9300K Clock This function is to minimize any vertical bars or stripes visible on the...

Page 27: ...the Sound Mode with PRxy button 12 Press the q button to select sound mode L R L L R R L R Audio signal from audio L input is sent to left loudspeaker and audio signal from audio R input is sent to r...

Page 28: ...izontal position and vertical position 5 Press the TV AV button to exit menu Auto This function is for the automatic adjustment of the screen position clock and clock phase The displayed image will di...

Page 29: ...ear H V sync D Press the Q VIEW button to switch the 640x480 60Hz to 720x480P 60Hz 22 29 PC DTV INPUT 1 Connect the PC IN cable D sub jack from the monitor output socket of the PC to the PC ANALOG inp...

Page 30: ...nput ports HEADPHONE OUT A V IN PC AUDIO IN PC Analog IN PC Digital IN SCART1 SCART2 S VIDEO ANTENNA COMPONENT IN COMM Note This product is designed and manufactured with high quality materials and co...

Page 31: ...rely inserted Make sure COLOR and CONTRAST settings Is the unit receiving interference from other devices Transmission antennas of radio broadcasting stations and transmission antennas of amateur radi...

Page 32: ...Limited Warranty 32...

Reviews: