


EasyPGX
®
qPCR instrument 96
Cat.Nr: RT800-96
13/21
2017/06
HARDWARE FUNCTIONS
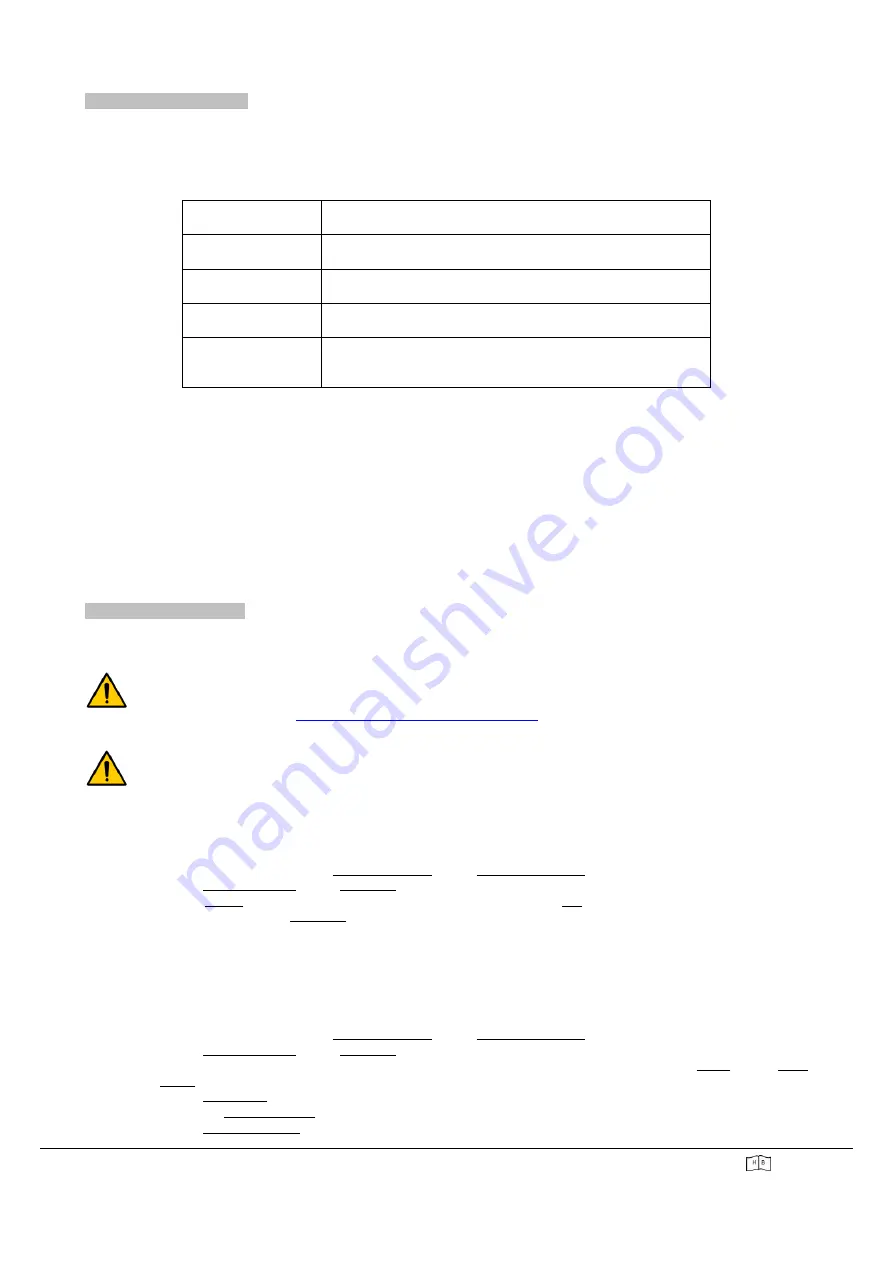
LED INDICATOR
On the front of the instrument (right upper corner) there is a LED status indicator. The table below shows the color code
for this indicator:
LIGHT INDICATION
MEANING
Off
The instrument is switched off
Flashing green
The instrument is running
Fix green
The instrument is paused
Flashing red
The instrument has detected an error. Check what is shown
on the instrument display for more details
LOADING THE HEATING BLOCK
The instrument can be loaded with individual PCR tubes, strips or 96-well plates.
▪
Open the instrument cover above the heating block using the handle to lift it. Open it completely.
▪
Raise the heated lid by pulling the handle forward and then lifting it from the heat block.
▪
Place the plate, strips or tubes on the block and check that they are correctly positioned.
▪
Close the heated cover and push it back so that it locks properly.
▪
Close the instrument cover and make sure it locks.
SOFTWARE FUNCTIONS
IMPORT OF TEMPLATES
“EasyPGX
®
qPCR instrument 96
”
uses the dedicated
Aria DX software
. The software is validated for use in
combination with the "
EasyPGX
®
ready
" kits manufactured and commercialized by Diatech Pharmacogenetics
srl. It is recommended to use only pre-set templates available on request contacting Diatech Pharmacogenetics
Technical Support (email:
Import of template should only be performed the first time you use the specific kit associated with that template.
In subsequent runs it is sufficient to recall it (see paragraph "Execution of a run").
▪
Save the template coupled with the kit in use to a USB stick.
▪
Switch on the instrument by pressing the button on the bottom of the front panel and wait for the Home
screen to appear.
▪
Insert the USB stick on the door on the instrument panel.
▪
On the Home screen, press "New Experiment". The "Experiment Types" screen opens.
▪
Press "Open Template". The "Template" screen opens.
▪
Press "Import", select the template on the USB stick and press "OK". The template is then automatically
saved in the specific "Template" folder.
▪
Remove the USB stick.
EXECUTION OF A RUN
▪
Switch on the instrument by pressing the button on the bottom of the front panel and wait for the Home
screen to appear.
▪
On the Home screen, press "New Experiment". The "Experiment Types" screen opens.
▪
Press "Open Template". The "Template" screen opens.
▪
Press on the template file associated with the kit you are using to select it and press "Open". The "Plate
Setup" screen opens.
▪
Press "Sync Plate" to synchronize the acquisition channels.
▪
Open the "Thermal Profile" window.
▪
Press "Run Experiment" to start the run.


