Diamond MCV/12C Manual Download Page 6

English

Operating instructions

7

Z15.027

V01

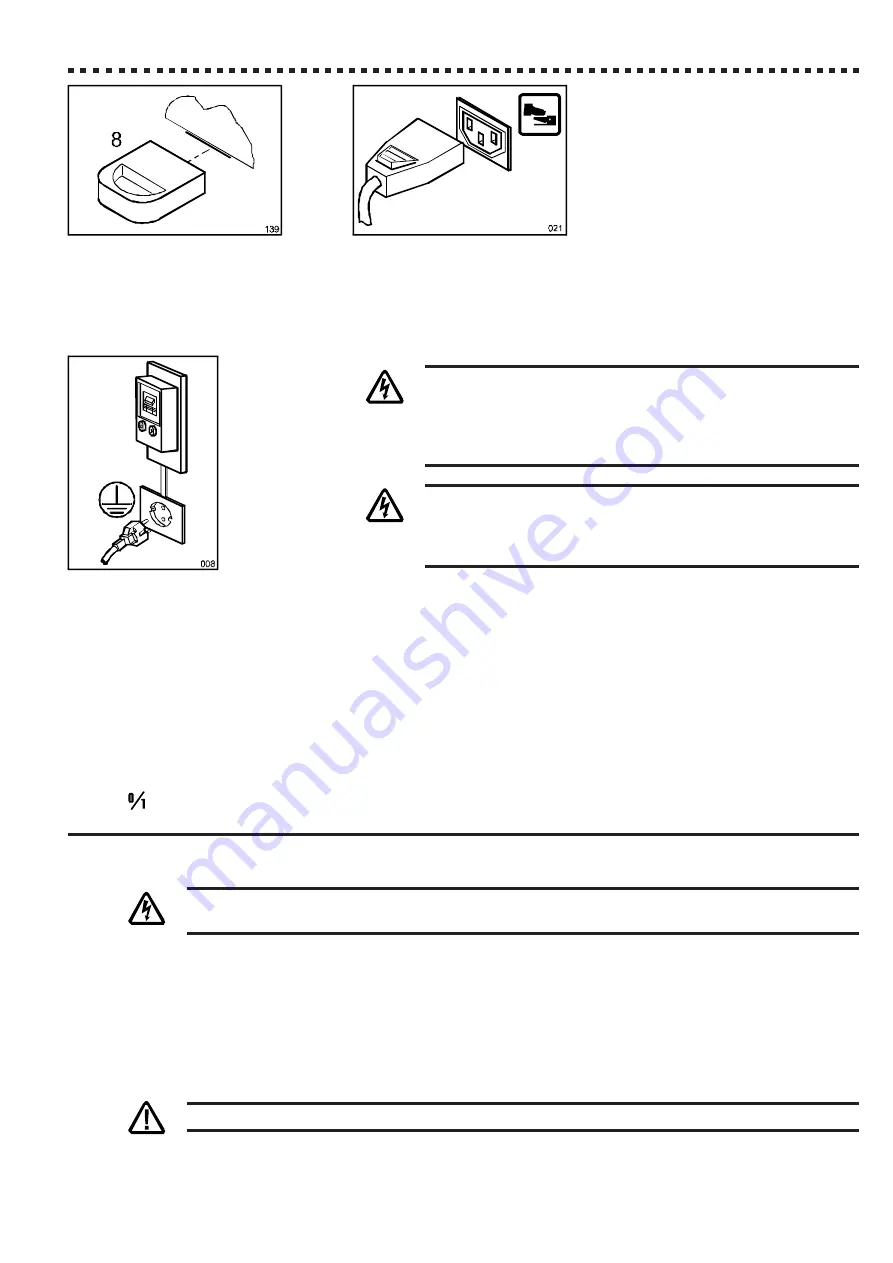
install drip tray [8] in the appropriate slot in the front panel;

In models equipped with pedal dispensing control, connect the pedal’s plug in the relevant socket, marked by the
appropriate symbol. It is possible to use the dispensing push-button also when the pedal is connected.

4.3

Electrical connection

T

HE


ELECTRICAL


SAFETY


OF


THIS


MACHINE


IS


REACHED


ONLY

WHEN


THE


SAME


IS


CORRECTLY


CONNECTED

BY


QUALIFIED

AND


CERTIFIED


PERSONNEL

TO


AN


ELECTRICAL


PLANT


PRO

-

VIDED


WITH


AN


EFFICIENT

 EARTHING SYSTEM, 

MADE


AS

REQUIRED


BY


IN


FORCE


SAFETY


REGULATIONS

.

M

AKE


SURE


THAT


THE


VOLTAGE


PRESENT


IN


THE


ELECTRICAL

NETWORK


IS


SUITABLE


WITH


THE


VOLTAGE


REQUESTED


BY

THE


MACHINE

 (

GIVEN


ON


THE


TECHNICAL


DATA


PLATE


OR


IN

THE


TECHNICAL


HANDBOOK

).

The manufacturer shall not be responsible for any damages caused by a faulty electrical supply or earthing
plant.

Check that the electrical capacity of the plant is adequate to the maximum requirements of the machine as indicated in
the technical data plate. Make sure that the cable section of the plant is sufficient for the power required by the machine.

It is required, for a safe and correct installation of the machine, to arrange a suitable socket controlled by a power breaker
provided for in current safety regulations, with an associated differential safety breaker, positioned so to be easily reached
by the operator.

The socket must also be protected by fuses with sizes and capacity adequate to the power required by the machine,
indicated on the technical data plate or on the Technical Handbook.

Verify that the plant complies with the above said characteristics and insert the plug in the socket. Only the green
POWER 

 indicator must turn on.

5

M

ACHINE

S


OPERATION

O

PERATING


THE


MACHINE

AS


ANY


OTHER


ELECTRICAL


DEVICE

ENTAILS


OBSERVING


SOME

VERY


IMPORTANT


SAFETY


RULES

IN


PARTICULAR

:

Do not touch it with wet or damp feet or hands.

Do not operate when barefoot.

Do not pull electrical feeding cable to unplug.

Do not expose machine to rain and prevent any water from entering, i.e. during washing.

In case of failure and/or malfunction and any time there is apparent damage to the power supply cable, cut
power off and call Assistance Service.

ALWAYS 

FOLLOW


SAFETY


MEASURES

 (

REF

. C

HAPTER

 1).

Summary of Contents for MCV/12C

Page 1: ...Mod MCV 12C Production code DELTA 12 08 2009 ...

Page 2: ...es or malfunctions to the device or falls in its quality 1 IMPORTANT SAFETY SUGGESTIONSAND PRECAUTIONS 4 2 TECHNICALDATA 5 2 1 Technical data plate and CE marking 5 2 2 Acoustic pressure level 5 3 CARRYINGAND UNPACKING 5 4 INSTALLATION 6 4 1 Placing 6 4 2 Assembling 6 4 3 Electrical connection 7 5 MACHINE S OPERATION 7 5 1 Controls and indicators 8 5 2 Operating the machine 8 5 3 Setting of air in...

Page 3: ...IANCE in compliance with EU directives relevant to the machine FORM of electric running tests In case of sale or transfer of the machine to another person the above documentation must be handed over to the new owner in order to become acquainted with all safety norms technical specifications as well as how to operate the machine Always unplug the machine before proceeding with any maintenance that...

Page 4: ...a has been measured at 1 meter from the surface of the machine and at 1 60 meters from ground level during the machine s functioning 3 CARRYING AND UNPACKING The weight of this machine net and with packing are stated both in the packing list and on the packing itself To prevent the oil contained in the compressor to flow into the refrigerating circuit it is necessary to always keep the machine in ...

Page 5: ... s lid and the suction tube 15 than check that the packing contains supply faucet 6 complete with labyrinth tube and inside 4 and outside 21 labyrinths container 19 drip tray 8 tube brushes 16 and 20 and plastic blade 17 spare parts outfit bag 18 Also make sure that the Technical Handbook the EC Conformity Certification and Electrical Tests Schedule are included 4 2 Assembling Proceed with the ins...

Page 6: ... Make sure that the cable section of the plant is sufficient for the power required by the machine It is required for a safe and correct installation of the machine to arrange a suitable socket controlled by a power breaker provided for in current safety regulations with an associated differential safety breaker positioned so to be easily reached by the operator The socket must also be protected b...

Page 7: ...tor light goes out and the timed functioning is deactivated dispensing will take place for as long as DISPENSING is manually pressed The Display shows the preservation temperature again and Pushbuttons When pressing either when TIMER indicator is blinking the automatic dispensing time can be adjusted For more details on their use refer to Par 5 4 Using the TIMER function DISPENSING Pushbutton When...

Page 8: ... directly in the re frigeration tub 4 Setup properly the air inlet valve see paragraph 5 3 to obtain the desired increase of volume 5 Should you require the TIMER function activate it and adjust dispensing time see Par 5 4 Using the TIMER function 6 Dispense cream by pushing DISPENSING Pushbutton 5 3 Setting of air inlet valve Rotating the graduated hand grip clockwise in the 0 position the valve ...

Page 9: ...chine by means the ON OFF Pushbutton Rotate the suction tube 15 upwards or pull it away from the air regulator remove the container 19 and store in a refrigerator the eventually remaining cream Let the tub defrost at room temperature and before turning the machine on get rid of water by using a sponge Dry up the surfaces of the tub by using a clean cloth Do not scrape the frost away by using sharp...

Page 10: ...sert at the bag s extremity 36 the nozzle carrier took from the decorations set 38 choose a nozzle 39 properly shaped upon the decoration to be carried out and fix it on the nozzle holder 37 by using the ferrule 40 Operate the cream whipper until the bag is filled and press it manually to carry out the decorations When the bag is empty re operate the machine 6 WASHING AND SANITISING 6 1 Warnings a...

Page 11: ...knob 12 counterclockwise take out valve socket 13 and remove valve 14 to make sure suction pipe is not blocked run water through it wash all parts thoroughly to remove any cream residue assemble and fit air regulator back in its position All parts have been designed to avoid any error when reassem bling 3 Dismantling and washing faucet labyrinth labyrinth tube and pump Discharge pressure from the ...

Page 12: ...s soaking in the detergent solution for a few hours i e when the machine is not been used in order to dissolve all residues before reassembling parts lubricate gaskets with food compatible grease 4 Sanitising Prepare DISINFECTANT SOLUTION following the product instruction and pour in the container turn on dispensing for as long as necessary If required let solution work for longer turn off machine...

Page 13: ... if damaged or dilated Use only genuine gaskets made of food compatible rubber Our spare parts kit includes a complete set of Manufac turer approved gaskets It is necessary to replace all gaskets paddles 29 and springs 30 at least once a year We advise to keep a spare set ready to use Please refer to the Spares Ordering Section in the Technical Handbook Replacing gaskets correctly remove old gaske...

Page 14: ...lugged Cause The socket is defective A qualified technician should substitute it Cause One of the circuit safety fuses is blown Eliminate the cause for the overload and replace fuses Cause Power in the socket is missing Check that the power breakers and the safety breakers on the electric plant are closed If they aren t before closing them make sure that no one is making electrical main tenance Ca...

Page 15: ...ticular on the intake tube Cause The pressurisation electrovalve is stopped Call the Assistance Service Cause Non return valve is stopped Disassemble it and clean it Cause The pump is damaged Call the Assistance Service Tendency at squirting cream Cause Air inlet valve is excessively opened Reduce it by rotating it on a lower number Insufficient or lacking refrigeration Panels or ventilation looph...

Page 16: ...nder special circumstances Before deciding that machine is out of order switch machine off for as long as it takes to normalize temperatures 10 20 minutes turn back on and check for alarm signals Alarm code AE tub temperature is outside safety limits Cause The cream in the tub is too cold or during washing too hot liquids were used Only use liquids with a temperature between 2 and 40 C Cause Refri...

Reviews: