background image

www.diablosport.com

Tech Support: 561.908.0040

www.diablosport.com

Tech Support: 561.908.0040

20

21

The inTune also serves as an extremely powerful data logging tool.  InTune’s data logging capabilities are easy to use 
and can even be customized.  Here we will cover how to log your vehicle’s data, how to customize your logs and 
playback/record features.  

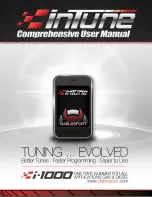
Let’s start by getting to the logging menu.

Step 1. 

From the Main Menu please select the scan tool icon.

Step 2. 

After selecting the Scan Tool Icon, the following 
screen is displayed.  Select Data Logging.

Step 3. 

After selecting Data Logging from the scan tool icon, you will be 
presented with the Logging menu: Record, Playback and Configure. 

Recording:
By selecting Record your inTune will start recording your vehicle’s data using the default PIDs (Parameter Identification).  
DiabloSport has already selected a default PID group for each vehicle.  To change the logged PIDs (customize) please 
see the selection below on configure/customize logging.  

Playback:
By selecting playback your inTune will now playback the log file you just recorded.  In addition to inTune’s playback 
feature, this log can be transferred to your computer to be used with our free Dataviewer software available on our 
website.  Transferring a data log is a very easy process.  Simply plug the inTune into any computer using the supplied 
USB cable.  When the inTune drive appears double click to “explore folders”.  Located on the inTune’s hard drive is a 
folder called “Logs”.  This folder will contain any saved data logs which can then be dragged to your computer’s desktop 
(or any other location) for future use.  If your intention is to use the data log with DiabloSport’s Dataviewer software the 
program can automatically access your inTune as long as it is plugged into your computer.  Just open Dataviewer and 
click on File/Open/Select the inTune’s hard drive/ select the Logs folder/then select the log file of your choice.

Configure:
After selecting Configure from the logging menu you will be presented with the following options: Gauge Mode, Gauge 
Units and PID Select.
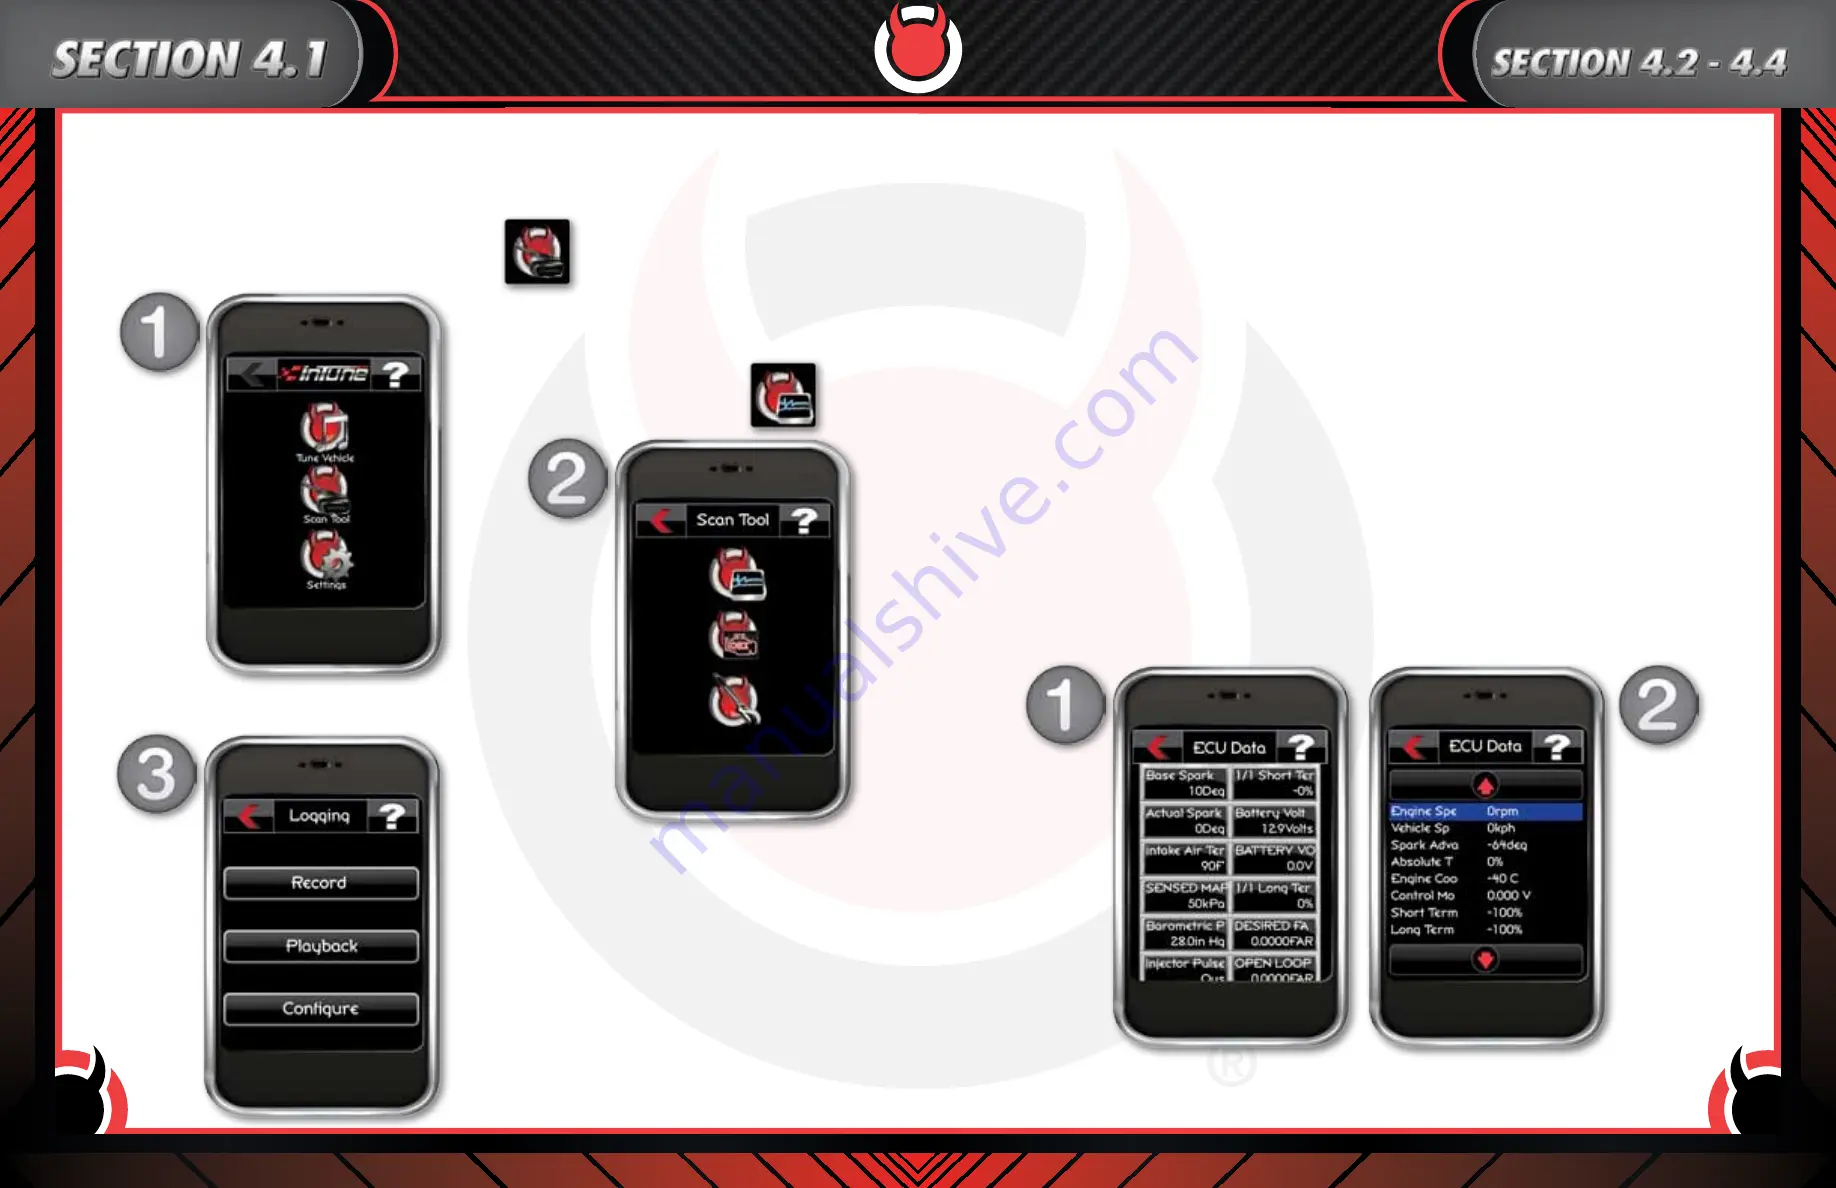
Gauge Mode:
By selecting Gauge Mode you will have the option of changing the way your data looks while logging/playback.  The 
two options are to show Digital gauges (Fig 1) which is also the default setting or you can change the display to a 
Formatted Text version (Fig 2).  

Gauge Units:
By selecting Gauge Units you will have the option to switch between Standard and Metric unit conversions.  
Select your preferred measurement (default is set to standard).

Section 4.1

-inTune logging Section

Section 4.2

-inTune Recording

Section 4.3

-inTune Playback

Section 4.4

-InTune Configure, Gauge Mode, Gauge Units and PID Select

Summary of Contents for inTune

Page 1: ......

Page 2: ... due to changing technology we recommend plugging the inTune into your computer and run the auto update software As always with DiabloSport these online updates are free of charge for the life of the product Introduction 2 Section One Knowing your inTune Section 1 1 Read Before Installing Tune 4 Section 1 2 Warranty Information 5 Section 1 3 Contents of inTune Box 6 Section 1 4 OBD II Cable Connec...

Page 3: ...perchargers turbochargers or nitrous systems which require proper custom tunes from a DiabloSport CMR dealer A DiabloSport inTune Warranty Policy a DiabloSport offers a 30 day satisfaction guarantee on inTune as well as a one year warranty against defects in materials or workmanship b DiabloSport s liability under this warranty shall be limited to the correction or replacement of any defective par...

Page 4: ...n the chance that your inTune does require an initial update have no worries The update process is easy and only takes a few minutes of your time As always with DiabloSport these online updates are free of charge for the life of the product See section 1 6 for how to update your inTune Step 1 Locate your OBD II connection and determine if it is mounted by 2 small screws or a snap out type of conne...

Page 5: ... inTune into your computer using the supplied USB cable Step 2 If auto run settings are not currently turned on please manually click on inTune exe to run the update software see picture below NOTE To avoid this step in the future you can click on the check box Always do this for software and games Step 3 If there is an update available you will get a popup window instructing you to not unplug you...

Page 6: ...Vehicle The Restore Vehicle icon is used to restore OEM factory software and calibration data back to the ECU s This must be done prior to taking your vehicle in for service maintenance Adjustable Parameters The Adjustable Parameters icon is used when you want to modify various aspects of the tune data that is sent to the ECU s Some of the many adjustable parameters include spark shift firmness sh...

Page 7: ...he green check Step 6 automatic The inTune will now save a copy of your vehicles back up Confirm by pressing the green check button To go back and select another tune press the red X button Processing Step 7 Once your vehicles backup has been saved a pop up window will appear asking if you wish to modify the tune Note Some tools will not allow for tune adjustments If this is your first time please...

Page 8: ...rvice maintenance by selecting Restore Vehicle located in the Tuning Menu If your inTune fails to install the tune to your vehicle for any reason it will enter into Vehicle Recovery Mode Please see the next section on how to recover your vehicle s backup tune If your tool reboots and you see the following screen Press after reading the disclaimer note Click the green check to restore your original...

Page 9: ...original backup has successfully been loaded you will get a Write Complete message After restoring the original backup to your vehicle the inTune can now be used on a different vehicle and is no longer married to the previous vehicle Step 6 It is now safe to unplug the inTune from your vehicle and start the engine Important Note This should be done prior to taking your vehicle in for service maint...

Page 10: ...er you wish to edit You will then be presented with either a text selection Fig 1 or a numerical adjustment screen Fig 2 After making a text adjustment the inTune will automatically save your change After making a numerical adjustment press the accept button to save your changes After making an adjustment you will notice that the name of the parameter has an next to it indicating a change has been...

Page 11: ...sferring a data log is a very easy process Simply plug the inTune into any computer using the supplied USB cable When the inTune drive appears double click to explore folders Located on the inTune s hard drive is a folder called Logs This folder will contain any saved data logs which can then be dragged to your computer s desktop or any other location for future use If your intention is to use the...

Page 12: ...e see picture Navigate through the PID list until you locate the specific PID you wish to change After selecting the PID you will be asked if you wish to Change or Delete the PID If you wish to Delete the PID you had previously chosen simply select Delete PID If you would like to change the PID select Change PID You will then be brought to a list of all available PIDs organized by family Navigate ...

Page 13: ...fo Under the Tool Info menu you will find 3 options Firmware info Tool Status and Vehicle Info A Firmware Info The firmware info option will display all of your inTune s current database information This information may be useful to DiabloSport s technical support team if you encounter any update problems B Tool Status The tool status option will display your inTune s current version build date an...

Page 14: ......

Reviews: