background image

Step 3: Installing the Software

You can install the driver, software, and electronic-format manual all at once. You can also install the driver and 
each piece of software separately.


"

"User's Manual" (electronic-format manual) "Installing the Driver Separately"

Important

Be sure to connect the machine to the computer as instructed in the procedure. Failure to follow the correct 
procedure may make installation impossible.

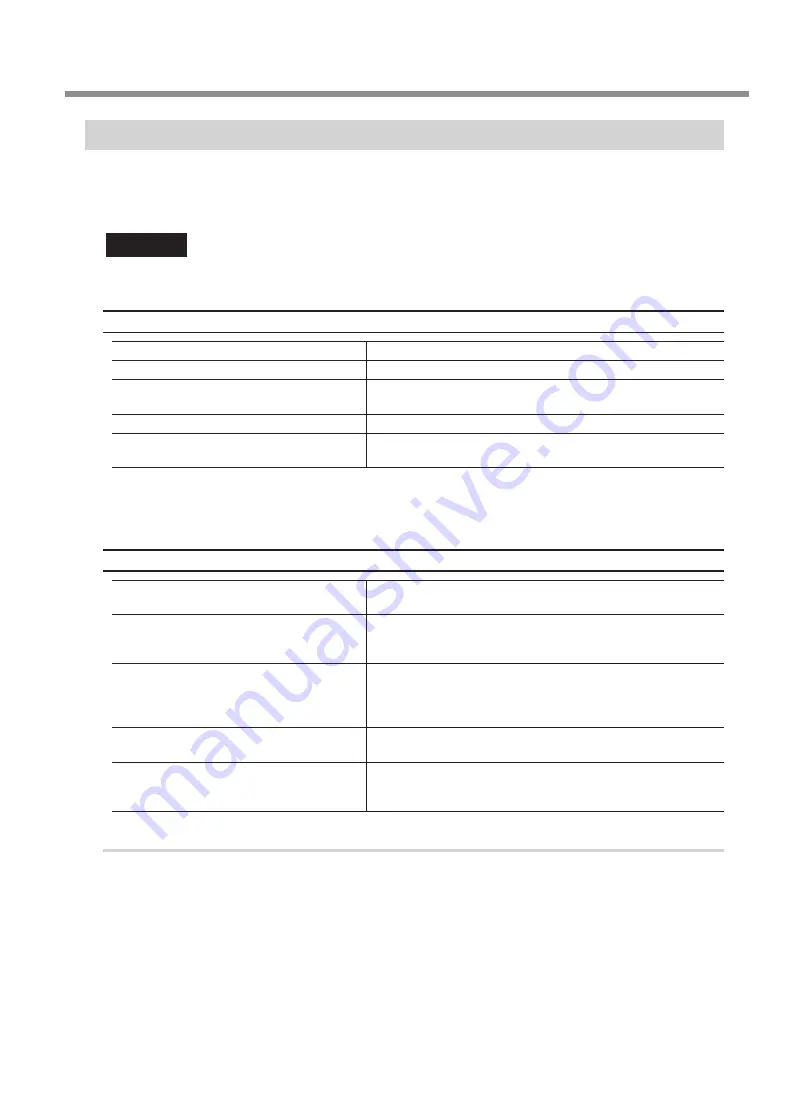
System Requirements

Operating system (OS)

Windows 7/8.1/10 (32-bit and 64-bit versions)

CPU

Minimum required CPU for the operating system

Memory

Minimum amount of required RAM for the operating system 

(1 GB or more recommended)

Optical drive

CD-ROM drive

Video card and monitor

A monitor with at least 256 colors and a resolution of 

1024 × 768 or more is recommended.

•   This software is a 32-bit application and therefore runs in WOW64 (Windows-On-Windows 64) when running 

on 64-bit versions of Windows operating systems.

For the latest information, see the DGSHAPE Corporation website (http://www.dgshape.com/).

Installable Software

DGSHAPE Engraver Driver

(hereinafter referred to as "Engraver Driver")

This is a driver required for sending data from a computer to the 

machine.

Dr. Engrave Plus

This software creates the text and shapes to engrave. For 

details on the functions, see the help for Dr. Engrave Plus 

software.

SFEdit2

This software can create and edit line text. Line text is a line 

drawing, which is created by automatically extracting the 

centerline of True Type font. You can use the line text you 

created as a font in Dr. Engrave Plus.

Setup Guide

(electronic-format manual)

This is the PDF of this document. The contents are the same.

User's Manual

(electronic-format manual)

This manual explains how to operate the software, how to 

perform engraving using this machine, and how to perform 

maintenance.

Procedure

Before installation, confirm that the machine and the computer are not connected with the 

USB cable or LAN cable.

Log on to Windows as an "Administrator."

Connecting to the Computer (LAN Connection)

31


Summary of Contents for DE-3

Page 1: ...uding manuals see the DGSHAPE Corporation website http www dgshape com R1 181210 Setup Guide This guide describes the setup tasks and important conditions about the installation site that must be met...

Page 2: ...ct and damage caused by deliverables obtained through use of this product Such damage can be either direct or indirect Applicable EMC Standards EN 61326 1 Class A EN 55011 Class A Group 1 This product...

Page 3: ...urface that is green with or with out yellow stripes is the equipment grounding conductor If repair or replacement of the electric cord or plug is necessary do not connect the equipment grounding cond...

Page 4: ...nstallation Environment 17 Removing the Retainers 18 Connecting the Power Cord 20 Selecting the Language Used for Text on the Display Screen 21 Connecting to the Computer USB Connection 23 Step 1 Inst...

Page 5: ...ll its furnishings as well as to domestic animals or pets About the Symbols The symbol alerts the user to important instructions or warnings The specific meaning of the symbol is determined by the des...

Page 6: ...Keep children away from the machine The machine includes areas and components that pose a hazard to children and may result in injury blindness choking or other serious accident Never operate the mach...

Page 7: ...acuum cleaner When the safety of use cannot be determined clean the machine using a brush or the like without using a vacuum cleaner CAUTION Wear dust goggles and a mask Wash away any cutting waste re...

Page 8: ...using an extension cord or power strip use one that adequately satisfies the machine s ratings for voltage frequency and current Use of multiple electrical loads on a single electrical outlet or use o...

Page 9: ...k or fire Never place any object on top or subject to damage Never allow to get wet Never bend or twist with excessive force Never make hot Never pull with excessive force Dust may cause fire Never bu...

Page 10: ...tion Sharp Tool The cutting tool is sharp Inadvertent contact may cause injury Never use a pneumatic blower This machine is not compatible with a pneumatic blower Cutting waste may get inside the mach...

Page 11: ...r la maison tous les meubles et m me les animaux domestiques propos des symboles Le symbole attire l attention de l utilisateur sur les instructions importantes ou les avertissements Le sens pr cis du...

Page 12: ...appareil L appareil comporte des zones et des composants qui pr sentent un danger pour les enfants et qui pourraient causer des blessures la c cit la suffocation ou d autres accidents graves Ne jamais...

Page 13: ...erminer si un aspirateur peut tre utilis sans danger se servir d une brosse ou d un article semblable plut t que d un aspirateur PRUDENCE Porter des lunettes de protection et un masque Rincer toutes l...

Page 14: ...r cela pourrait causer un incendie ou un choc lectrique ATTENTION Si une rallonge ou une bande d alimentation lectrique sont utilis es s assurer qu elles correspondent aux caract ristiques de l appare...

Page 15: ...aucun objet dessus au risque de les endommager Ne jamais laisser mouiller Ne jamais plier ni tordre avec une force excessive Ne jamais chauffer Ne jamais tirer avec une force excessive La poussi re pe...

Page 16: ...peut provoquer des blessures Un contact accidentel peut provoquer des blessures Ne jamais utiliser d air sous pression Cet appareil n est pas con u pour tre nettoy l aide d un appareil soufflant Des r...

Page 17: ...l this machine in a suitable location Install this machine in a location that meets the specified conditions for temperature humidity and the like Install this machine in a quiet stable location offer...

Page 18: ...ll the included software Be sure to read this first You can find the manual as an electronic format manual on the included DGSHAPE Software Package CD DE 3 User s Manual electronic format manual This...

Page 19: ...ose cones resin 2 metal 1 Spring Retaining screw Spare tool retaining screw for cutter holder Character cutter 3 175 mm 0 125 in with cutter holder Solid collet 3 175 mm 0 125 in Nose unit retainer US...

Page 20: ...tion or explosion may occur WARNING Never install this machine outside or in any location where exposure to water or high humidity may occur Current leakage may cause electrical shock or fire WARNING...

Page 21: ...uring shipment When installation is complete remove these retainers Remove all the retainers Any that remain may cause faulty operation or a breakdown when the power is switched on The retainer will b...

Page 22: ...ls will remove their grease leading to the rails rusting Rail Procedure A Make sure the power cord is not connected B Remove retainer A Retainer A Hexagonal wrench C Slowly move the spindle head to th...

Page 23: ...his machine Connecting the Power Cord WARNING Connect to an electrical outlet that complies with this machine s ratings for voltage frequency and current Incorrect voltage or insufficient current may...

Page 24: ...00 V commercial power supply with a capacity of 1 0 A or more Right side Power outlet Power cord Selecting the Language Used for Text on the Display Screen Procedure A Close the front cover B Switch o...

Page 25: ...C Press MENU TOP SELECT LANGUAGE ENGLISH D Select the language 1 Select the language using the Dial 2 Press ENTER PAUSE to confirm 1 2 E Switch off the power switch OFF Installation 23...

Page 26: ...resolution of 1024 768 or more is recommended This software is a 32 bit application and therefore runs in WOW64 Windows On Windows 64 when running on 64 bit versions of Windows operating systems For...

Page 27: ...click Allow or Yes and then continue with the installation The setup menu screen appears automatically D Click Install Install the various software all at once Follow the on screen instructions to pr...

Page 28: ...lectronic Format Manual Windows 10 From the Start menu click DGSHAPE DE 3 and then click Setup Guide or User s Manual Windows 8 1 On the Start screen click On the Apps screen click Setup Guide or User...

Page 29: ...and a USB cable to the machine at the same time Left side Computer USB cable Step 3 Switching the Power On Procedure A Switch on the power switch The Engraver Driver will be installed automatically on...

Page 30: ...and default gateway to connect the computer and this machine via a LAN Connecting the Computer and the Machine Directly The settings used in this section are merely examples Computer Machine Remarks I...

Page 31: ...g Center 3 Click Change adapter settings from the list on the left side of the window 4 Right click Ethernet 5 Click Properties Windows 8 1 1 On the Start menu click PC settings then Control Panel 2 C...

Page 32: ...ame of this window is Local Area Connection Properties or Wireless Network Connection Properties D Select Use the following IP address and then enter the number you determined in step P 28 Step 1 Dete...

Page 33: ...s operating systems For the latest information see the DGSHAPE Corporation website http www dgshape com Installable Software DGSHAPE Engraver Driver hereinafter referred to as Engraver Driver This is...

Page 34: ...menu screen appears automatically D Click Install E Click OK F Select Install DGSHAPE DE 3 for the model name and IP_ for the port and then click Start Engraver Driver installation begins Proceed wit...

Page 35: ...n for each piece of software will be displayed automatically Follow the instructions displayed for each installer to continue with the installation J If the following window appears click OK K Click o...

Page 36: ...On the Apps screen click Setup Guide or User s Manual under DGSHAPE DE 3 Windows 7 From the Start menu click All Programs DGSHAPE DE 3 and then click Setup Guide or User s Manual Step 4 Configuring t...

Page 37: ...Dial and select IP LAN IP 192 168 001 254 SUBNET 255 255 255 000 GATEWAY 000 000 000 000 012345678901234567 READY H Press ENTER PAUSE I Set the IP address Enter the IP address for this machine you det...

Page 38: ...gateway M Hold down and press MENU TOP The main screen appears again X 50 00mm Y 30 00mm Z 20 00mm S 5000rpm 012345678901234567 PAUSE N Restart the machine Step 5 Connecting the LAN Cable You have to...

Page 39: ...A direct connection to the machine is possible when using a crossover cable In addition if the computer supports AUTO MDI MDI X a direct connection to the machine is possible when using a straight ca...

Page 40: ...on manually starts and stops rotation of the spindle You perform the operation using the handy panel Procedure A Close the front cover B Press ENTER PAUSE C On the main screen press SPINDLE The cursor...

Page 41: ...rsor disappears press SPINDLE several times to move the cursor to S and then operate the Dial E Hold down SPINDLE for one second or longer The spindle begins to rotate F Leave the spindle rotating for...

Page 42: ...to debe devolverse al centro de reciclaje m s cercano a su domicilio para su correcta eliminaci n No lo tire a la basura Deite fora separadamente este produto no seu centro de reciclagem local N o o d...

Reviews:

Related manuals for DE-3