www.dfi.com
Chapter 2 Hardware Installation
Chapter 4
15
Chapter 4 Jumper Settings
Socket LGA1151
2
1
39
40
LVDS LCD Panel
Mini PCIe
mSATA
LAN 1
LAN 2
DC-in
DDR4_2 SODIMM
DDR4_1 SODIMM
HDMI/DP
DVI-D
USB 3-4
USB 3.0
USB 1-2
USB 3.0
S/PDIF
1
10
9
Front Audio
2
1
Buzzer
1
2
Battery
Intel
H110
SPI Flash
BIOS
PCIe 1 (PCIe x4)
10
9
1
2
10
9
1
2
10
9
1
2
10
9
1
2
COM 2
COM 3
COM 4
COM 1
1
1
SATA 0
SATA 3
9
1
2
10
9
1
2
10
USB
5-6
USB
7-8
SATA 3.0
1 2
1112
Front
Panel
Digital
I/O
1
USB 2.0
LCD/Inverter
Power
Standby
Power LED
1
System Fan 1
1
1
CPU Fan
Digital
I/O Power
1
SATA
Power
5
1
6
2
6
5
2
1
3
1
1
1
1
1
1
2
5
6
SMBus
Auto Power-on
Select (JP1)
COM 1
RS232/Power
Select (JP2)
LCD/Inverter Power Select (JP7)
Backlight
Power
Select
(JP6)
Panel Power
Select (JP8)
(J
P5)
(JP5)
Clear CMOS Data
ASMedia
ASM1442
ASMedia
ASM1442
Intel
WGI211AT
Chassis
Intrusion
ME Disable
1
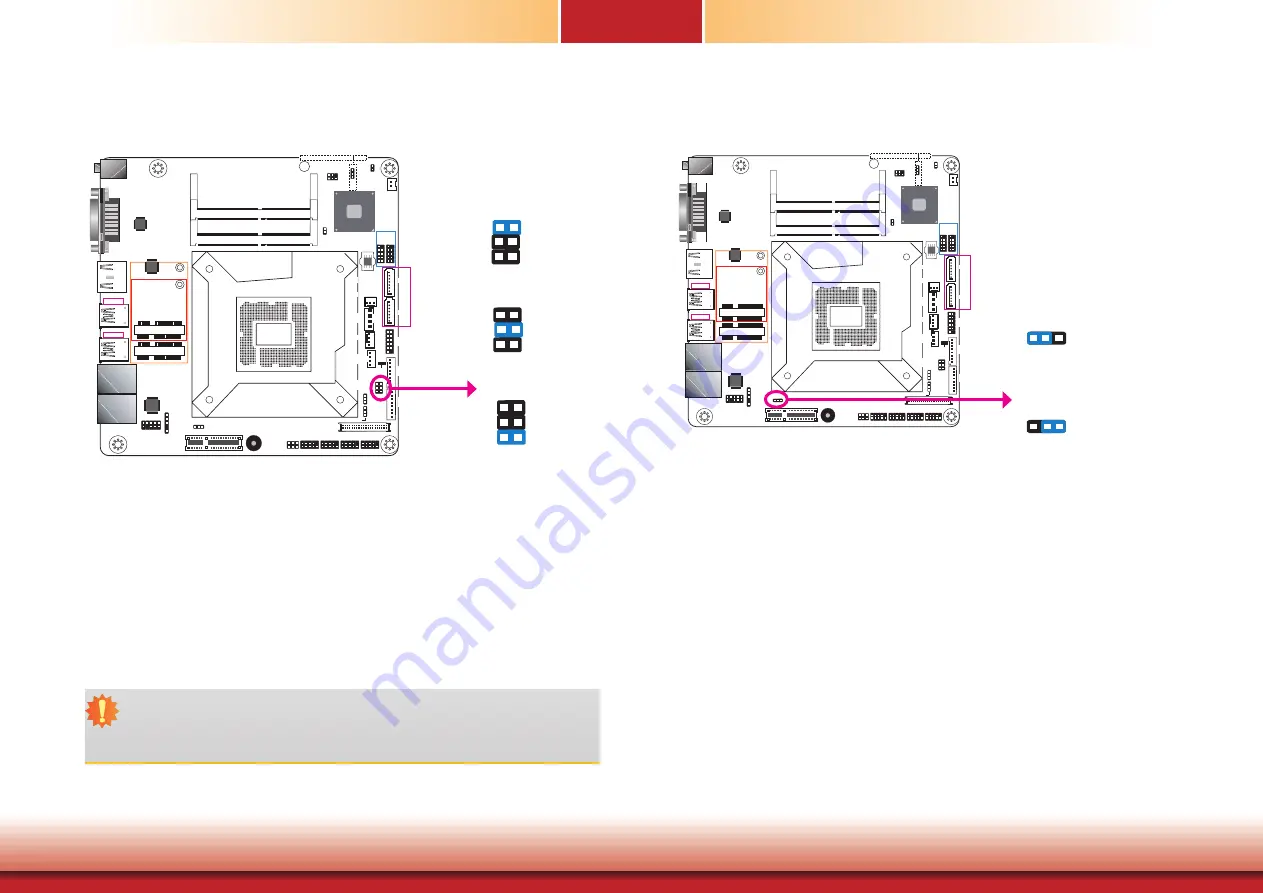
Power-on Select
1-2 On:
Power-on via power button
(default)
2-3 On:
Power-on via AC power
JP1 is used to select the method of powering on the system. If you want the system to
power-on whenever AC power comes in, set the jumper pins 2 and 3 to On. If you want to
use the power button, set jumper pins 1 and 2 to On.
When using JP1 “Power On” feature to power the system back on after a power failure occurs,
the system may not power on if the power lost is resumed within 5 seconds (power flicker).
JP1
3
1 2
3
1 2
Panel Power Select
Socket LGA1151
2
1
39
40
LVDS LCD Panel
Mini PCIe
mSATA
LAN 1
LAN 2
DC-in
DDR4_2 SODIMM
DDR4_1 SODIMM
HDMI/DP
DVI-D
USB 3-4
USB 3.0
USB 1-2
USB 3.0
S/PDIF
1
10
9
Front Audio
2
1
Buzzer
1
2
Battery
Intel
H110
SPI Flash
BIOS
PCIe 1 (PCIe x4)
10
9
1
2
10
9
1
2
10
9
1
2
10
9
1
2
COM 2
COM 3
COM 4
COM 1
1
1
SATA 0
SATA 3
9
1
2
10
9
1
2
10
USB
5-6
USB
7-8
SATA 3.0
1 2
1112
Front
Panel
Digital
I/O
1
USB 2.0
LCD/Inverter
Power
Standby
Power LED
1
System Fan 1
1
1
CPU Fan
Digital
I/O Power
1
SATA
Power
5
1
6
2
6
5
2
1
3
1
1
1
1
1
1
2
5
6
SMBus
Auto Power-on
Select (JP1)
COM 1
RS232/Power
Select (JP2)
LCD/Inverter Power Select (JP7)
Backlight
Power
Select
(JP6)
Panel Power
Select (JP8)
(J
P5)
(JP5)
Clear CMOS Data
ASMedia
ASM1442
ASMedia
ASM1442
Intel
WGI211AT
Chassis
Intrusion
ME Disable
1
JP8
Important:
Before powering-on the system, make sure that the power settings of JP8 match the
LCD panel’s specification. Selecting the incorrect voltage will seriously damage the
LCD panel.
3-4 On:+5V
2
4
6
5
1
3
1-2 On: +12V
2
4
6
5
1
3
JP8 is used to select the power supplied with the LCD panel.
5-6 On: +3.3V
(default)
5
1
3
2
4
6


