background image

4. Clip the battery cover back into place and make sure it is firmly closed.   


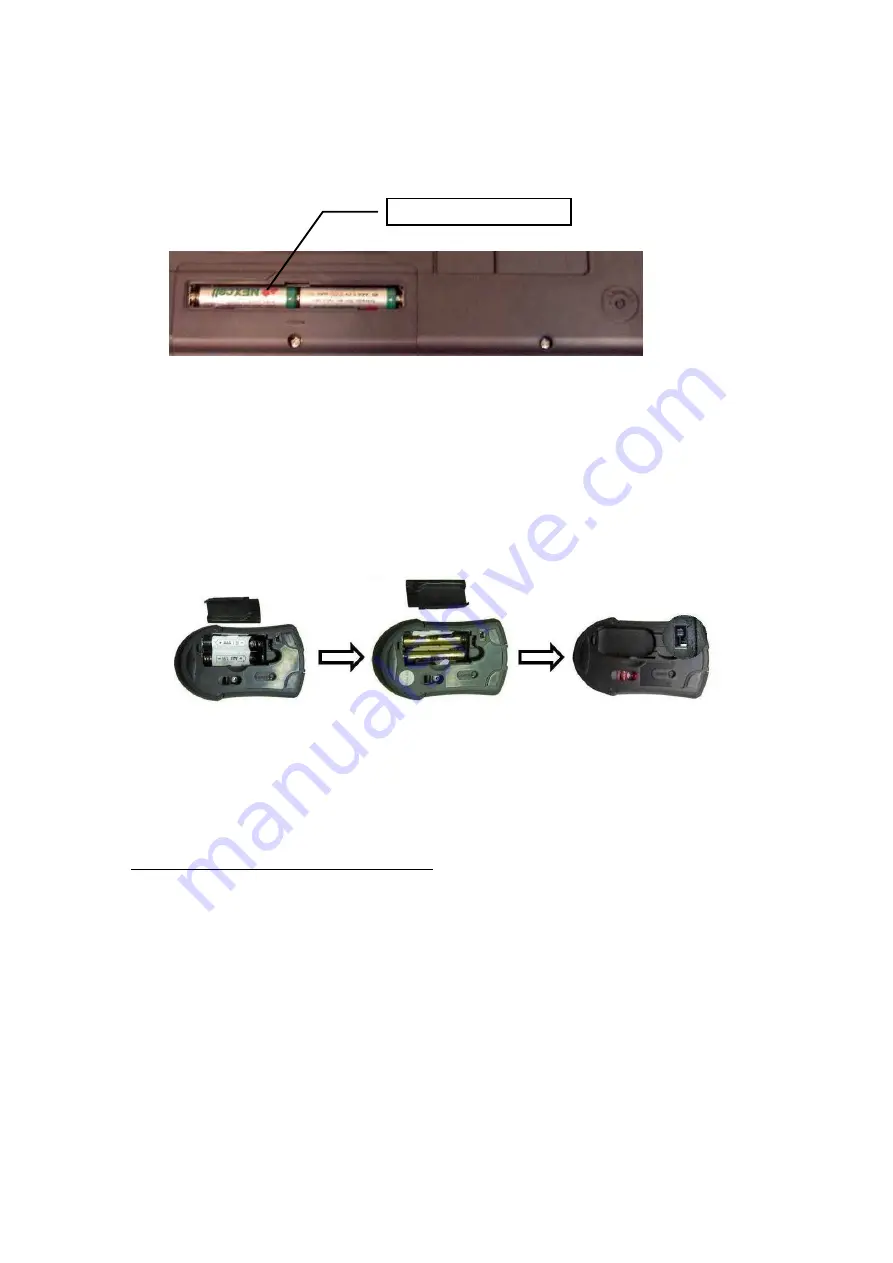
The wireless mouse uses 2 AAA batteries. They are inserted as follows:   

1.  Remove the battery compartment cover. 

2.  Install batteries with the positive (+) & negative (-) in the correct direction 

indicated by the battery compartment label.   

3.  Replace battery compartment cover.   


PAIRING THE MOUSE & KEYBOARD WITH THEIR RECEIVER   

Connect the receiver with computer. 

1. Turn off your computer 

2. Disconnect the current mouse 

3. Plug the USB connector (receiver) into USB port (computer). 

4. Turn the computer on   

a.

  USB is a PnP device; you can plug the device no matter the computer is on or 

off. Of course, you can remove USB device in the same way.   

b.

  If the device is HD or pen drive or any device which can store files, stop the 

device than remove is the best way to protect. 

Insert 2 AAA Batteries 

Summary of Contents for KS-28103

Page 1: ...ur elbows at your side Position your keyboard and mouse so you do not have to reach Adjust your chair and keyboard so your upper arms and wrists are straight Avoid resting your wrists on sharp edges S...

Page 2: ...ny part is missing please contact your dealer for a replacement immediately Precaution The optical mouse can not work on a glass or mirror surface Avoid operating this mouse on a glossy surface otherw...

Page 3: ...are operating the mouse just beside your desktop computer Battery Warning When replace the batteries use alkaline You may use rechargeable NiMH or other type of batteries but do not mix then with alka...

Page 4: ...ompartment cover PAIRING THE MOUSE KEYBOARD WITH THEIR RECEIVER Connect the receiver with computer 1 Turn off your computer 2 Disconnect the current mouse 3 Plug the USB connector receiver into USB po...

Page 5: ...after clicking the connect button on the mouse The LED will start blinking when the connection is established Move the mouse around to test if it was successful The LED on the receiver will light up o...

Page 6: ...ug the receiver d Wait for 20 sec then to try the step 1 to 2 again Note During normal use please make sure that the mouse keyboard are no more than 5M away from the receiver in order to have reliable...

Page 7: ...adually from standby mode to sleep mode if it is not being used Standby mode Around 1 second after the mouse stops moving it enter into standby mode Sleep mode If the mouse is left intact for around 8...

Page 8: ...nctions The hot keys on the keyboard are labeled as follows 1 Mute Press this button once to mute the volume press again to un mute 2 Vol Vol Increase volume Decrease the volume 3 Play Pause Press thi...

Page 9: ...your options to prevent interruption 5 buttons design with scrolling wheel mouse Ergonomic design for comfortable grip TROUBLESHOOTING 1 Mouse does not function If mouse is not functional please turn...

Page 10: ...o based devices are subject to interference from other 2 4GHz radio based devices such as cordless telephones cordless baby monitors and cordless toys It may help to move the receiver unit and the bas...

Page 11: ...installation Make sure you have connected the receiver correctly For optimal performance place the receiver at least 8 inches or 20 centimeters away from other electrical devices such as the computer...

Page 12: ...communications However there is no guarantee that interference will not occur in a particular installation If this equipment does cause harmful interference to radio or television reception which can...

Page 13: ...nce with FCC RF exposure compliance requirements please avoid direct contact to the transmitting antenna during transmitting End users must follow the specific operating instructions for satisfying RF...

Reviews: