DeWalt T STak DWST17510 Instruction Manual Download Page 11

18

19

EN

EN

EN

EN

OPERATION

The TSTAK

®

 CONNECT RADIO + CHARGER can be operated from the appliance itself or controlled 

by a Bluetooth

®

-enabled mobile device (iOS or Android) using a dedicated application.

THE TSTAK

®

 CONNECT RADIO + CHARGER UNIT

The TSTAK

®

 CONNECT RADIO + CHARGER is equipped with flash memory for storing 12 AM and 12 

FM radio stations, and up to 6 paired Bluetooth

®

 devices.

  

NOTE:

 The appliance will operate when connected to the AC/DC power adaptor and/or when  

         a charged battery pack is inserted.

  

NOTE:

 When the TSTAK

®

 CONNECT RADIO + CHARGER is connected by the supplied power  

         chord to a wall outlet, it automatically charges the installed battery. When unplugged, the appliance will  
         automatically switch to operating off the battery and can run up to 8 hours on a fully charged 5Ah 
         20V MAX Lithium-ion battery. Using batteries of lower voltage and amp hours will yield less run time.

This appliance can be operated in the vertical or horizontal position.

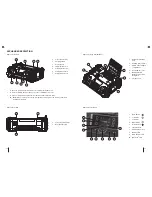
USER INTERFACE AND BUTTONS

The front panel includes an LCD screen with on-screen touch- buttons. Below the screen is a 
selection dial button and four pushbuttons.

SELECTION DIAL AND PUSHBUTTONS

Selection Dial 
(this button has multiple functions)

Back button

Left button

Right button

Home button

ON SCREEN DISPLAY

The LCD display, and the resistive touch-buttons on both sides, change function according to the 
mode of operation. The various functions are explained in the mode sections below.

POWERING ON AND OFF

Press the Selection Dial to turn on the appliance. It starts up on the last selected audio source.
Press the Selection Dial for 3 seconds. The appliance turns off. 

VOLUME ADJUSTMENT

  Warning:

 Excessive sound level can damage hearing.


NOTE:

 The volume is set and saved separately for each of the audio source types.

Turn the 

Selection Dial

 clockwise to increase the volume. Turn it counterclockwise to reduce volume. 

A volume bar is displayed showing the volume level.

HOME BUTTON 

Press the 

Home

 button 

 to display the home screen.

The home screen includes icons for selecting the audio source 

(AM/FM/Bluetooth

®

/AUX)

, and 

for accessing the 

Settings

 menu.

  

NOTE:

 The screen automatically returns to the last playing mode screen after about 30  

        seconds of no activity.

SELECTING THE AUDIO SOURCE

Press the touch buttons to select the audio source 

(AM, FM, Bluetooth

®

 or AUX).

BACK BUTTON  

After entering any one of the screens, press the Back button 

 to return to the previous screen.

LEFT AND RIGHT BUTTONS 

When in 

FM

 or 

AM

 audio source, pressing the Left or Right button moves between channels 1–6 

and 7-12 and to the list of channels. They move between these screens rotationally.
For more information see the AM and FM modes section.

AM AND FM MODES

The TSTAK

®

 CONNECT RADIO + CHARGER can be tuned to 

AM

 and 

FM

 radio frequencies with 

the option of saving up to twelve (12) AM preset stations (favorites) and twelve (12) FM preset 
stations (favorites). After setting and saving the favorites, selecting a preset station instantly 
changes the frequency to the desired station. The screen displays the station name and after two 
seconds, the station frequency.

To move between the first six stations and the next six stations, push the Left or Right button. 
Press any of the touch buttons to select one of the preset stations.

To see a list of the preset stations, press the Right button to the setting tab 

 and rotate it to 

scroll through the preset stations. Press the Selection Dial to select a specific preset station.

AM/FM RADIO

Setting the AM/FM preset stations can be performed by 

Auto Scan

 or by 

Manual Scan

. To 

select the scan type:

1. 

Press the audio source (

AM

 or 

FM

).

2. 

Press the Selection Dial 

 to enter the AM or FM settings screen.

3. 

Press the touch button to the left or right of the type of scan to perform.

Summary of Contents for T STak DWST17510

Page 1: ...PREMIUM SOUND FOR THE JOBSITE SONIDO PREMIUM PARA EL SITIO DE TRABAJO UN SON DE QUALITÉ SUR LE CHANTIER 1 800 4 DEWALT WWW DEWALT COM DWST17510 CONNECT RADIO CHARGER CARGADOR CHARGEUR ...

Page 2: ......

Page 3: ...3 English INSTRUCTION MANUAL 4 Espanol MANUAL DE INSTRUCCIONE 26 Francais MODE D EMPLOI 48 ...

Page 4: ...K storage system Water and dust resistant IP54 tested iOS and Android mobile app for complete remote control of the appliance TECHNICAL DATA POWER SUPPLY UNIT AC DC POWER ADAPTOR Power input 100 240VAC 50 60 Hz Class II Power output 24 VDC Current output 2 A Weight 0 66 lb 0 3 kg APPLIANCE Power input 24 VDC Power output USB charge 5V 2 1A Networked standby mode standby mode power consumption 3W T...

Page 5: ...rvice personnel Servicing is required when the appliance has been damaged in any way such as power supply cord or plug is damaged liquid or direct rain has reached the connectors the appliance has been exposed to extensive moisture does not operate normally or has been dropped and does not operate 19 This appliance is not intended for use by persons including children with reduced physical sensory...

Page 6: ... Read all documentation BATTERIES AND CHARGERS The battery pack is not fully charged out of the carton Before using the battery pack and charger read the safety instructions below and then follow charging procedures outlined When ordering replacement battery packs be sure to include the catalog number and voltage The TSTAK CONNECT RADIO CHARGER is to be used only with DEWALT DCB series 12VDC 20VDC...

Page 7: ... 3 x 40 h STORAGE RECOMMENDATIONS 1 1 The best storage place is one that is cool and dry away from direct sunlight and excess heat or cold 2 For long term storage it is recommended to store a fully charged battery pack in a cool dry place out of the charger for optimal results Note Battery packs should not be stored completely depleted of charge The battery pack will need to be recharged before us...

Page 8: ...LEXVOLT Battery packs up to 9Ah Use of any other battery packs or any non rechargeable batteries may create a risk of injury or fire Be sure to read all safety instructions before using this appliance for charging your battery pack Note To ensure maximum performance and life of lithium ion battery packs charge the battery pack fully before first use IMPORTANT CHARGING NOTES 1 1 Longest life and be...

Page 9: ...icates the battery pack status Green Battery pack is fully charged Yellow Battery pack is partially charged Red Battery pack needs to be charged Slow Blink Mains Adaptor LED is on Battery is charging Fast Red Blink Error Faulty battery pack Mains Adaptor LED A red LED indicates battery Mains Adaptor red Mains Adaptor Connected When the appliance is turned ON When charging a battery pack a large ba...

Page 10: ... the compartment push the cover down until it is locked in place Note When correctly closed the compartment helps protect its contents from dust debris and light rain Figure 2 Rear View 2 1 2 1 1 USB power charging port 2 2 Auxiliary jack 3 5 mm 3 3 AC DC power adaptor compartment 4 4 Compartment cover 5 5 Battery PaIsrael Guide Dog Centerck Receptacle 6 6 Storage space 1 1 Back button 2 2 Left bu...

Page 11: ...types Turn the Selection Dial clockwise to increase the volume Turn it counterclockwise to reduce volume A volume bar is displayed showing the volume level HOME BUTTON Press the Home button to display the home screen The home screen includes icons for selecting the audio source AM FM Bluetooth AUX and for accessing the Settings menu NOTE The screen automatically returns to the last playing mode sc...

Page 12: ...D indicates the Bluetooth status Blue Bluetooth connected to Mobile App Off Not connected light does not need to be on for connecting to the device Connecting to Bluetooth 1 1 Press the Home button and select BT as the audio source 2 2 Press the Bluetooth touch button to disconnect any other connected device 3 3 Enable Bluetooth discovery on the audio device you wish to connect 4 4 Scan for the TS...

Page 13: ...NGS The display Brightness and Auto Dim Display can be adjusted In addition you can select how Flip Display operates when the appliance is positioned vertically 1 1 Press the touch buttons of the plus or minus signs to increase or decrease the screen Brightness level 2 2 Press the touch buttons of the plus or minus signs to set the Auto Dim duration after which the backlight of the buttons and tou...

Page 14: ...loss such as fire flood or theft your registration of ownership will serve as your proof of purchase FOR YOUR SAFETY Registering your product will allow us to contact you in the unlikely event a safety notification is required under the Federal Consumer Safety Act Register online at www dewalt com register THREE YEAR LIMITED WARRANTY DEWALT will repair without charge any defects due to faulty mate...

Page 15: ......

Page 16: ... APR15 Part No DWST17510 Copyright 2018 DEWALT DEWALT Industrial Tool Co 701 East Joppa Road Baltimore MD 21286 1 800 4 DEWALT 1 800 433 9258 www dewalt com V1 0 15320 04 2018 ...

Reviews: