ENGLISH
7
TOOL OPERATION
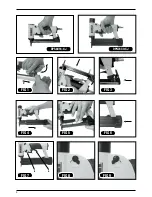
The trigger operated tool is operated by first actuating the
trigger under the handgrip (Fig. 7A), followed by actuating
the trigger under the valve, as shown (Fig. 7B). The Tool
will actuate each time the trigger under the valve is
actuated until the trigger under the hand grip is released.
For more information, refer to the relevant section in the
Safety and Operating Instructions Manual supplied with
this tool.
TOOL OPERATION CHECK
m
Warning
: Remove all fasteners from tool before
performing tool operation check.
A. With finger off the trigger, hold the tool with a firm grip
on the handle.
B. Place the nose of the tool against the work surface.
C. Raise the secondary trigger device.
D. Pull the trigger to cycle the tool. Release the trigger and
cycle is complete.
m
Warning
: With the secondary trigger device raised, the
tool will cycle each time the trigger is pulled!
ADDITIONAL WARNINGS:
m
Warning
: The secondary trigger device should be
checked periodically, to ensure it is operating correctly.
While following the above tool operation check notes,
release the secondary safety trigger and the operating
trigger simultaneously, this should automatically lockout
the operating trigger, preventing the tool from being
actuated.
The tool should only then operate again when the
secondary trigger device is raised and the operating
trigger is depressed.
POWER ADJUSTMENT
These tools include a power adjustment for changing
fastener penetration in different materials.
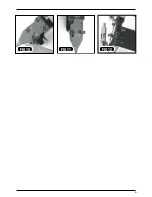
For maximum power: rotate valve anticlockwise as far as
possible. (Fig. 8)
To reduce power: rotate valve clockwise for up to 30%
reduction. (Fig. 9)
JAM CLEARANCE (DPN2330-XJ)
m
Warning!
Always disconnect the air before clearing a
jammed fastener.
1. Disconnect the air supply from the tool.
2. Release the magazine and pull it back to stop pin
feeding.
3. Loosen the two screws as shown in (Fig. 10) by one
full turn.
4. Slide cover down until the two large clearance holes
line up with the two screw heads as shown in (Fig. 11).
5. Pull the cover away from nose as shown in (Fig. 12).
6. Remove the jammed fastener.
7. Re-install cover, slide it up, tighten the two screws and
close magazine.
8. Reconnect air hose.


