background image

English

8

Removing and Installing Blade (Fig. A, G, H)


DANGER:

 RISK OF INJURY. 

WHEN 

REASSEMBLING THE BLADE SYSTEM, ENSURE EACH 
PART IS REINSTALLED CORRECTLY, AS DESCRIBED 
BELOW. IMPROPER ASSEMBLY OF THE BLADE OR 
OTHER PARTS OF THE BLADE SYSTEM CAN CAUSE 
SERIOUS INJURY.


DANGER:


To reduce the risk of serious 

personal injury, turn unit off, remove battery pack 

before making any adjustments or removing/

installing attachments or accessories.

 An 

accidental start‑up can cause serious personal injury.


WARNING:

 Use gloves and proper eye 

protection. Be careful of the sharp edges on the blade.

Replacement blades are available from your nearest 

authorized service center.

 This pruner requires replacement 

blade DWZPRB300.

1.  Remove the battery.
2.  Wear proper eye protection and gloves and be careful 

not to cut yourself.

3.  Place the product on a smooth, level surface.
4.  Using the supplied hex wrench 

 10 

 loosen the fixed 

blade screw 

 11 

 one full turn as shown in Fig. G. This 

will allow for easier removal and assembly of the cutting 
blade 

 6 

 .

5.  Flip the product onto its other side.
6.  Using the hex wrench 

 10 

 remove the cutting blade 

screw 

 12 

 and nut 

 13 

 as shown in Fig. H.

Pruning Instructions (Fig. A, F)


DANGER:

 Keep hands and other body 

parts away from the blade. Contact with the blade 
will result in serious personal injury.


WARNING:

 To guard against injury, 

observe the following:
•  Read instruction manual before using. Save 

instruction manual.

•  Check the shrub for foreign objects such as wires or 

fences before each use.

•  Keep hand on firmly on tool and other hand far 

away from cutting action. Don't overreach.

•  Do not use under wet conditions.


CAUTION:

 Do not use blade to cut 

branches greater than 1.25" (32 mm). Use the pruner 
only for cutting normal shrubbery around houses 
and buildings. 

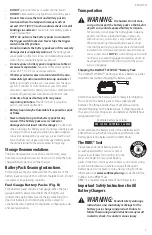
Working Position (Fig. F) 

Maintain proper footing and balance and do not overreach. 
Wear safety goggles, non‑skid footwear and gloves when 
pruning. Hold the tool firmly. Always hold the pruner, as 
shown in Fig. F. Refer to 

Proper Hand Position

 for more 

information. Never hold the tool by the blades.

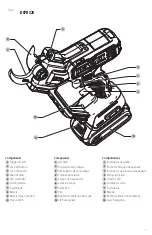
LED Worklight (Fig. A)


CAUTION:

 Do not stare into worklight. 

Serious eye injury could result.

The LED worklight 

 5 

  is activated when the trigger switch 

 1 


is depressed, and will automatically turn off 20 seconds after 
the trigger switch is released. If the trigger switch remains 
depressed, the worklight will remain on.

nOTE: 

The worklight is for lighting the immediate work 

surface and is not intended to be used as a flashlight.

MAINTENANCE


WARNING:

 To reduce the risk of serious 

personal injury, turn unit off and remove the 

battery pack before making any adjustments or 

removing/installing attachments or accessories.


An accidental start‑up can cause injury.

Your 

D

e

WALT

 power tool has been designed to operate 

over a long period of time with a minimum of maintenance. 
Continuous satisfactory operation depends upon proper tool 
care and regular cleaning.

1.  Keeping your hands and other body parts away from the 

blade, push the lock‑off button 

 2 

 down and squeeze the 

lock‑off switch 

 3 

 then squeeze the trigger switch 

 1 

.

2.  The cutting blade 

 6 

 will make a cut cycle. Once this 

cycle is complete you must release the trigger switch 

 1 

.

3.  To make repeated cuts, squeeze the trigger 

switch 

 1 

 again while continuing to hold down lock off 

switch 

 3 

.

4.  To turn the tool off, release the trigger switch 

 1 

 and the 

lock‑off switch 

 3 

nOTE:

 In order to keep the unit powered on, you must 

continue to squeeze the lock‑off switch 

 3 

. If held too 

long the tool will time out and will need to release 
switches and start again. 

nOTE: 

If the lock‑off button 

 2 

 or lock‑off switch 

 3 

 are 

unintentionally depressed without squeezing the trigger 
switch 

 1 

, the tool will power off.

1.  Position the branch to be cut between the cutting 

blade 

 6 

 and fixed blade 

 7 

.

2.  Push the lock‑off button 

 2 

 down and squeeze the lock‑

off switch 

 3 

 then squeeze the trigger switch 

 1 

.

3.  The cutting blade 

 6 

 will make a cut cycle and cut the 

branch off. 

nOTE: 

Cut branches at an angle for a cleaner cut.

4.  Release the trigger switch. 

nOTE: 

If more branches need to be cut, at the same time, 

the lock‑off switch 

 3 

 can be held down and actuate the 

trigger switch 

 1 

 as needed.  Otherwise, repeat steps 1‑4..

Summary of Contents for DCPR320

Page 1: ...act us Pour toute question ou tout commentaire nous contacter Si tiene dudas o comentarios contáctenos 1 800 4 DeWALT DCPR320 20V Max Pruner Sécateur 20 V Max Podadora 20 V MáX Instruction Manual Guide D utilisation Manual de instrucciones ...

Page 2: ...English original instructions 3 Français traduction de la notice d instructions originale 11 Español traducido de las instrucciones originales 20 ...

Page 3: ...ouillage 3 Interrupteur de verrouillage 4 Poignée principale 5 Lampe de travail à DEL 6 Lame de coupe 7 Lame fixe 8 Pile 9 Bouton de libération de la pile 10 Clé hexagonale Componentes 1 Interruptor de gatillo 2 Botón de bloqueo de apagado 3 Interruptor de bloqueo de apagado 4 Manija principal 5 Linterna LED 6 Cuchilla de corte 7 Cuchilla fija 8 Batería 9 Botón de liberación de batería 10 Llave he...

Page 4: ... à 74 51 74 cargada 50 charged Chargé de 50 50 cargada Pack needs to be charged Le bloc piles doit être rechargé La batería tiene que cargarse Indicators Témoin Indicador Charging Bloc piles en Cours de Chargement Unidad en Proceso de Carga Fully Charged Bloc piles Chargé Unidad Cargada Hot Cold Pack Delay Suspension de Charge Contre le Chaud Froid Restraso por Unidad Caliente Fría ...

Page 5: ...ignment of moving parts binding of moving parts breakage of parts mounting and any other condition that may affect its operation A guard or other part that is damaged should be properly repaired or replaced by an authorized service center unless indicated elsewhere in this manual 15 Damage to Unit If you strike or become entangled with a foreign object stop appliance immediately remove battery che...

Page 6: ...may be easily knocked over Air vents often cover moving parts and should be avoided Loose clothes jewelry or long hair can be caught in moving parts Additional Safety Information WARNING Never modify the power tool or any part of it Damage or personal injury could result WARNING ALWAYS use safety glasses Everyday eyeglasses are NOT safety glasses Also use face or dust mask if operation is dusty AL...

Page 7: ...n a fire Toxic fumes and materials are created when lithium ion battery packs are burned Do not expose a battery pack or appliance to fire or excessive temperature Exposure to fire or temperature above 265 F 130 C may cause explosion If battery contents come into contact with the skin immediately wash area with mild soap and water If battery liquid gets into the eye rinse water over the open eye for...

Page 8: ... DCB1112 chargers are equipped with an internal fan designed to cool the battery pack The fan will turn on automatically when the battery pack needs to be cooled DO NOT attempt to charge the battery pack with any chargers other than a DeWALT charger DeWALT chargers and battery packs are specifically designed to work together These chargers are not intended for any uses other than charging DeWALT r...

Page 9: ...ased separately at least 1 25 4 mm long with a screw head diameter of 0 28 0 35 7 9 mm screwed into wood to an optimal depth leaving approximately 7 32 5 5 mm of the screw exposed Align the slots on the back of the charger with the exposed screws and fully engage them in the slots SAVE THESE INSTRUCTIONS FOR FUTURE USE Never operate the charger if the fan does not operate properly or if ventilatio...

Page 10: ...tion for more information Never hold the tool by the blades LED Worklight Fig A CAUTION Do not stare into worklight Serious eye injury could result The LED worklight 5 is activated when the trigger switch 1 is depressed and will automatically turn off 20 seconds after the trigger switch is released If the trigger switch remains depressed the worklight will remain on NOTE The worklight is for light...

Page 11: ...n a vise 15 as shown in Fig I 5 Carefully file the cutting edge 16 of the cutting blade with a fine tooth file 17 not included or sharpening stone not included maintaining the angle of the original cutting edge of the cutting blade 6 Inspect the edge of the fixed blade and remove any burrs with a fine tooth file 7 Install sharpened cutting blade as described in the Removing and Installing Blade se...

Page 12: ...ad Towson MD 21286 or call 1 800 4 DeWALT 1 800 433 9258 LATIN AMERICA This warranty does not apply to products sold in Latin America For products sold in Latin America see country specific warranty information contained in the packaging call the local company or see website for warranty information FREE WARNING LABEL REPLACEMENT If your warning labels become illegible or are missing call 1 800 4 ...

Page 13: ...tes de sécurité sont disponibles à un coût supplémentaire dans votre centre de service local DeWALT ou dans un établissement de service autorisé 6 Utilisez le bon outil ne pas utiliser cet outil pour toute tâche autre que celles pour lesquelles il est conçu 7 Évitez les démarrages accidentels ne pas transporter avec votre doigt sur la gâchette si la pile est installée 8 Ne pas forcer l outil le tr...

Page 14: ... de sécurité supplémentaires AVERTISSEMENT ne jamais modifier l outil électrique ou toute pièce de celui ci Cela pourrait entraîner des dommages matériels ou des blessures corporelles 11 Débranchez l appareil Retirez la batterie lorsque vous ne l utilisez pas avant de réparer lorsque vous changez les accessoires comme les lames et autres 12 Entreposez les outils arrêtés à l intérieur lorsqu ils ne...

Page 15: ...e est un endroit frais et sec loin de la lumière directe du soleil et de la chaleur ou du froid excessif Entreposez le bloc piles entièrement chargé hors du chargeur Instructions de nettoyage du bloc piles La saleté et la graisse peuvent être retirées des surfaces extérieures du bloc piles à l aide d un linge ou d une LISEZ TOUTES LES INSTRUCTIONS Consignes de sécurité importantes pour les blocs p...

Page 16: ...dans un centre de services DeWALT autorisé ou chez votre détaillant local pour les recycler Dans certaines régions il est illégal de mettre les blocs piles usagés à la poubelle Vous pouvez aussi contacter votre centre de recyclage local pour des informations sur les Expédier la bloc pile FLEXVOLTMC de DeWALT Le bloc piles FLEXVOLTMC de DeWALT a un couvercle des piles qui doit être utilisé lorsque ...

Page 17: ...indique pas un problème Pour faciliter le refroidissement du bloc piles après l utilisation évitez de placer le chargeur ou le bloc piles dans un environnement chaud comme une remise en métal ou une remorque non isolée 3 Si le bloc piles ne charge par de adéquatement Calibre minimum pour rallonges électriques Volts Longueur totale de la rallonge en pieds mètres 120 V 25 7 6 50 15 2 100 30 5 150 45...

Page 18: ...e de l outil Insérez le dans le chargeur comme indiqué dans la section relative au chargeur du présent manuel CYCLE I O 1s 1s Symbole Signification s secondes I marche O arrêt FONCTIONNEMENT AVERTISSEMENT afin de réduire le risque de blessure corporelle éteignez l appareil et retirez le bloc piles avant d effectuer tout ajustement ou de retirer installer des pièces ou des accessoires Un déclenchem...

Page 19: ... gâchette 1 selon les besoins Sinon répétez les étapes 1 à 4 Instructions d élagage Fig A F DANGER gardez les mains et les autres parties du corps éloignées de la lame Tout contact avec la lame entraînera une blessure corporelle grave AVERTISSEMENT pour vous protéger contre les blessures respectez ce qui suit Lisez le guide d utilisation avant d utiliser Conservez le guide d utilisation Vérifiez s...

Page 20: ...pendant que vous retirez aiguisez et installez la lame Les lames de coupe sont fabriquées en acier trempé de qualité supérieure et en conditions d usage normal elles ne nécessiteront pas d affûtage Cependant si vous heurtez accidentellement une clôture en grillage des pierres de la vitre ou d autres objets durs vous pouvez mettre un cran d arrêt dans la lame Il n est pas nécessaire de retirer ce c...

Page 21: ...ETTES D AVERTISSEMENT si les étiquettes d avertissement deviennent illisibles ou sont manquantes composer le 1 800 4 DeWALT 1 800 433 9258 pour en obtenir le remplacement gratuit Registre en ligne Merci pour votre achat Enregistrez dès maintenant votre produi RÉPARATIONS SOUS GARANTIE cette carte remplie vous permettra de vous prévaloir du service de réparations sous garantie de façon plus efficac...

Page 22: ...ice el sentido común NO opere mientras esté bajo la influencia de alcohol o drogas o cuando esté cansado o enfermo 11 Desconecte el aparato Retire la batería cuando no esté en uso antes de realizar el mantenimiento al cambiar accesorios tales como cuchillas y similares 12 Guarde los aparatos sin uso en el interior Cuando no los use los aparatos deben almacenarse en interiores en lugares secos y al...

Page 23: ...fique la herramienta eléctrica o ninguna parte de ella Podría resultar en daño o lesiones personales ADVERTENCIA SIEMPRE use gafas de seguridad Las gafas de uso diario NO son gafas de seguridad También use una careta o máscara de polvo si la operación produce polvo SIEMPRE USE EQUIPO DE SEGURIDAD CERTIFICADO Protección para los ojos ANSI Z87 1 CAN CSA Z94 3 Protección auditiva ANSI S12 6 S3 19 Pro...

Page 24: ...terminales de la batería estén protegidas y bien aisladas de materiales que puedan entrar en contacto con ellas y causar un cortocircuito LEA TODAS LAS INSTRUCCIONES Instrucciones de Seguridad Importantes para Todos los Paquetes de Batería ADVERTENCIA Lea todas las advertencias de seguridad instrucciones y marcas de precaución para el paquete de la batería el cargador y el producto La falla en seg...

Page 25: ... cuando se requiera servicio o reparación El reensamble incorrecto puede resultar en un riesgo de descarga eléctrica electrocución o incendio Instrucciones de Seguridad Importantes para Todos los Cargadores de Batería ADVERTENCIA Lea todas las advertencias de seguridad instrucciones y marcas de precaución para el paquete de la batería el cargador y el producto La falla en seguir las advertencias e...

Page 26: ...asa se pueden retirar del exterior del cargador con una tela o cepillo no metálico suave No use agua o ninguna solución de limpieza El cargador está diseñado para operar con corriente eléctrica doméstica estándar de 120 V No intente usarlo en ningún otro voltaje Esto no aplica al cargador de vehículos Los materiales extraños de naturaleza conductiva tales como pero sin limitarse a polvo de pulido ...

Page 27: ...identalmente sin oprimir el interruptor de gatillo 1 la herramienta se apagará Colocación Adecuada de las Manos Fig E ADVERTENCIA Para reducir el riesgo de lesiones personales serias SIEMPRE use la posición de las manos adecuada como se muestra ADVERTENCIA Para reducir el riesgo de lesiones personales serias SIEMPRE sostenga firmemente en anticipación de una reacción repentina Instalación y Desins...

Page 28: ...o de la cuchilla fija 11 como se muestra en la Fig G 12 Voltee el producto sobre su otro lado y use la llave hexagonal 10 para apretar completamente el tornillo de la cuchilla de corte 12 MANTENIMIENTO ADVERTENCIA Para reducir el riesgo de lesiones personales apague la unidad y retire el paquete de batería antes de realizar cualquier ajuste o retirar instalar conexiones o accesorios Una activación...

Page 29: ...ca afila e instala la cuchilla Las cuchillas de corte están hechas de acero endurecido de alta calidad y con un uso normal no requerirán un reafilado Sin embargo si golpea accidentalmente una cerca de alambre piedras vidrio u otros objetos duros puede poner un corte en la cuchilla No es necesario quitar este corte siempre que no interfiera con el movimiento de la cuchilla Si deja caer la recortado...

Page 30: ...accesorios originales Solamente para propósito de México Importado por Black and Decker S A de C V Antonio Dovali Jaime 70 Torre C Piso 8 Col Santa Fe Alvaro Obregon Ciudad de Mexico Mexico C P 01210 TEL 52 55 53267100 R F C BDE8106261W7 MONTERREY N L Av Francisco I Madero 831 Poniente Col Centro 818 375 23 13 PUEBLA PUE 17 Norte 205 Col Centro 222 246 3714 QUERETARO QRO Av San Roque 274 Col San G...

Page 31: ......
Page 32: ... tension nominale est de 18 54 ou 108 120 V max se base sur l utilisation combinée de 2 blocs piles au lithium ion DeWALT de 60 V max El máximo voltaje inicial de la batería medido sin carga de trabajo es 20 o 60 voltios El voltaje nominal es de 18 54 o 108 V 120 V Máx se basan en el uso de 2 baterías de iones de litio DeWALT de 60 V Máx combinadas BT Bluetooth NOTE The Bluetooth word mark and log...

Reviews: