background image

English

10

Preparing the Connection


WARNING:


Always follow the specific 

manufacturer's installation instructions for 
connector and cable combinations being 
used. 

It is the installer's responsibility to ensure the 

compatibility of the cable and connectors used for the 
crimp. Failure to follow all instructions and warnings 
may result in property damage and/or serious personal 
injury.

1.  Before operating, make sure that the work area and the 

area below are clear of people and other distractions 
and that the tool and work area have been properly 
set up.

2.  Prepare the connectors and cable according to the 

manufacturer’s specifications.

3.  Make sure the cable is inserted to the proper depth 

in the connector in accordance with the connector 
manufacturer's specifications.

Crimping


WARNING: 

An incomplete crimp can cause property 

damage.
•  Always use the manufacturer-approved 

combination of connector and cable. Failure 
to do so, may result in an incomplete or faulty 
connection.


WARNING: 

To reduce the risk of serious personal 

injury, inspect the crimp head assembly for cleanliness, 
cracks or other damage before beginning a crimp. 
Using a dirty or damaged crimp head assembly could 
result in improper crimp connections that could lead 
to extensive property damage. Return damaged crimp 
head assembly to a 

D

e

WALT

 service facility.


WARNING: 

To reduce the risk of serious


personal 

injury, prior to use, inspect workpieces for cracks, 
defects or wear. Defective workpieces may shatter. 


WARNING: Before turning on the crimping tool, 
be sure hands are clear of the crimp head.

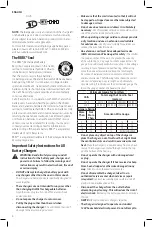
Before beginning a crimp, check the battery pack fuel gauge 
to determine whether the battery charge is sufficient to 
complete the crimping operation.

nOTE: 

The tool will turn off automatically after 2 minutes 

of no use.


Always follow the specific manufacturer's installation 
instructions for the appropriate length to strip the cable and 
preparation of the workpiece surface.

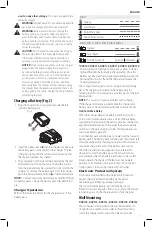
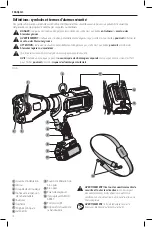
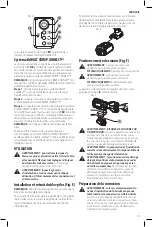
1.  Insert the entire stripped part of the cable into the 

connector. 

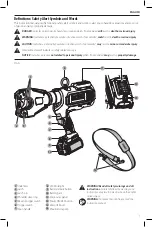
2.  If necessary, pull open the latch pin 

 3 

 to rotate the 

latch 

 2 

 open. This will allow more room to fit the 

connector inside the crimp head when crimping in 
tight spaces. Rotate the latch closed then slide the latch 
pin 

 3 

 closed until the ball detent snaps into the pin. 

This locks the latch pin into place. Align the connector 
midway between the indenters 

 1 

. Never crimp with the 

latch or latch pin open.

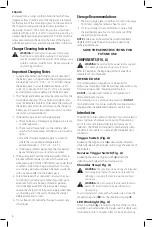
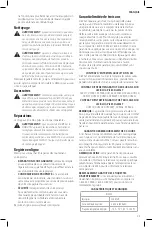
3.  Turn the tool ON by holding the power ON/OFF button 

 12 

 until all 3 LEDs illuminate green.

4.  Press and hold the trigger switch until the cycle is 

complete, indicated by the indenters automatically 
returning to their original position. The LED worklight 
will illuminate the workpiece when the trigger is pulled.

5.  When the cycle is complete, the Cycle Complete LED 

 16 

 will flash green for 5 seconds. If the crimp cycle is 

incomplete, the cycle complete LED 

 16 

 will flash red 

for 5 seconds. No action is possible until the user presses 
the ON/OFF button.

6.  Repeat steps 4 and 5 according to the connector 

manufacturer’s instructions. Crimp sequences start at 
the pad for lugs and the center for splices and work  
toward the cable.

7.  Complete the number of crimps specified by the 

manufacturer.

nOTE: 

If the battery dies or tool malfunctions during the 

cycle, the indenters can retract by pressing the reverse 
trigger switch 

 5 

. Hold tool securely until the indenters 

retract fully.

nOTE: 

Clean off oxide inhibitor from the aluminum 

connectors after completion.

nOTE: 

If the tool does not complete the crimp properly, 

read the 

Troubleshooting

 section or take the tool to a local 

dealer or authorized service center.

nOTE: 

When crimping overhead, always confirm workpiece 

and tool are secure before crimping.

MAINTENANCE


WARNING: To reduce the risk of serious personal 
injury, turn unit off and remove the battery pack 
before making any adjustments or removing/
installing attachments or accessories.

 An 

accidental start-up can cause injury.


WARNING: Before each use, inspect the tool 
(including LED indicators) and correct any 
problems before attempting to use.


WARNING: Skin injection hazard. The oil in the 
mechanism is under extreme pressure. Do not 
use hands to check for oil leaks.


WARNING: Explosion hazard. The internal 
hydraulic system creates extreme pressures. Only 

D

e

WALT

-qualified personnel should service this 

tool.

Required Maintenance

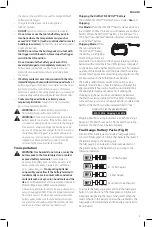
Maintenance is required when the crimping tool reaches 
25,000 cycles. Warning indicators will illuminate on the 
diagnostic panel 

 11 

 as follows.

1.  Maintenance warning at 24,500 cycles (Maintenance 

LED lights yellow continuously)

2.  Final maintenance warning at 24,900 cycles 

(Maintenance LED flashes yellow continuously)

3.  Needs service at 25,000 cycles (Maintenance LED lights 

red for 10 seconds then turns tool off automatically). 
At 25,000 cycles, the tool will no longer run. Take your 

Summary of Contents for DCE350

Page 1: ...omentarios contáctenos 1 800 4 DeWALT Instruction Manual Guide D utilisation Manual de instrucciones DCE350 20V Max Cordless Dieless Cable Crimping Tool Sertisseuse de câblage sans matrice et sans fil de 20 V Max Herramienta de engaste de cables sin troquel inalámbrica de 20 V Máx Final Page Size Half Letter 5 5 x 8 5 ...

Page 2: ...English original instructions 1 Français traduction de la notice d instructions originale 14 Español traducido de las instrucciones originales 28 ...

Page 3: ...may result in minor or moderate injury Used without word Indicates a safety related message NOTICE Indicates a practice not related to personal injury which if not avoided may result in property damage WARNING Read all safety warnings and all instructions Failure to follow the warnings and instructions may result in electric shock fire and or serious injury WARNING To reduce the risk of injury rea...

Page 4: ...n Protective equipment such as dust mask non skid safety shoes hard hat or hearing protection used for appropriate conditions will reduce personal injuries l Prevent unintentional starting Ensure the switch is in the off position before connecting to power source and or battery pack picking up or carrying the tool Carrying power tools with your finger on the switch or energizing power tools that h...

Page 5: ...anufacturer approved combinations for successful installation Combining materials not approved by manufacturers can result in faulty installations Faulty installations can result in catastrophic failures injury to installers and damage to property DANGER To reduce the risk of serious injury turn off power to the electrical lines before making a crimp Failure to shut off power prior to work could r...

Page 6: ...r proper personal hearing protection that conforms to ANSI S12 6 S3 19 during use Under some conditions and duration of use noise from this product may contribute to hearing loss CAUTION When not in use place tool on its side on a stable surface where it will not cause a tripping or falling hazard Some tools with large battery packs will stand upright on the battery pack but may be easily knocked ...

Page 7: ...rohibit transporting batteries in commerce or on airplanes in carry on baggage UNLESS they are properly protected from short circuits So when transporting individual battery packs make sure that the battery terminals are protected and well insulated from materials that could contact them and cause a short circuit Shipping the DeWALT FLEXVOLT Battery The DeWALT FLEXVOLT battery has two modes Use an...

Page 8: ...ting the charger This will reduce the risk of damage to the electric plug and cord Make sure that the cord is located so that it will not be stepped on tripped over or otherwise subjected to damage or stress Do not use an extension cord unless it is absolutely necessary Use of improper extension cord could result in risk of fire electric shock or electrocution When operating a charger outdoors alw...

Page 9: ...CB112 DCB113 DCB115 DCB118 DCB132 Charging Fully Charged Hot Cold Pack Delay DCB107 DCB112 DCB113 DCB115 DCB118 DCB132 The red light will continue to blink but a yellow indicator light will be illuminated during this operation Once the battery pack has reached an appropriate temperature the yellow light will turn off and the charger will resume the charging procedure The compatible charger s will ...

Page 10: ...dup of metallic particles should be kept away from charger cavities Always unplug the charger from the power supply when there is no battery pack in the cavity Unplug the charger before attempting to clean 6 Do not freeze or immerse the charger in water or any other liquid Storage Recommendations 1 The best storage place is one that is cool and dry away from direct sunlight and excess heat or cold...

Page 11: ...ge and help screens located inside the software OPERATION WARNING To reduce the risk of serious personal injury turn unit off and remove the battery pack before making any adjustments or removing installing attachments or accessories An accidental start up can cause injury WARNING Inspect the indenters and connectors before use Only use properly matched connectors and cable Installing and Removing...

Page 12: ...lace Align the connector midway between the indenters 1 Never crimp with the latch or latch pin open 3 Turn the tool ON by holding the power ON OFF button 12 until all 3 LEDs illuminate green 4 Press and hold the trigger switch until the cycle is complete indicated by the indenters automatically returning to their original position The LED worklight will illuminate the workpiece when the trigger i...

Page 13: ... YOUR SAFETY Registering your product will allow us to contact you in the unlikely event a safety notification is required under the Federal Consumer Safety Act Register online at www dewalt com register Three Year Limited Warranty DeWALT will repair without charge any defects due to faulty materials or workmanship for three years from the date of purchase This warranty does not cover part failure...

Page 14: ... is pressed Battery is too low to complete a crimp press Battery LED lights in red continuously Recharge battery in compatible DeWALT charger Other causes Refer to LED Indications for additional information Tool is plugged into computer via micro USB cable but the maintenance LED does not light blue continuously Micro USB cable is not the provided cable and may only be a charging cable not a data ...

Page 15: ...n as tool is switched on RED Crimp Press Cycle Cycle Complete Attempt a crimp press Cycle Complete LED flashes in green for 5 seconds GREEN Cycle Not Complete Attempt a crimp press Cycle Complete LED flashes in red for 5 seconds NOTE No action is possible until user presses ON OFF button RED Maintenance Maintenance Warning Maintenance LED lights in yellow continuously NOTE 500 cycles left Indicati...

Page 16: ...sécurité Ces guides d utilisation utilisent les symboles et termes d alarmes sécurité suivants pour vous prévenir de situations dangereuses et de risques de dommages corporels ou matériels DANGER indique une situation dangereuse imminente qui si elle n est pas évitée entraînera la mort ou des blessures graves AVERTISSEMENT indique une situation potentiellement dangereuse qui si elle n est pas évit...

Page 17: ...ircuit d alimentation dotés d un disjoncteur de fuite à la terre GFCI L utilisation de ce type de disjoncteur réduit les risques de choc électrique Sécurité personnelle j Être vigilant surveiller le travail effectué et faire preuve de jugement lorsqu un outil électrique est utilisé Ne pas utiliser d outil électrique en cas de fatigue ou sous l influence de drogues d alcool ou de médicaments Un sim...

Page 18: ...de provoquer des brûlures ou un incendie ac En cas d utilisation abusive le liquide peut gicler hors du bloc piles éviter tout contact avec ce liquide Si un contact accidentel se produit laver à grande eau Si le liquide entre en contact avec les yeux obtenir également des soins médicaux Le liquide qui gicle hors du bloc piles peut provoquer des irritations ou des brûlures ad Ne pas utiliser un blo...

Page 19: ...sertissage peut faire que des débris de matériau s envolent Et ces particules posent des risques de dommages oculaires permanents Porter systématiquement des gants pendant l utilisation de l outil et pour manipuler les matériaux Les extrémités des matériaux peuvent être acérées et poser des risques de dommages corporels graves Porter systématiquement des souliers de sécurité pour protéger les pied...

Page 20: ...connaître les compatibilités entre chargeurs et blocs piles Recharger les blocs piles exclusivement dans des chargeurs DeWALT NE PAS éclabousser le bloc piles ou l immerger dans l eau ou dans tout autre liquide Ne pas entreposer ou utiliser l appareil et le bloc piles en présence de températures ambiantes pouvant excéder 40 C 104 F comme dans des hangars ou des bâtiments métalliques l été Pour pré...

Page 21: ...ntendu 1 bloc piles Témoin de Charge du Bloc Piles Fig B Certains blocs piles DeWALT possèdent un témoin de charge qui consiste en trois voyants Del verts indiquant le niveau de charge du bloc piles Le témoin de charge indique approximativement le niveau de charge restant dans le bloc piles en fonction des voyants suivants Chargé de 75 à 100 Chargé de 51 à 74 Chargé de 50 Le bloc piles doit être r...

Page 22: ... chargeur dans la prise appropriée avant d y insérer le bloc piles Directives de sécurité importantes propres à tous les chargeurs de piles AVERTISSEMENT Lire toutes les instructions et toutes les consignes de sécurité propres au bloc piles au chargeur et à l outil électrique Tout manquement aux avertissements et instructions pose des risques de décharges électriques d incendie et ou de blessures ...

Page 23: ...Un bloc piles froid se rechargera moins vite qu un bloc piles chaud Le bloc piles se rechargera à ce rythme plus lent tout au cours du cycle de charge et ne retournera pas à sa vitesse maximale de charge même s il venait à se réchauffer Le chargeur DCB118 est équipé d un ventilateur interne destiné à refroidir le bloc piles Le ventilateur se mettra automatiquement en marche chaque fois que le bloc...

Page 24: ...réutilisation CONSERVER CES CONSIGNES POUR UTILISATION ULTÉRIEURE DESCRIPTION FIG A AVERTISSEMENT ne jamais modifier l outil électrique ni aucun de ses composants car il y a risques de dommages corporels ou matériels Reportez vous en figure A au début de ce manuel pour obtenir la liste complète des composants USAGE PRÉVU La sertisseuse de câblage sans matrice et sans fil a été conçue seulement pou...

Page 25: ...ésultats optimums s assurer que le bloc piles est complètement chargé Pour installer le bloc piles dans la poignée de l outil alignez le bloc piles sur les rails dans la poignée de l outil et faites le glisser fermement en place puis vérifiez qu il ne s en détachera pas Pour retirer le bloc piles de l outil poussez sur le bouton de libération et tirez fermement le bloc piles hors de la poignée de ...

Page 26: ...rrou ou la goupille de verrouillage est ouvert 3 Mettez l outil en MARCHE en appuyant sur l interrupteur MARCHE ARRÊT 12 jusqu à ce que les 3 DEL s allument vert 4 Maintenez appuyée la gâchette tant que le cycle n est pas terminé ce qui sera indiqué par le retour automatique des goujons d indentation sur leur position initiale La lampe DEL éclairera la pièce à travailler lorsque vous appuierez sur...

Page 27: ...rois ans DeWALT réparera sans frais tout produit défectueux causé par un défaut de matériel ou de fabrication pour une période de trois ans à compter de la date d achat La présente garantie ne couvre pas les pièces dont la défectuosité a été causée par une usure normale ou l usage abusif de l outil Pour obtenir de plus amples renseignements sur les pièces ou les réparations couvertes par la présen...

Page 28: ...chette Le bloc piles est trop déchargé pour compléter une sertissure Le voyant DEL du bloc piles reste rouge en continu Recharger le bloc piles dans un chargeur DeWALT compatible Autres causes Se reporter à la section Voyants DEL pour plus d informations L outil est connecté à un ordinateur par un câble micro USB mais la DEL de maintenance ne s allume pas bleu en continu Le câble micro USB n est p...

Page 29: ...on est permanente dès que l outil est mis en marche ROUGE Cycle de sertissage Cycle complet Sertissure La DEL de fin de cycle clignote vert 5 secondes VERT Cycle incomplet Sertissure La DEL de fin de cycle clignote rouge 5 secondes REMARQUE aucune action n est possible tant que l utilisateur n appuie pas sur l interrupteur marche arrêt ROUGE Maintenance Voyant d entretien La DEL de maintenance s a...

Page 30: ... 14 4 13 12 11 8 9 10 5 6 7 2 1 3 Definiciones Símbolos y palabras de alerta de seguridad Este manual de instrucciones utiliza los siguientes símbolos y palabras de alerta de seguridad para alertarle de situaciones peligrosas y del riesgo de lesiones corporales o daños materiales PELIGRO Indica una situación de peligro inminente que si no se evita provocará la muerte o lesiones graves ADVERTENCIA ...

Page 31: ... riesgo de descarga eléctrica i Si el uso de una herramienta eléctrica en un lugar húmedo es imposible de evitar utilice un suministro protegido con un interruptor de circuito por falla a tierra GFCI El uso de un GFCI reduce el riesgo de descargas eléctricas Seguridad Personal j Permanezca alerta controle lo que está haciendo y utilice el sentido común cuando emplee una herramienta eléctrica No ut...

Page 32: ...r especificado por el fabricante Un cargador adecuado para un tipo de paquete de baterías puede originar riesgo de incendio si se utiliza con otro paquete de baterías aa Utilice herramientas eléctricas sólo con paquetes de baterías específicamente diseñados El uso de cualquier otro paquete de baterías puede producir riesgo de incendio y lesiones ab Cuando no utilice el paquete de baterías manténga...

Page 33: ...odría provocar daños materiales y o lesiones corporales graves Peligro de aplastamiento Mantenga las manos y otros objetos alejados del área de engaste de la herramienta mientras esté utilizándose la herramienta Podrían aplastarse los dedos Fije y apoye el material antes de realizar el engaste para evitar movimientos durante el engaste Siga las instrucciones de instalación del fabricante de conect...

Page 34: ... instrucciones de seguridad antes de usar el cargador Consulte la tabla al final de este manual para información sobre compatibilidad entre cargadores y baterías LEA TODAS LAS INSTRUCCIONES Instrucciones de Seguridad Importantes Para Todas las Unidades de Batería ADVERTENCIA Lea todas las advertencias de seguridad y todas las instrucciones para la batería el cargador y la herramienta eléctrica No ...

Page 35: ...atería lo que resulta en tres baterías con una capacidad nominal de vatios hora Wh inferior comparada con una batería con una capacidad nominal de vatios hora superior Esta mayor cantidad de tres baterías con una capacidad nominal de vatios hora menor puede hacer que la unidad de batería quede exenta de ciertos reglamentos de transporte que se imponen a las baterías con mayor capacidad nominal de ...

Page 36: ...ucir riesgo de incendios descargas eléctricas o electrocución Cuando opere un cargador al exterior hágalo siempre en un lugar seco y use un alargador apropiado para uso al exterior El uso de un alargador apropiado para uso al exterior reduce el riesgo de descarga eléctrica Los hilos del alargador deben ser de un calibre apropiado AWG o American Wire Gauge para su seguridad Mientras menor sea el ca...

Page 37: ...e Carga Unidad Cargada Restraso por Unidad Caliente Fría Problema con la Batería o el Cargador DCB107 DCB112 DCB113 DCB115 DCB118 DCB132 Unidad en Proceso de Carga Unidad Cargada Restraso por Unidad Caliente Fría DCB107 DCB112 DCB113 DCB115 DCB118 DCB132 La luz roja continuará parpadeando pero una luz indicadora amarilla estará iluminada durante esta operación Una vez que la batería haya llegado a...

Page 38: ...enta unidad de batería y el cargador a su centro de servicio local 4 La unidad de batería debería ser recargada cuando no sea capaz de producir suficiente potencia para trabajos que eran fácilmente realizados antes NO CONTINÚE usándola bajo estas circunstancias Siga el procedimiento de carga También puede cargar una unidad de batería que haya sido usada parcialmente cuando lo desee sin dañarla 5 L...

Page 39: ...tiliza el software del Sistema CRIMP CONNECTTM de DeWALT NOTA El software del Sistema CRIMP CONNECT está regido por sus propios términos y condiciones que pueden verse mediante la descarga del software Paso 1 Descargue el software del Sistema CRIMP CONNECT a su computadora desde www dewalt com crimpconnect Paso 2 Siga las instrucciones en el software para crear su cuenta del Sistema CRIMP CONNECT ...

Page 40: ...fundidad correcta conforme a las especificaciones del fabricante del conector Engaste ADVERTENCIA Un engaste incompleto puede causar daños materiales Use siempre la combinación de conector y cable aprobada por el fabricante El incumplimiento de esta instrucción podría resultar en una conexión incompleta o defectuosa ADVERTENCIA Para reducir el riesgo de lesiones corporales graves inspeccione la un...

Page 41: ... mantenimiento cuando la herramienta de engaste alcanza 25 000 ciclos Los indicadores de advertencia se iluminarán en el panel de diagnóstico 11 como se indica a continuación 1 Advertencia de mantenimiento al llegar a 24 500 ciclos la LED de mantenimiento se ilumina en amarillo continuamente 2 Advertencia final de mantenimiento al llegar a 24 900 ciclos la LED de mantenimiento destella en amarillo...

Page 42: ...omercial donde se adquirió el producto de no contar con ésta bastará la factura de compra Excepciones Esta garantía no será válida en los siguientes casos Cuando el producto se hubiese utilizado en condiciones distintas a las normales Cuando el producto no hubiese sido operado de acuerdo con el instructivo de uso que se acompaña Cuando el producto hubiese sido alterado o reparado por personas dist...

Page 43: ...stá completamente satisfecho con el desempeño de su máquina herramienta láser o clavadora DeWALT cualquiera sea el motivo podrá devolverlo hasta 90 días de la fecha de compra con su recibo y obtener el reembolso completo de su dinero sin necesidad de responder a ninguna pregunta AMÉRICA LATINA Esta garantía no se aplica a los productos que se venden en América Latina Para los productos que se vend...

Page 44: ...o baja para completar un doblado o prensado La LED de la batería se ilumina en rojo continuamente Recargue la batería en un cargador DeWALT compatible Otras causas Consulte las lndicaciones de LED para obtener más información La herramienta está enchufada en una computadora a través de un cable de micro USB pero la LED de mantenimiento no se ilumina en azul continuamente El cable de micro USB no e...

Page 45: ...onto como se enchufe la herramienta ROJO Ciclo de doblado prensado Ciclo completo Intente un doblado pren sado La LED de ciclo completo parpadea en verde por 5 segundos VERDE Ciclo no completo Intente un doblado pren sado La LED de ciclo completo parpadea en rojo por 5 segundos NOTA No es posible ninguna acción hasta que el usuario presiona el botón de ENCENDIDO APAGADO ROJO Mantenimiento Adverten...

Page 46: ......

Page 47: ......

Page 48: ...20 12 X X X X 30 30 30 60 45 35 X 20 X X 45 X DCB127 12 X X X X 35 35 35 90 60 50 X 30 X X 60 X DCB080 8 X X X 60 X X X X X X X X X X X X BT Bluetooth NOTE The Bluetooth word mark and logos are registered trademarks owned by the Bluetooth SIG Inc and any use of such marks by DeWALT is under license Other trademarks and trade names are those of their respective owners Battery Datecode 201536 or lat...

Reviews: