background image

ENGLISH

3

HAMMER TRUCK D259801

FOR USE WITH D25980


WARNING:

 Improper operation or 

maintenance of this product could result 
in serious injury and property damage. 
Read and understand all warnings and 
operating instructions in the pavement 
breaker's instruction manual before 
operating or performing maintenance on 
this equipment.


WARNING: 

Turn off the pavement 

breaker and unplug from the power 
source before making any adjustments 
or removing or installing attachments or 
accessories. 

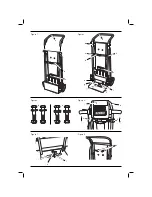
CONTENTS (fi g. 1–3)

 a. Handle

 b. Strap

  c. Max load 165 lbs. (75 kg) warning label

  d. Handle hardware: 2 bolts, 2 nuts, 2 curved 

washers

  e. Base plate hardware: 2 bolts, 2 nuts, 4 flat 

washers

 f. 

Wrenches 

(2)

ASSEMBLY (fi g. 1–3)

Handle

Align the tubes on the handle (a) with the tubes on 
the hammer truck body. Firmly push handle down to 
align holes. Using the wrench supplied, secure with 
handle hardware (d). 

Base plate

Unfold the base plate. Using the wrench supplied, 
install the base plate hardware (e). Secure the base 
plate by tightening all four bolts (e, g).
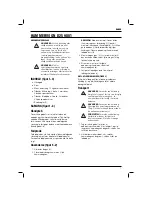
Usage (Fig. 5–7)

  1. Remove hook (h).

  2. Place pavement breaker (i) onto hammer truck.


NOTE:

 If bit is attached, place bit in the base 

plate groove (j). If the bit is not attached, pull 
up on knob (k), move base plate peg (l) into 
the center position and release knob. Place 
pavement breaker on base plate peg.

  3. Replace hook (h). Adjust the strap (b) to the 

desired height by moving the hook (h) and loop 
(m) up and down.

  4. Secure pavement breaker to hammer truck by 

tightening strap (b).

  5. Wrap power cord around the quick-release cord 

wrap levers (n).

QUICK-RELEASE CORD WRAP (FIG. 6)

Pull one or both of the quick-release cord wrap 
levers (n) and rotate the levers to release the cord 
wrap.

Transporting


 WARNING: 

Risk of unsafe operation. 

Ensure proper footing and use caution 
when rolling hammer truck so it does 
not tip or cause loss of balance. 


 WARNING: 

Risk of unsafe operation. 

Do not exceed load limit of 165 lbs. 
(75 kg). 

P

ersonal injury may result. 

Refer to warning label (c).


 CAUTION: 

Risk of unsafe operation. Do 

not transport unsecured tool. Personal 
injury may result.

  1. With pavement breaker (i) secured, grasp 

handle (a) and slowly tilt hammer truck back so 
it can be rolled on the tyres.

  2. When location is reached, slowly lower hammer 

truck to rest on base plate. 

Summary of Contents for D259801

Page 1: ...D259801 www eu ...

Page 2: ......

Page 3: ...Dansk 1 Deutsch 2 English 3 Español 4 Français 5 Italiano 6 Nederlands 7 Norsk 8 Português 9 Suomi 10 Svenska 11 Türkçe 12 Ελληνικά 13 ...

Page 4: ...Figure 1 Figure 2 Figure 3 a b c a b c e g d e h m l j k i a h m n l j k Figure 4 Figure 5 Figure 6 d ...

Page 5: ... e g Anvendelse figur 5 7 1 Afmonter krogen h 2 Placer opbrydningshammeren i på hammervognen BEMÆRK Med bit monteret Placer bitten i hammervognens fordybning j Uden bit monteret træk opad i håndtaget k flyt stiften på fodpladen l til midterposition og frigør håndtaget Placer opbrydningshammeren på fodpladens stift 3 Monter krogen igen h Juster remmen b til den ønskede højde ved at flytte krogen h o...

Page 6: ...ung Abb 5 7 1 Den Haken entfernen h 2 Den Brechhammer i auf den Hammerwagen stellen HINWEIS Bei angebrachtem Meißel den Meißel in die Bodenplattennut j stecken Wenn der Meißel nicht angebracht ist den Knopf k nach oben ziehen den Pflock der Bodenplatte l in die mittlere Position stellen und den Knopf wieder frei geben Den Brechhammer auf den Pflock stellen 3 Den Haken h wieder anbringen Zum Einste...

Page 7: ...age Fig 5 7 1 Remove hook h 2 Place pavement breaker i onto hammer truck NOTE If bit is attached place bit in the base plate groove j If the bit is not attached pull up on knob k move base plate peg l into the center position and release knob Place pavement breaker on base plate peg 3 Replace hook h Adjust the strap b to the desired height by moving the hook h and loop m up and down 4 Secure pavem...

Page 8: ...ancho h 2 Coloque el martillo para pavimento i en el carro NOTA si se va a insertar una broca colóquela en la ranura j de la placa base Si no se inserta la broca en el pomo k desplace la clavija l de la placa base hasta la posición central y suelte el pomo Coloque el martillo para pavimento en la clavija de la placa base 3 Coloque de nuevo el gancho h Ajuste la correa b a la altura deseada moviend...

Page 9: ...EMARQUE si la mèche est fixée la placer dans le sillon de la plaque de base j En l absence de mèche lever la poignée k placer le point d appui de la plaque de base l en position centrale et relâcher la poignée Placer le brise béton sur le point d appui de la plaque de base 3 Remettre le crochet h en place Régler la sangle b à la hauteur souhaitée en faisant glisser le crochet h et la boucle m vers...

Page 10: ... piastra di base j Se la punta non è installata tirare verso l alto la manopola k spostare la parte picchettata della piastra di base l al centro e rilasciare la manopola Collocare il martello demolitore sulla parte picchettata della piastra di base 3 Sostituire il gancio h Regolare la cinghia b all altezza desiderata muovendo il gancio h e l anello m versp l alto o verso il basso 4 Fissare il mar...

Page 11: ... 1 Verwijder haak h 2 Plaats breekhamer i op rolwagen OPMERKING Plaats het boorijzer als deze is bevestigd in de groef van de voetplaat j Trek als het boorijzer niet bevestigd is de knop omhoog k zet de pin van de voetplaat l in de middelste positie en laat de knop los Plaats de breekhamer op de pin van de voetplaat 3 Vervang de haak h Pas de band aan b op de gewenste hoogte door de haak h en lus ...

Page 12: ...n kroken h 2 Plasser meiselhammeren i på trallen OBS Hvis meiselen er montert skal den plasseres i sokkelsporet j Hvis meiselen ikke er montert skal knotten k trekkes opp og tappen I i sokkelen flyttes i senterposisjon og knotten slippes Plasser meiselhammeren på sokkelpinnen 3 Sett på kroken h Juster stroppen b til ønsket høyde ved å flytte kroken h og løkken m opp og ned 4 Fest meiselhammeren ti...

Page 13: ...tiver instalada coloque a na ranhura da chapa de base j Se a cabeça não estiver instalada puxe o botão k para cima desloque a cavilha da chapa de base l para a posição central e solte o botão Coloque o martelo picador de pavimentos sobre a cavilha da chapa de base 3 Volte a instalar o gancho h Regule a correia b para a altura pretendida ao deslocar o gancho h e o laço m para cima e para baixo 4 Fi...

Page 14: ...n i murskainkärrylle HUOMAA Mikäli teräpala on mukana aseta se jalustan uraan j Mikäli teräpala ei ole mukana vedä nuppia ylöspäin k siirrä jalustan tappi l keskiasentoon ja päästä irti nupista Aseta katumurskain jalustan tapille 3 Kiinnitä haka takaisin h Säädä hihna b halutulle korkeudelle liikuttamalla hakaa h ja silmukkaa m ylös ja alas 4 Kiinnitä katumurskain murskainkärryyn tiukentamalla hih...

Page 15: ...g bild 5 7 1 Avlägsna kroken h 2 Placera asfaltsbrytaren i på hammarvagnen NOTERA Om borren är monterad skall den placeras i jacket i bottenplattan j Om borren inte är monterad drar du upp knoppen k flyttar bottenplattans pinne l till mitten och släpper sedan knoppen Placera asfaltsbrytaren på bottenplattans pinne 3 Sätt tillbaka kroken h Justera remmen b till önskad höjd genom att flytta på kroke...

Page 16: ...ıcı matkabı i yürüyen matkap takımının üzerine yerleştirin NOT Eğer matkap ucu bağlıysa ucu ayaklık oluğuna j yerleştirin Eğer matkap ucu bağlı değilse çiviyi k çekip çıkarın ayaklık askısını l merkez konumuna getirin ve çiviyi bırakın Beton kırıcı matkabı ayaklık askısına yerleştirin 3 Kancayı h tekrar yerine yerleştirin Kancayı h ve kıvrık sapı m yukarı ve aşağı doğru hareket ettirerek kemeri b ...

Page 17: ... προσαρμοσμένη η μύτη τοποθετήστε τη μύτη στην εγκοπή της βάσης στήριξης j Εάν η μύτη δεν είναι προσαρμοσμένη τραβήξτε το κουμπί k μετακινήστε το εξάρτημα ανάρτησης βάσης στήριξης I στην κεντρική θέση και απελευθερώστε το κουμπί Τοποθετήστε το θραύστη οδοστρώματος στο εξάρτημα ανάρτησης της βάσης στήριξης 3 Τοποθετήστε και πάλι το άγκιστρο h Ρυθμίστε τον ιμάντα b στο επιθυμητό ύψος μετακινώντας το...

Page 18: ......

Page 19: ......

Page 20: ...Hill Fax 00353 2781811 Black Rock Co Dublin www dewalt ie Italia DEWALT Tel 800 014353 Viale Elvezia 2 Fax 039 2387592 20052 Monza Mi www dewalt it Nederlands Black Decker DEWALT Tel 0164 283000 Joulehof 12 Fax 0164 283100 4600 AB Bergen Op Zoom www dewalt com Norge DEWALT Tel 22 90 99 00 Postboks 4814 Nydalen Fax 22 90 99 01 0422 Oslo www dewalt nordic com Österreich DEWALT Tel 01 66116 0 Werkzeu...

Reviews: