10. Service Mode
Field Service Ver. 1.0 Apr. 2005
88
ineo 161
ineo 210
Adjustment / Setting
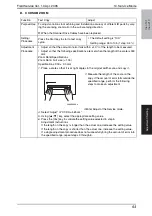
K. VERTICAL EDGE ERASE
L. LOOP ADJUST (TRAY1)
M. LOOP ADJUST (TRAY2 TO TRAY5)
Purpose/Use
To adjust the erase width on both edges of the image (in CD direction) by varying the
laser emission timing.
✽
When the PH Unit has been replaced
Setting/
Procedure
Select the erase width value in the CD direction. (The default setting is “4 mm.”)
0 mm
1 mm
2 mm
3 mm
“4 mm”
5 mm
Adjustment
Procedure
Set the erase width on both edges of the
paper (width C).
1. Call Service’s Choice of Service Mode to the screen.
2. Select “Vertical Edge Erase” and press the [Yes] key.
3. Using [
▲
/
▼
] key, select the desired setting value.
4. Press the [Yes] key to validate the setting value selected in step 3.
Adjustment Instructions
To make the erase width smaller, decrease the setting value.
To make the erase width greater, increase the setting value.
C
4035D518AA
C
Purpose/Use
To adjust the length of the loop formed in the paper before the Synchronizing Roller.
✽
When a skew feed, fold, or misfeed of paper occurs
✽
When variations in the amount of void on the leading edge occurs
Setting/
Procedure
Setting range: -3.9 to 3.9 mm (1 step: 0.6 mm)
Adjustment
Procedure
1. Call Service’s Choice of Service Mode to the screen.
2. Select “Loop Adjust (Tray1)” and press the [Yes] key.
3. Using [
▲
/
▼
] key, select the desired setting value.
4. Press the [Yes] key to validate the setting value selected in step 3.
Adjustment Instructions
• Try a different setting value until there are no variations in the amount of void on
the leading edge, and paper skew, fold, or misfeed.
Purpose/Use
To adjust the length of the loop formed in the paper before the Synchronizing Roller
when the optional Paper Feed Unit is used.
✽
When a skew feed, fold, or misfeed of paper occurs
✽
When variations in the amount of void on the leading edge occurs
Setting/
Procedure
✽
Refer to the option service manual (PF-502) for details.


