


Customer Documentation DEV 2161, DEV 2162, DEV 2165
Copyright DEV Systemtechnik GmbH 2011-2017
7
4
INSTALLATION INSTRUCTIONS
4.1
SCOPE OF DELIVERY
1 * DEV 2161 or DEV 2162 or DEV 2165
equipped with
additional splitter unit option(s)
as ordered
1 * DEV 79-0163 external power supply
1 * Customer documentation (this document)
4.2
INSTALLATION OF THE PRODUCT
4.2.1
Mechanical Integration of the Product in a 19" Rack
For the integration in a 19" rack, the rack slots must be prepared with rails
for the 1 RU chassis. After inserting the chassis in the rack, fix the chassis
with four screws to the rack at its rack mount flanges.
Warning:
It is absolutely not permitted to fix the chassis on the rack mount flanges,
only.
4.2.2
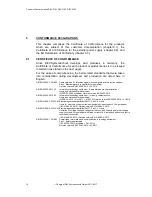
Grounding and Power Connection
The chassis needs to be connected to the 19" rack via a ground wire. The
grounding bolt (
G
) is located on the left at the rear side of the product:
G
C
L
E
P
E th e rn e t
+
1 8 V D C
-
5 0 V A
To connect the grounding cable, please take off the upper nut and the first
washer of the grounding bolt (
G
). Then connect the grounding cable, which
must have a ring tongue terminal matching for the M4 fastening bolt. The
washer and the nut have to be tightened again.
The external power supply delivered with the product has to be suitably
stowed away within the rack in a way, that it is firmly fixed, that the DC
output cable of the external power supply is in reach of the chassis, and that
the applied primary power cord is in reach of the external power supply and
of the available electrical outlet. First connect the DC output cable of the
external power supply to the DC power inlet (
P
) of the chassis; a cable
fixture (
C
) is provided for this cable to avoid unintentional disconnection.
Then connect a power cord on one side to the external power supply and on
the other side to the available electrical outlet.